Hello friends! Today we will design a web application using Flask framework. We will use opencv to process the video frames. The user will submit a form containing input parameters. These parameters are Brightness value, and Blur value. Following is the code for the deployment of application on the internet especially using the PythonAnywhere.com service. Its basic plan is free, for more details please visit the website. Follow the above video tutorial for deployment on the wifi local area network as per your server’s IP address.
Important installation steps to aviod any issues
We need to install the proper working version of Werkzeug i.e. (Werkzeug-0.10.2.dev0dev-20220510) . In addition install the following versions
pip3 install Flask-SocketIO==4.3.1
pip3 install python-engineio==3.13.2
pip3 install python-socketio==4.6.0
pip3 install git+https://github.com/untitaker/werkzeug.git@reloader-perf
Please note that the above installations will resolve following issues:
- ImportError: cannot import name ‘run_with_reloader’ from ‘werkzeug.serving’
- The client is using an unsupported version of the Socket.IO or Engine.IO protocols (further occurrences of this error will be logged with level INFO)
- “GET /socket.io/?EIO=3&transport=polling&t=O2j_BJX HTTP/1.1” 400
Files for deployment on the internet
process.py
from flask import Flask, render_template, request,Response
import cv2,imutils,time
import pyshine as ps
app = Flask(__name__)
@app.route('/')
def index():
   return render_template('index.html')

def changeBrightness(img,value):
	""" This function will take an image (img) and the brightness
		value. It will perform the brightness change using OpenCv
		and after split, will merge the img and return it.
	"""
	hsv = cv2.cvtColor(img,cv2.COLOR_BGR2HSV)
	h,s,v = cv2.split(hsv)
	lim = 255 - value
	v[v>lim] = 255
	v[v<=lim] += value
	final_hsv = cv2.merge((h,s,v))
	img = cv2.cvtColor(final_hsv,cv2.COLOR_HSV2BGR)
	return img

def changeBlur(img,value):
	""" This function will take the img image and blur values as inputs.
		After perform blur operation using opencv function, it returns
		the image img.
	"""
	kernel_size = (value+1,value+1) # +1 is to avoid 0
	img = cv2.blur(img,kernel_size)
	return img

def pyshine_process(params):
	print("Parameters:",params)
	"""Video streaming generator function."""
	CAMERA=False
	if CAMERA:
		cap = cv2.VideoCapture(0)
	else:
		cap = cv2.VideoCapture('videos/mario.mp4')
	print('FUNCTION DONE')
### Read until video is completed
	fps=0
	st=0
	frames_to_count=20
	cnt=0


	while(cap.isOpened()):

		ret, img = cap.read()
		brightness_value_now = int(params['brightness'])
		blur_value_now = int(params['blur'])
		img = changeBrightness(img,brightness_value_now)
		img = changeBlur(img,blur_value_now)
		if ret == True:

			if cnt == frames_to_count:
				try: # To avoid divide by 0 we put it in try except

					fps = round(frames_to_count/(time.time()-st))
					st = time.time()
					cnt=0
				except:
					pass

			cnt+=1

			img = imutils.resize(img, width=640)

			text  =  'FPS: '+str(fps)
			img = ps.putBText(img,text,text_offset_x=20,text_offset_y=30,background_RGB=(10,20,222))
			text = str(time.strftime("%d %b %Y %H.%M.%S %p"))
			img = ps.putBText(img,text,text_offset_x=190,text_offset_y=30,background_RGB=(228,20,222))
			text  =  f"Brightness: {brightness_value_now}"
			img = ps.putBText(img,text,text_offset_x=20,text_offset_y=300,background_RGB=(20,210,4))
			text  =  f'Blur: {blur_value_now}'
			img = ps.putBText(img,text,text_offset_x=490,text_offset_y=300,background_RGB=(210,20,4))
			frame = cv2.imencode('.JPEG', img,[cv2.IMWRITE_JPEG_QUALITY,20])[1].tobytes()
			time.sleep(0.016)
			yield (b'--frame\r\n'b'Content-Type: image/jpeg\r\n\r\n' + frame + b'\r\n')
		else:
			break


@app.route('/res',methods = ['POST','GET'])
def res():
	global result
	if request.method == 'POST':
		result = request.form.to_dict()
		return render_template("results.html",result = result)

@app.route('/results')
def video_feed():
	global result
	params= result
	return Response(pyshine_process(params),mimetype='multipart/x-mixed-replace; boundary=frame')

if __name__ == "__main__":
    app.run(debug=True,threaded=True)
index.html
<!DOCTYPE html>

<html>
  <head>
    <title>PyShine streaming video application </title>
  </head>
  <body>

  <h1>Please input the parameters (0 to 100): </h1>

<form action = "/res" method = "POST">

  <table>
    <tr>
      <td align="right">Brightness:</td>
      <td align="left"><input type="text" name="brightness" value="1" /></td>
    </tr>
    <tr>
      <td align="right">Blur:</td>
      <td align="left"><input type="text" name="blur" value="0" /></td>
    </tr>
   <tr>
   <td></td>
      <td align="right"><input type = "submit" value = "submit" /></td>
    </tr>

  </table>
</form>


  </body>

</html>
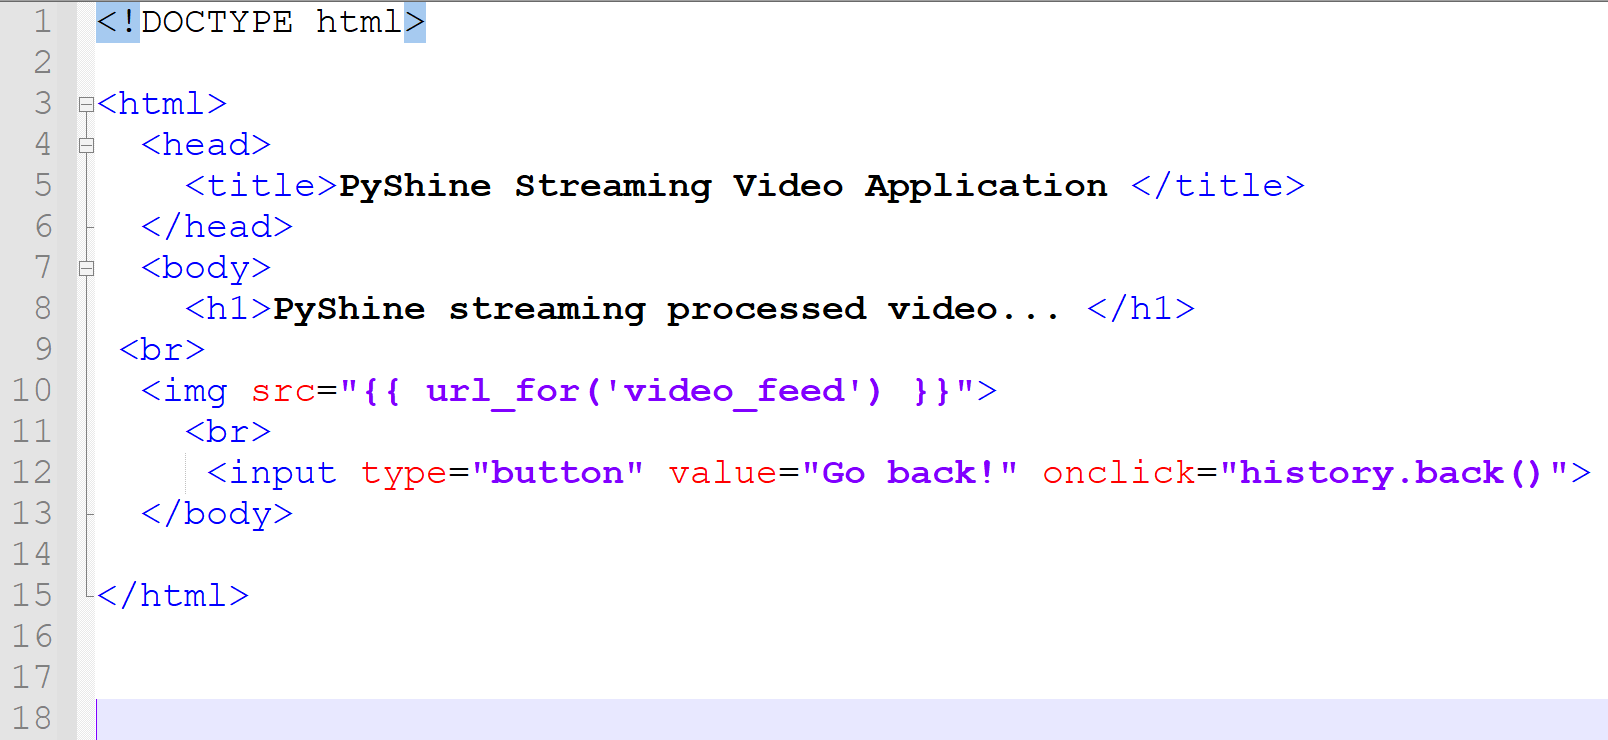
results.html
!
Files for deployment on the wifi LAN
Following is the code set for the local wifi based deployment. Please note that ‘192.168.1.104’ is the IP address on our computer, please change it according to your computer’s IP address against the Wirless LAN. If you dont know your IP address, then please follow our tutorial about socket programming. The process.py file is the main python code here. The index.html and results.html should be put in the templates directory. Because Flask looks for the htmls in this directory by default. We have set the Camera flag to True, so when you will run this code, the video will come from your webcam attached to the server.
python process.py
After running this code, copy the address and enter in the browser, http://192.168.1.104:9999, again it may be different in your case. It will appear in the power shell or terminal window, so you can copy it easily. The good thing about this application is that, you can view the video on your wireless mobile device. It can be a smart phone, table, etc.
process.py
from flask import Flask, render_template, request,Response
import cv2,imutils,time
import pyshine as ps
app = Flask(__name__)
@app.route('/')
def index():
   return render_template('index.html')

def changeBrightness(img,value):
	""" This function will take an image (img) and the brightness
		value. It will perform the brightness change using OpenCv
		and after split, will merge the img and return it.
	"""
	hsv = cv2.cvtColor(img,cv2.COLOR_BGR2HSV)
	h,s,v = cv2.split(hsv)
	lim = 255 - value
	v[v>lim] = 255
	v[v<=lim] += value
	final_hsv = cv2.merge((h,s,v))
	img = cv2.cvtColor(final_hsv,cv2.COLOR_HSV2BGR)
	return img

def changeBlur(img,value):
	""" This function will take the img image and blur values as inputs.
		After perform blur operation using opencv function, it returns
		the image img.
	"""
	kernel_size = (value+1,value+1) # +1 is to avoid 0
	img = cv2.blur(img,kernel_size)
	return img

def pyshine_process(params):
	print("Parameters:",params)
	"""Video streaming generator function."""
	CAMERA=True
	if CAMERA:
		cap = cv2.VideoCapture(0)
	else:
		cap = cv2.VideoCapture('videos/mario.mp4')
	print('FUNCTION DONE')
### Read until video is completed
	fps=0
	st=0
	frames_to_count=20
	cnt=0


	while(cap.isOpened()):

		ret, img = cap.read()
		brightness_value_now = int(params['brightness'])
		blur_value_now = int(params['blur'])
		img = changeBrightness(img,brightness_value_now)
		img = changeBlur(img,blur_value_now)
		if ret == True:

			if cnt == frames_to_count:
				try: # To avoid divide by 0 we put it in try except

					fps = round(frames_to_count/(time.time()-st))
					st = time.time()
					cnt=0
				except:
					pass

			cnt+=1

			img = imutils.resize(img, width=640)

			text  =  'FPS: '+str(fps)
			img = ps.putBText(img,text,text_offset_x=20,text_offset_y=30,background_RGB=(10,20,222))
			text = str(time.strftime("%d %b %Y %H.%M.%S %p"))
			img = ps.putBText(img,text,text_offset_x=190,text_offset_y=30,background_RGB=(228,20,222))
			text  =  f"Brightness: {brightness_value_now}"
			img = ps.putBText(img,text,text_offset_x=20,text_offset_y=300,background_RGB=(20,210,4))
			text  =  f'Blur: {blur_value_now}'
			img = ps.putBText(img,text,text_offset_x=490,text_offset_y=300,background_RGB=(210,20,4))
			frame = cv2.imencode('.JPEG', img,[cv2.IMWRITE_JPEG_QUALITY,20])[1].tobytes()
			time.sleep(0.016)
			yield (b'--frame\r\n'b'Content-Type: image/jpeg\r\n\r\n' + frame + b'\r\n')
		else:
			break


@app.route('/res',methods = ['POST','GET'])
def res():
	global result
	if request.method == 'POST':
		result = request.form.to_dict()
		return render_template("results.html",result = result)

@app.route('/results')
def video_feed():
	global result
	params= result
	return Response(pyshine_process(params),mimetype='multipart/x-mixed-replace; boundary=frame')

if __name__ == "__main__":
    app.run(debug=True, host='192.168.1.104',port=9999,threaded=True)
index.html
<!DOCTYPE html>

<html>
  <head>
    <title>PyShine streaming video application </title>
  </head>
  <body>
	<h1>Please input the parameters (0 to 100): </h1>
	<form action = "http://192.168.1.104:9999/res" method = "POST">
		<table>
		<tr>
		  <td align="right">Brightness:</td>
		  <td align="left"><input type="text" name="brightness" value="1" /></td>
		</tr>
		<tr>
		  <td align="right">Blur:</td>
		  <td align="left"><input type="text" name="blur" value="0" /></td>
		</tr>
		 <tr>
		 <td></td>
		  <td align="right"><input type = "submit" value = "submit" /></td>
		</tr>
		</table>
	</form>
  </body>
</html>
results.html
!
Please do comment, if you like this tutorial, also if have question or suggestions. Enjoyed this post? Never miss out on future posts by following us 
