Contents
A quick and easy multilayer model for Keras
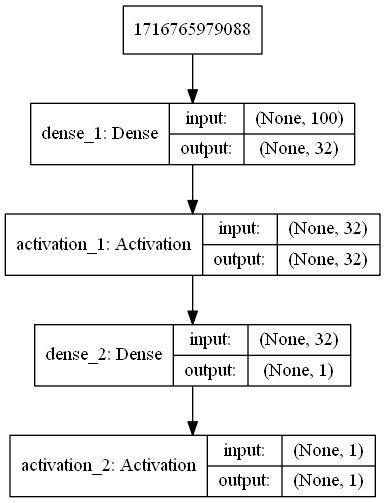
Hi there! today we will build a multilayer model that should be like this figure: ! .
.
from keras.models import Sequential
from keras.layers import Dense, Activation
from keras.utils import plot_model
Lets import the necessary components. Note that the Dense is a fully connected layer of nodes. Activation layer is appled to keep values of neurons under specific range as defined by the activation functions. Our goal in this lab is to generate a model whose input is a vector of 1 dimension consisting of 100 elements. The output of the model is a scalar value of size 1. This kind of model can be used for the regression purpose. For example if we have a vector that contains 100 features of some data and we want the output to be some continous value of it. These 100 features can be taken from a face and the output value may give us the degree of happy, sad or anything we want our model to learn. We will learn about the training process in later labs. But for today lets just build this multilayer model. The first layer is a Dense and input is 100 and the output of this Dense layer is 32.
It is followed by another layer called Activation whoes inputs and outputs are by default same as the input to it which is 32. The activation function is relu. Then we add another Dense layer whose output is 1. Note that in the cases when more than 1 outputs are required then simply change this 1 to your desired output vector size. The input size of this Dense layer is automatically selected same as the output of the previous layer (which was Activation layer). The final layer is a softmax activation layer and again we see that the size is not present because it will be 1 as input to it and 1 as output of this activation layer. The keyword None means any number of data can be applied to the input of our model. We will explore it in coming labs. Lets put the remaing code of this lab.
model = Sequential([Dense(32, input_shape=(100,)),Activation('relu'),Dense(1), Activation('softmax')])
plot_model(model,to_file='mymodel.png',show_shapes=True)
Thats all for this lab 2. In the next lab 3 we will learn about training the model with some data. Code is available. I hope this lab will be helpful for the beginners.