Learn Computer Networking in a Single Post: Complete Tutorial From OSI Layers to DNS and HTTPS
Networking is the substrate everything else runs on. Every curl, every docker pull, every kubectl apply, every database query, every web page — they all become packets on a wire, routed through switches and routers, following protocols designed decades ago and refined ever since. Understanding networking turns “the internet is magic” into “I can see the request, the resolution, the handshake, and the bytes.” This single post teaches the whole subject in five stages, with hand-drawn diagrams and runnable commands.
Learning Roadmap
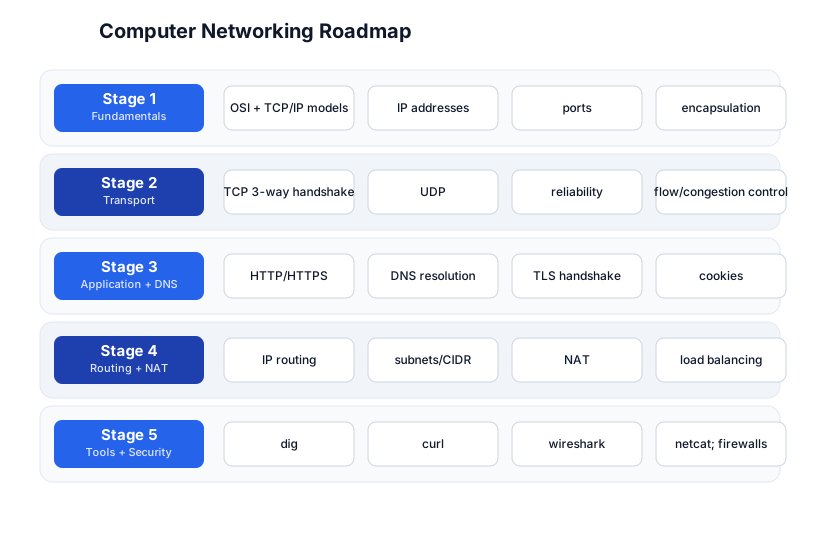
The roadmap moves from the layered models (Stage 1), through transport (Stage 2), to the application layer and DNS (Stage 3), routing and NAT (Stage 4), and the tools and security that bind it together (Stage 5).
Stage 1 — Fundamentals: Models, IP, Ports
The OSI and TCP/IP models
Network communication is layered: each layer handles one concern and hands data to the layer above or below. The OSI model has 7 layers; the TCP/IP model that the real internet uses has 4-5. Knowing both is how you read any protocol description.
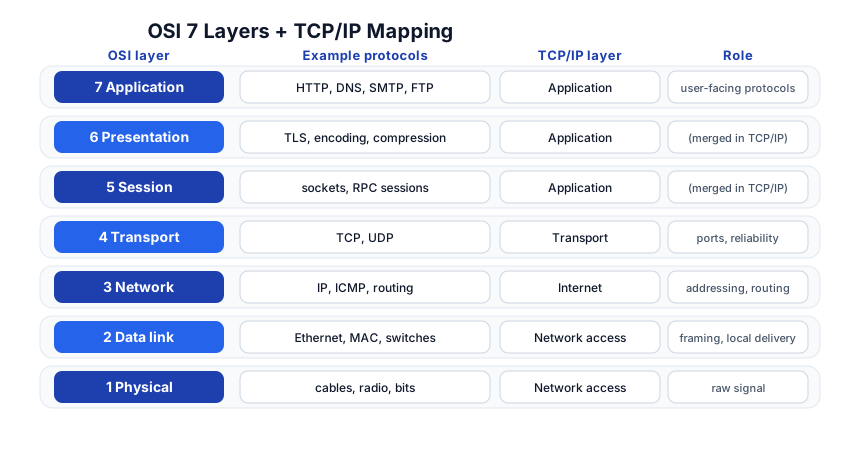
| OSI | Name | Example | TCP/IP |
|---|---|---|---|
| 7 | Application | HTTP, DNS, SMTP, FTP | Application |
| 6 | Presentation | TLS, encoding | Application |
| 5 | Session | sockets, RPC | Application |
| 4 | Transport | TCP, UDP | Transport |
| 3 | Network | IP, ICMP, routing | Internet |
| 2 | Data link | Ethernet, MAC, switches | Network access |
| 1 | Physical | cables, radio, bits | Network access |
Pitfall: Nobody implements 7 separate OSI layers in practice — TCP/IP folds the top three into one “Application” layer and the bottom two into “Network access.” But the OSI names are the universal vocabulary, so learn them.
Encapsulation
Each layer wraps the data from above with its own header (and sometimes trailer). An HTTP message gets a TCP header (source/dest port, sequence number), then an IP header (source/dest IP), then an Ethernet frame header (MAC addresses). The receiver unwraps in reverse — this is encapsulation.
IP addresses, ports, and sockets
- IP address — identifies a host on a network (IPv4 like
192.168.1.5, IPv6 like2606:2800::). - Port — identifies a service on that host (
:443for HTTPS,:53for DNS). Ports 0–1023 are “well-known”; 1024–65535 are ephemeral. - Socket — the tuple
(source IP, source port, dest IP, dest port, protocol). A TCP connection is a unique socket pair.
ip addr            # see your interfaces + IPs (Linux)
ip route           # routing table
ss -tlnp           # listening TCP sockets
Stage 2 — Transport: TCP and UDP
TCP — reliable, ordered, connection-oriented
TCP establishes a connection, then guarantees bytes arrive in order, without loss, without duplication. It does this with sequence numbers, acknowledgments, retransmission, and flow/congestion control.
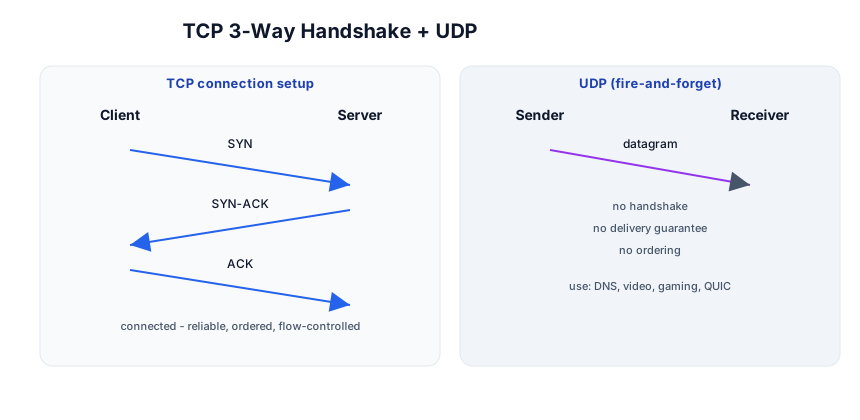
The 3-way handshake
Client                Server
  |--- SYN ----------->|        "I want to talk, my seq is x"
  |<-- SYN-ACK --------|        "OK, my seq is y, ack x+1"
  |--- ACK ----------->|        "got it, ack y+1"
  |    (connected)     |
# watch a real handshake
curl -v https://example.com 2>&1 | head        # shows the TLS + HTTP layers
# or capture packets:
sudo tcpdump -n -i any port 443
After the handshake, TCP sends segments with sequence numbers; the receiver ACKs what it got; un-ACKed segments are retransmitted. Flow control (the sliding window) keeps a fast sender from overwhelming a slow receiver; congestion control (slow-start, AIMD) backs off when the network itself drops packets.
Pitfall: TCP’s reliability has a cost — every lost packet triggers a retransmit and a timeout. For latency-sensitive workloads (gaming, video calls, live streaming), the cost isn’t worth it, which is where UDP comes in.
UDP — fire-and-forget
UDP sends datagrams with no connection, no delivery guarantee, and no ordering. It’s just “source port, dest port, length, checksum, payload.” Fast, simple, and the right choice when:
- The app handles reliability itself (QUIC, WebRTC).
- Loss is tolerable and latency matters (live video, gaming).
- The exchange is one-shot (DNS queries, DHCP).
TCP vs UDP at a glance
| TCP | UDP | |
|---|---|---|
| Connection | yes (handshake) | no |
| Reliability | guaranteed delivery | best-effort |
| Ordering | in-order | none |
| Overhead | high | low |
| Use cases | HTTP, SSH, email | DNS, video, gaming, QUIC |
Stage 3 — Application Layer + DNS
The HTTPS request lifecycle
When you type https://pyshine.com, six things happen before you see the page:
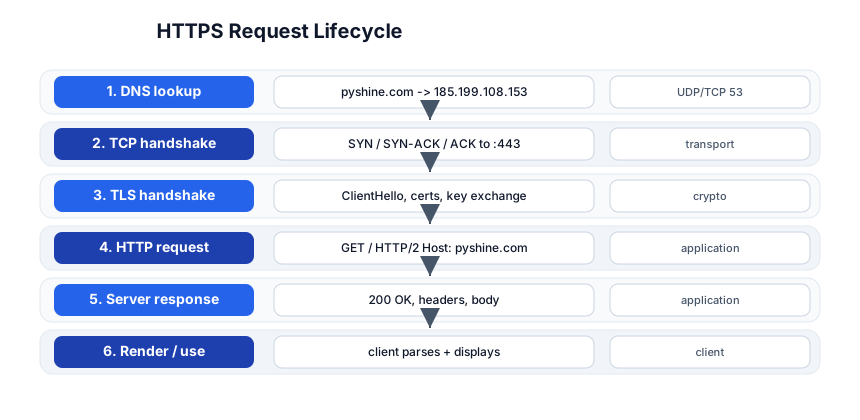
- DNS lookup — resolve
pyshine.comto an IP (e.g.185.199.108.153). UDP to port 53 (TCP for large responses), recursively from your resolver up to the authoritative server. - TCP handshake — SYN/SYN-ACK/ACK to port 443.
- TLS handshake — ClientHello, server certificate, key exchange, change cipher spec. After this, the channel is encrypted.
- HTTP request —
GET / HTTP/2withHost: pyshine.comover the encrypted channel. - Server response —
200 OK, headers (Content-Type,Cache-Control), and the body. - Render / use — the client parses the body and displays it.
# trace the whole lifecycle yourself
dig pyshine.com                          # step 1: DNS
curl -v https://pyshine.com 2>&1 | head  # steps 2-5
# or capture every packet:
sudo tcpdump -n -i any -w capture.pcap host pyshine.com
DNS — the phonebook
DNS is a hierarchical, distributed database mapping names to IPs. A lookup walks: your resolver → root (.) → TLD (.com) → authoritative (pyshine.com) → A record.
Records:
- A / AAAA — name → IPv4 / IPv6 address.
- CNAME — alias to another name.
- MX — mail server.
- TXT — arbitrary text (SPF, verification tokens).
- NS — nameserver for the zone.
dig pyshine.com A          # A record
dig +trace pyshine.com     # walk the resolution from root down
dig @1.1.1.1 pyshine.com  # query a specific resolver (Cloudflare)
nslookup pyshine.com       # simpler alternative
TLS — encryption + identity
TLS provides confidentiality (encryption), integrity (tamper detection), and authentication (the server proves it is who it claims via a certificate chain). The handshake:
- Client offers supported cipher suites + a random.
- Server picks a cipher, sends its certificate + a random.
- Both derive shared keys (ECDHE — ephemeral Diffie-Hellman; the key never crosses the wire).
- They switch to encrypted communication.
TLS 1.3 (the current standard) collapses this to one round-trip (and zero for resumed sessions).
HTTP — the application protocol
HTTP is request/response: a method (GET/POST/PUT/DELETE), a path, headers, and an optional body. HTTP/2 multiplexes multiple requests over one TCP connection; HTTP/3 runs over QUIC (UDP-based) to avoid TCP’s head-of-line blocking. Cookies, caching (Cache-Control, ETag), and status codes (200, 301, 404, 500) live here — see the REST API tutorial for the HTTP protocol in depth.
Stage 4 — Routing + NAT
IP routing
Routers forward packets hop-by-hop toward the destination IP, using their routing table (destination prefix → next hop). The decision is “longest prefix match” — the most specific route wins.
ip route                      # your machine's routing table
# default via 192.168.1.1 dev eth0    <- the "catch-all" gateway
# 192.168.1.0/24 dev eth0             <- your local subnet (direct)
traceroute pyshine.com        # see each hop your packets take
Subnets and CIDR
A subnet is a range of IPs defined by a prefix length in CIDR notation: 192.168.1.0/24 = 256 addresses (the first 24 bits are the network, the last 8 are hosts). 10.0.0.0/8 = 16 million; 172.16.0.0/12; 192.168.0.0/16 are the private ranges (RFC 1918) — not routable on the public internet.
192.168.1.0/24     network
192.168.1.1        gateway (usually .1)
192.168.1.5-254    usable hosts
192.168.1.255      broadcast
NAT
Network Address Translation lets many private IPs share one public IP — your home router translates the source IP:port on outbound packets and remembers the mapping so replies come back. This is how every device in your house reaches the internet through one public address.
Load balancing
A load balancer distributes incoming requests across multiple backend servers (round-robin, least-connections, hash). It sits at layer 4 (TCP/UDP — e.g. HAProxy, NLB) or layer 7 (HTTP — e.g. nginx, ALB, which can route by path/host). This is the edge of every web service — see the REST architecture diagram and Kubernetes Services for how this scales.
Stage 5 — Tools + Security
The tools
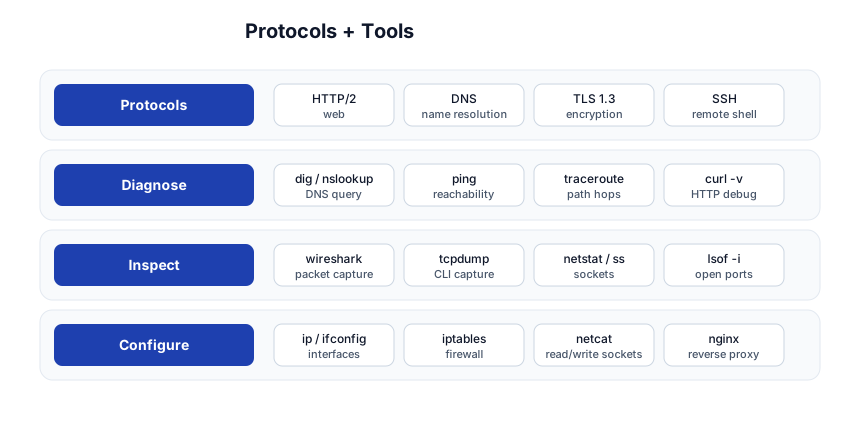
| Category | Tools |
|---|---|
| Diagnose | ping (reachability), traceroute/mtr (path + latency per hop), dig/nslookup (DNS), curl -v (HTTP debug) |
| Inspect | wireshark (GUI packet capture), tcpdump (CLI capture), ss/netstat (sockets), lsof -i (open ports) |
| Configure | ip/ifconfig (interfaces), iptables/nftables (firewall), netcat (nc) for raw socket reads, nginx/haproxy for reverse proxies |
ping -c 4 1.1.1.1                  # reachability to Cloudflare DNS
mtr pyshine.com                     # live traceroute with loss %
sudo tcpdump -n -i any port 53     # watch DNS queries
nc -vz pyshine.com 443             # "can I reach port 443?"
ss -tlnp                           # what's listening locally
sudo wireshark                     # full packet capture GUI
Security
- Firewall —
iptables/nftables(Linux) or cloud security groups filter packets by IP/port/protocol (stateful). - TLS — encrypts the channel and authenticates the server (certificates + certificate authorities).
- VPN — tunnels traffic through an encrypted connection (WireGuard, IPsec, OpenVPN); see the Tailscale tutorial for a modern mesh-VPN implementation.
- Defense in depth — don’t rely on any single layer; combine network segmentation, least-privilege ports, TLS, and application auth.
Quick-Start Checklist
- Learn the OSI layers by name — then map them to TCP/IP (4-5 layers). It’s the shared vocabulary.
- Understand encapsulation — each layer adds a header; the receiver unwraps in reverse.
- Know the TCP handshake — SYN / SYN-ACK / ACK. It’s the most-asked networking question.
- Know TCP vs UDP and when each wins (HTTP/SSH vs DNS/video).
- Trace a real HTTPS request with
curl -vanddig— see DNS, TCP, TLS, HTTP. - Learn CIDR —
a.b.c.d/N, where N is the prefix length; calculate the host count as2^(32-N). - Use
tcpdump/wiresharkto see packets — nothing teaches networking like watching real traffic. - Understand NAT — why every home device shares one public IP.
- Learn one load balancer (nginx) and one DNS tool (
dig). - Layer security — firewall + TLS + auth, never just one.
Common Pitfalls
- Confusing the models — OSI is the vocabulary (7 layers); TCP/IP is what runs (4-5). Don’t expect strict 7-layer separation in real code.
- Forgetting ports — a connection is a 5-tuple (proto, src IP, src port, dst IP, dst port). Two connections to the same host:port differ by source port.
- TCP over UDP for “reliability” without thinking — for latency-bound traffic, TCP’s head-of-line blocking and retransmit cost can be worse than a dropped frame.
- Assuming DNS is cached everywhere — TTLs vary; a change can take seconds or days. Lower the TTL before a planned change.
- Public IPs on private ranges —
10/8,172.16/12,192.168/16are not routable on the internet; they need NAT. - TLS != auth of the client — server TLS cert authenticates the server; client certs / mTLS are separate and optional.
pingfailing != host down — ICMP may be firewalled; a host can respond to TCP but not ping.
Further Reading
- RFC 1180: A TCP/IP Tutorial — the classic, gentle intro
- Computer Networking: A Top-Down Approach by Kurose & Ross — the standard textbook (free companion site)
- Beej’s Guide to Network Programming — sockets from the C side, invaluable
- Julia Evans’ zines — Networking!, TLS, HTTP — short, visual, excellent
- Wireshark docs
Related guides
Networking is the foundation every other systems topic builds on — these PyShine tutorials apply it directly:
- Learn REST API in One Post: Complete Tutorial — HTTP lives at OSI layer 7; this is the application layer in depth.
- Learn Docker in One Post: Complete Tutorial — bridge/host/overlay networks are virtual L2/L3 on top of this.
- Learn Kubernetes in One Post: Complete Tutorial — Services, Ingress, and CNI (Calico/Cilium) are networking.
- Tailscale: Open-Source WireGuard Mesh VPN — WireGuard, NAT traversal, and DERP relays are applied networking.
- Learn Bash in One Post: Complete Tutorial —
curl,dig,nc,sshare all networking tools you drive from the shell.
Networking rewards seeing it in motion. The five stages here — models, transport, application+DNS, routing+NAT, tools+security — cover the map, but it only clicks once you’ve watched a real handshake in Enjoyed this post? Never miss out on future posts by following us tcpdump and a real DNS resolution in dig. Run the commands above against a site you use daily; the layers stop being abstract and become the actual packets you can see. Once the OSI model and the TCP handshake are reflexes, every protocol documentation you read afterward makes sense — they all describe one layer’s contribution to the same stack.