Learn OAuth 2.0 and OIDC in a Single Post: Complete Tutorial From Authorization Flows and Tokens to PKCE and Security
OAuth 2.0 is the authorization framework that lets a user grant a third-party app access to their data on another service — without giving the app their password. OpenID Connect (OIDC) is the authentication layer on top of OAuth that proves who the user is. Together they power “Sign in with Google/GitHub/Microsoft” and every delegated-access API. This single post covers the whole stack in five stages, with hand-drawn diagrams and runnable code.
Learning Roadmap
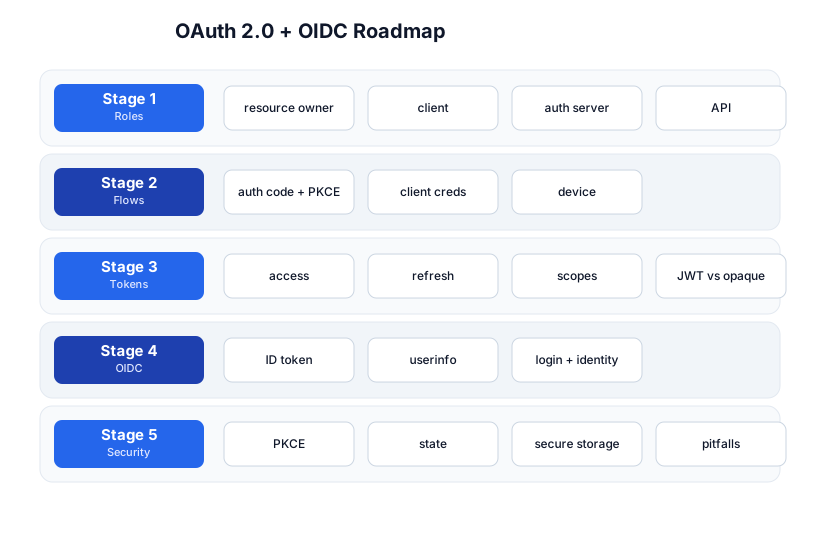
The roadmap moves from the roles (Stage 1), through the flows (Stage 2), tokens (Stage 3), OIDC (Stage 4), and security best practices (Stage 5). The Cryptography tutorial and REST API tutorial are companions.
Stage 1 — Roles: Who’s Who
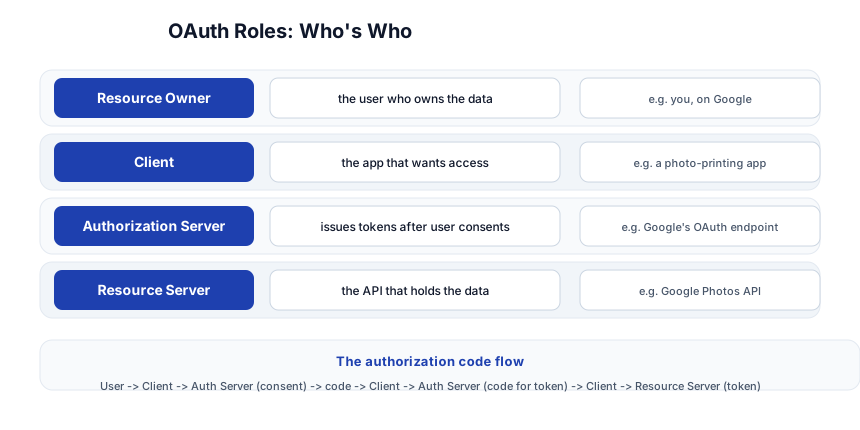
| Role | What it is | Example |
|---|---|---|
| Resource Owner | the user who owns the data | you, logged into Google |
| Client | the app that wants access to the user’s data | a photo-printing app |
| Authorization Server | issues tokens after the user consents | Google’s OAuth endpoint |
| Resource Server | the API that holds the data | Google Photos API |
The client never sees the user’s password. It redirects the user to the authorization server, the user logs in there and consents, the authorization server gives the client a token, and the client uses that token to call the resource server. The password stays with the authorization server.
The authorization code flow (simplified)
1. Client → User: "Do you want to grant me access to your photos?"
2. User → Auth Server: logs in + consents
3. Auth Server → Client: gives an authorization CODE (short-lived, one-time)
4. Client → Auth Server: exchanges code + client_secret for a TOKEN
5. Client → Resource Server: sends token in the Authorization header
6. Resource Server → Client: returns the photos
The code (step 3) is delivered via a browser redirect (URL parameter); the token (step 4) is delivered via a server-to-server POST — the code → token exchange happens on the backend, so the token never touches the browser.
Pitfall: OAuth is authorization (what you can do), not authentication (who you are). A successful OAuth flow means “the user granted the client access” — it doesn’t prove “the user is who they claim.” That’s what OIDC adds (Stage 4).
Stage 2 — Flows
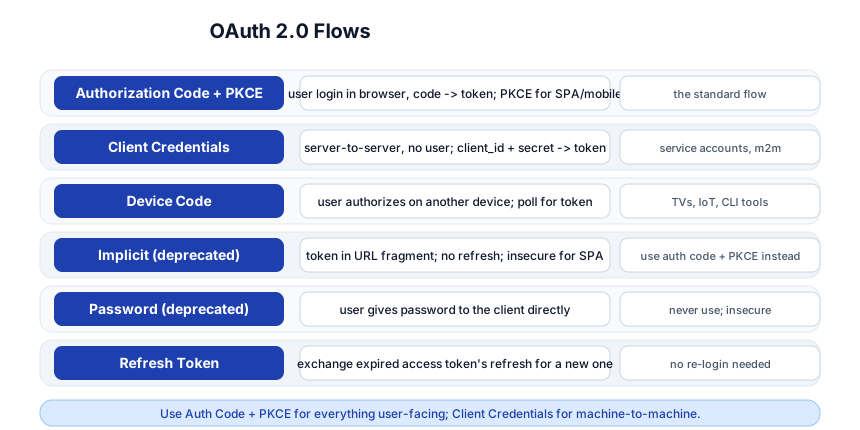
Authorization Code + PKCE — the standard flow
Used by web apps, SPAs (React/Vue), and mobile apps. PKCE (Proof Key for Code Exchange) replaces the client secret (which can’t be safely stored in a browser/app) with a dynamically generated challenge:
// 1. Generate PKCE pair (client-side)
const verifier = randomString(64);
const challenge = base64url(sha256(verifier));

// 2. Redirect user to authorization server
window.location = `https://auth.example.com/authorize?
  response_type=code&
  client_id=MY_APP&
  redirect_uri=https://myapp.com/callback&
  scope=photos:read&
  code_challenge=${challenge}&
  code_challenge_method=S256&
  state=${randomString()}`;

// 3. Authorization server redirects back with ?code=XYZ
// 4. Exchange code + verifier for tokens (server-to-server POST)
const tokenResponse = await fetch("https://auth.example.com/token", {
  method: "POST",
  body: new URLSearchParams({
    grant_type: "authorization_code",
    code: "XYZ",
    code_verifier: verifier,
    client_id: "MY_APP",
    redirect_uri: "https://myapp.com/callback",
  }),
});
const { access_token, refresh_token } = await tokenResponse.json();
PKCE prevents an attacker who intercepts the authorization code (from the browser redirect) from exchanging it for a token — they don’t have the code_verifier, which was generated and stored on the client. PKCE is required for all SPAs and mobile apps (OAuth 2.1 makes it mandatory for everything).
Client Credentials — server-to-server (no user)
POST /token
grant_type=client_credentials&
client_id=SERVICE_A&
client_secret=SECRET&
scope=api:read
No user involvement — a service authenticates with its own ID + secret and gets a token. Used for machine-to-machine (a cron job calling an API, a microservice calling another).
Device Code — TVs, IoT, CLIs
1. Device → Auth Server: "give me a device code"
2. Auth Server → Device: "show the user this URL + code: example.com/device, code ABC123"
3. User → opens browser, enters code, logs in + consents
4. Device → polls Auth Server: "is it done yet?" → eventually gets tokens
Used when the device can’t render a browser (a smart TV, a CLI tool, an IoT device). The user authorizes on a different device (their phone/laptop).
Deprecated flows
- Implicit — returned the access token directly in the URL fragment (no code exchange). No refresh token, token visible in URL (logs, referrer). Deprecated; use auth code + PKCE.
- Password (ROPC) — the client asks for the user’s password directly. Never use; it trains users to type passwords into arbitrary apps.
Pitfall: If you see
response_type=token(implicit) or a flow that asks the user for their password, it’s wrong. Always useresponse_type=code+ PKCE.
Stage 3 — Tokens: Access, Refresh, Scopes
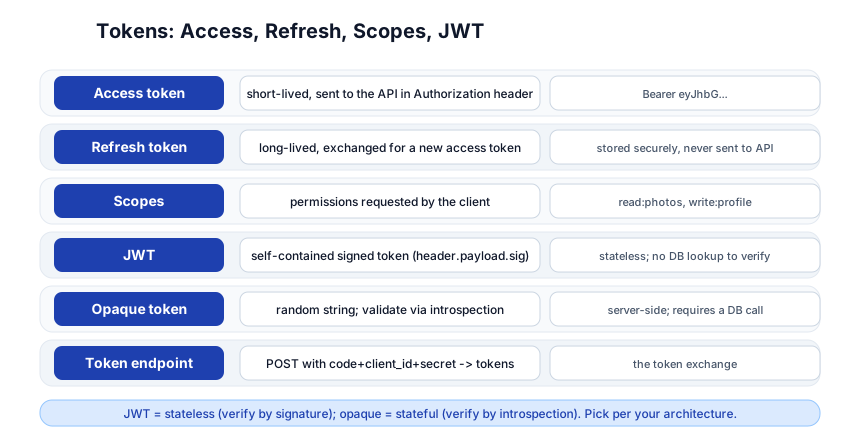
Access token
- Short-lived (minutes to an hour).
- Sent to the API in the
Authorization: Bearer <token>header. - Never put it in a URL (logs + referrer leak it).
- The resource server validates it (by signature for JWT, by introspection for opaque).
Refresh token
- Long-lived (days to weeks).
- Used to get a new access token when the old one expires — no re-login.
- Never sent to the resource server (it’s for the authorization server only).
- Store securely: httpOnly cookie (web), secure storage (mobile), env var (server).
Scopes
scope=photos:read profile email
Scopes are the permissions the client requests — they limit what the access token can do. The user sees them in the consent screen (“This app wants to read your photos and see your email”). The token carries the scopes; the resource server checks them on every request.
JWT vs opaque tokens
| JWT | Opaque | |
|---|---|---|
| Format | header.payload.signature (base64) | random string |
| Validation | verify signature (no DB lookup) | call introspection endpoint |
| Stateless | ✅ (self-contained) | ❌ (server must track) |
| Revocation | hard (can’t un-sign) | easy (delete from DB) |
| Size | large (~1KB) | small (32 bytes) |
JWT is great for distributed APIs (no shared DB needed); opaque is better when you need revocation (the server can immediately invalidate a token by deleting it). Most modern systems use JWT with short expiry + a revocation list for emergencies.
Pitfall: A JWT access token can’t be revoked — once signed, it’s valid until it expires. That’s why access tokens are short-lived (5-15 min). The refresh token (which can be revoked) is the control point; the access token is the fast path.
Stage 4 — OIDC: Identity on Top of OAuth
What OIDC adds
OAuth 2.0 gives you an access token (authorization: “what the app can do”). OpenID Connect adds an ID token (authentication: “who the user is”):
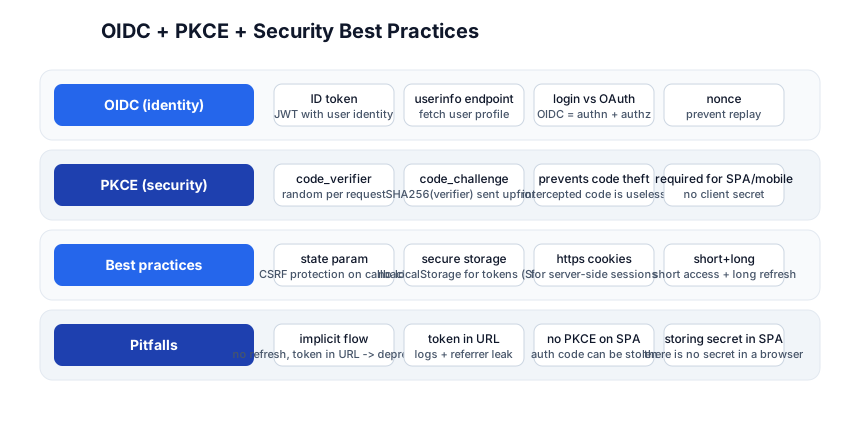
- ID token — a JWT containing the user’s identity claims (
sub,email,name,picture). openidscope — request OIDC by addingopenidto the scope list.- Userinfo endpoint — a REST endpoint to fetch the user’s profile (separate from the ID token, for when you need more claims).
- Nonce — a random value the client sends and checks in the ID token (prevents replay attacks).
// OIDC authorization request
window.location = `https://auth.example.com/authorize?
  response_type=code&
  client_id=MY_APP&
  scope=openid profile email&   // "openid" activates OIDC
  redirect_uri=...&
  nonce=${randomString()}&       // checked in the ID token
  code_challenge=...`;

// After token exchange, you get:
// { access_token, refresh_token, id_token }
// id_token is a JWT with: { sub: "user_123", email: "ada@example.com", name: "Ada" }
Login vs OAuth
| OAuth 2.0 | OIDC | |
|---|---|---|
| Purpose | authorization (delegated access) | authentication (who are you) |
| Token | access token (for the API) | ID token (for the client) |
| Scope | photos:read | openid |
| Question answered | “Can this app access my data?” | “Who just logged in?” |
Sign in with Google is OIDC (it proves who you are); “let this app read my Google Photos” is OAuth (it delegates access). Most “Sign in with X” buttons use both: OIDC for the identity + OAuth for any additional API access.
Pitfall: Don’t use an OAuth access token as proof of identity. An access token says “this app can do X” — it doesn’t say “the user is Y.” Only the ID token (verified by its signature + the nonce) proves identity. If you validate a user by calling the userinfo endpoint with an access token, you’re vulnerable to token substitution (app A’s token used to log in as app A’s user to app B).
Stage 5 — Security: PKCE, State, Storage, Pitfalls
PKCE — required for everything
PKCE prevents authorization-code interception: an attacker who steals the code (from the redirect URL) can’t exchange it without the code_verifier, which was generated and stored on the client. Use PKCE on every flow, not just SPAs — OAuth 2.1 makes it mandatory for the authorization code flow universally.
state parameter — CSRF protection
const state = randomString();
sessionStorage.setItem("oauth_state", state);
// send state in the auth request
// on callback, verify: if (params.state !== sessionStorage.getItem("oauth_state")) reject();
The state parameter prevents CSRF — an attacker can’t trick a user into completing someone else’s OAuth flow. Always generate a random state, store it, and verify it on the callback.
Secure token storage
| Client type | Where to store tokens |
|---|---|
| Server-side web app | httpOnly, Secure, SameSite=Lax cookies |
| SPA (React/Vue) | httpOnly cookie via a backend proxy; never localStorage (XSS steals it) |
| Mobile | OS secure storage (Keychain/iOS, Keystore/Android) |
| Server (m2m) | env var / secrets manager |
Pitfall: Storing access tokens in
localStorageis the #1 SPA auth mistake. Any XSS (a compromised dependency, a third-party script) can readlocalStorageand steal the token. UsehttpOnlycookies (set by a backend proxy that does the token exchange) — XSS can’t readhttpOnly.
Short access + long refresh
- Access token: 5-15 minutes. If stolen, it’s useless in 15 min.
- Refresh token: days to weeks. If stolen, the server can revoke it.
- Never make the access token long-lived “for convenience.” The short expiry IS the security boundary.
The big pitfalls
- Implicit flow — token in URL, no refresh, no PKCE. Deprecated; use auth code + PKCE.
- Token in URL — access token in the redirect URL (logs, browser history, Referer header leak it). Never.
- No PKCE on SPA/mobile — the auth code is in the redirect URL; without PKCE, it can be exchanged by an attacker.
- Storing client secret in a browser — there is no secret in a browser. Use PKCE instead.
- Using access token as ID token — the access token is for the API, not for identity. Use the ID token.
- Not validating the ID token — always verify the JWT signature + the
nonce+ theaud(audience). A forged ID token logs in anyone.
Quick-Start Checklist
- Use an auth provider — Auth0, Okta, Keycloak, or the provider’s own (Google, GitHub).
- Use the authorization code flow + PKCE — not implicit, not password.
- Generate a random
stateand verify it on the callback. - Generate a PKCE
code_verifier+code_challenge(S256). - Exchange the code server-side — never expose the token exchange to the browser.
- Store tokens in
httpOnlycookies (web) or OS secure storage (mobile). - Add
openidscope for OIDC (identity). - Validate the ID token — signature, nonce, audience, expiry.
- Use short-lived access tokens (5-15 min) + long-lived refresh tokens.
- Use
state+ PKCE + HTTPS + secure cookies — the four horsemen of OAuth security.
Common Pitfalls
- Using the implicit flow — deprecated; use auth code + PKCE.
- Storing tokens in
localStorage— XSS steals them; usehttpOnlycookies. - No
stateparameter — CSRF attack on the callback; always use + verifystate. - No PKCE — auth code interception; PKCE is mandatory for SPAs/mobile.
- Long-lived access tokens — if stolen, they’re valid for a long time; keep access short (5-15 min).
- Using access token for identity — it’s for the API, not for “who is the user”; use the ID token.
- Not validating the ID token — verify the JWT signature + nonce + aud.
- Client secret in a browser — there’s no secret in a browser; PKCE replaces it.
- Token in URL — logs, Referer, browser history leak it; tokens go in headers, not URLs.
Further Reading
- OAuth 2.0 RFC 6749 — the spec
- OAuth 2.1 Draft — the modernized spec
- OIDC Spec — OpenID Connect
- OAuth 2.0 for Browser Apps (BCP) — best current practice
- OAuth Playground — interactive OAuth flow simulator
Related guides
OAuth + OIDC is the auth layer of the web stack — these PyShine tutorials connect to it:
- Learn Cryptography in One Post — JWT signatures (HMAC/RSA), TLS for the token exchange, hashing for PKCE.
- Learn REST API in One Post — the
Authorization: Bearerheader that carries the access token. - Learn FastAPI in One Post —
fastapi.security.OAuth2AuthorizationCodeBearerimplements the flow. - Learn Next.js App Router in One Post — middleware.ts for auth gating;
next-authwraps OIDC. - Learn Computer Networking in One Post — HTTPS, redirects, and the HTTP layers the flow uses.
OAuth 2.0 + OIDC is the protocol that makes “Sign in with Google” work — and getting it wrong leaks passwords, tokens, or user data. The five stages here — roles, flows, tokens, OIDC, security — cover everything from a one-line “Sign in with Google” button to a PKCE-protected, OIDC-authenticated, short-token + long-refresh production system with Enjoyed this post? Never miss out on future posts by following us httpOnly cookie storage. The two rules that pay off forever: always use auth code + PKCE (never implicit, never password), and store tokens in httpOnly cookies (never localStorage). Pick an auth provider (Auth0, Keycloak, or the provider’s own), add scope=openid, generate state + PKCE, and exchange the code server-side — once you’ve seen the full flow, “Sign in with X” stops being magic. 


