Learn WebRTC in a Single Post: Complete Tutorial From Signaling and ICE to Media, Data Channels, and SFU Scaling
WebRTC is the browser-native protocol for real-time audio, video, and data — peer-to-peer, encrypted, sub-second latency, no plugins. It powers Google Meet, Discord voice, Zoom’s web client, and every browser-based video call. This single post covers the whole stack in five stages, with hand-drawn diagrams and runnable code.
Learning Roadmap
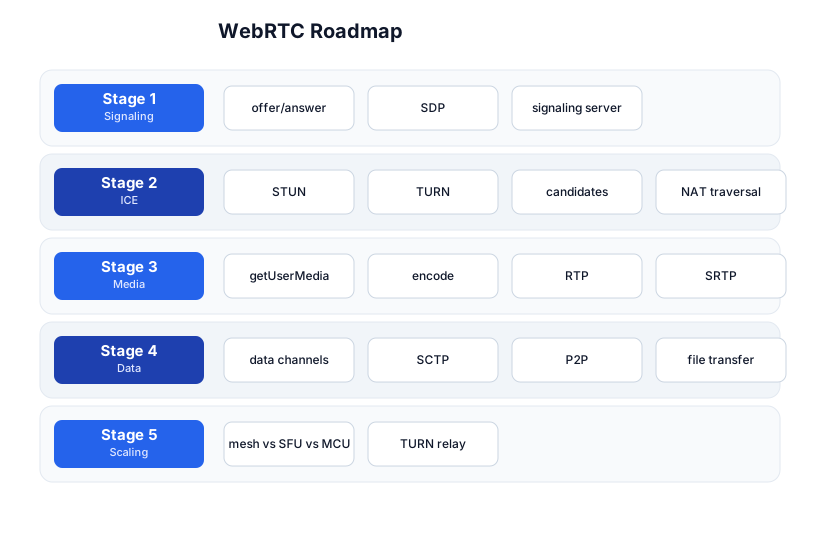
The roadmap moves from signaling (Stage 1), through ICE/NAT traversal (Stage 2), media (Stage 3), data channels (Stage 4), and scaling topologies (Stage 5). The WebSocket tutorial is the companion — WebSocket is for real-time text/binary; WebRTC is for real-time media + P2P data.
Stage 1 — Signaling: Offer/Answer + SDP
WebRTC has no signaling protocol
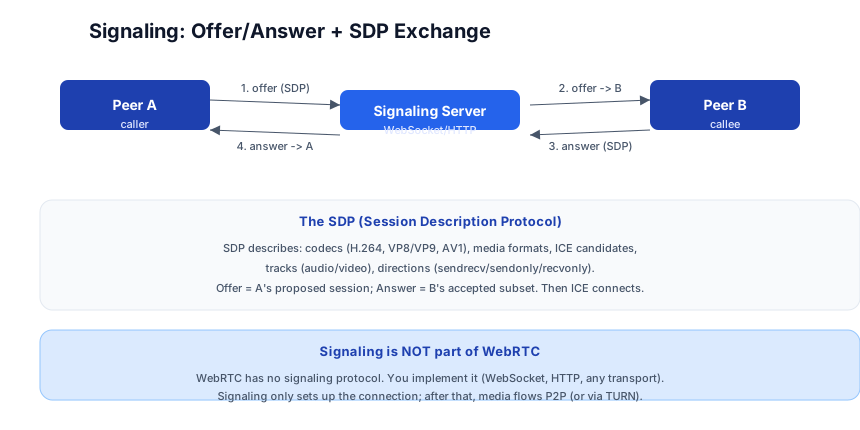
WebRTC defines how to connect peers and stream media — but it does not define how peers find each other. You implement signaling yourself (WebSocket, HTTP, any transport). Signaling only sets up the connection; after that, media flows directly peer-to-peer (or via TURN).
The offer/answer exchange
// Peer A (caller) creates an offer
const pc = new RTCPeerConnection(configuration);
const offer = await pc.createOffer();
await pc.setLocalDescription(offer);
// send offer to Peer B via signaling server (WebSocket)

// Peer B (callee) receives the offer, creates an answer
await pc.setRemoteDescription(offer);
const answer = await pc.createAnswer();
await pc.setLocalDescription(answer);
// send answer back to Peer A via signaling server

// Peer A receives the answer
await pc.setRemoteDescription(answer);
// Connection is being established (ICE starts)
SDP — Session Description Protocol
The offer/answer contains an SDP blob describing the session:
- Codecs — which audio/video codecs are supported (Opus, VP8, VP9, H.264, AV1).
- Media tracks — audio and video tracks with directions (sendrecv, sendonly, recvonly).
- ICE candidates — possible network paths to reach the peer.
- Extensions — simulcast, congestion control feedback, etc.
The offer proposes the full set; the answer accepts a subset. After the exchange, ICE begins connecting.
Pitfall: The signaling server is only needed for the initial connection. Once ICE connects the peers, media flows P2P — the signaling server is no longer involved. Don’t route media through the signaling server; it’s only for the handshake.
Stage 2 — ICE: STUN, TURN, NAT Traversal
The NAT problem
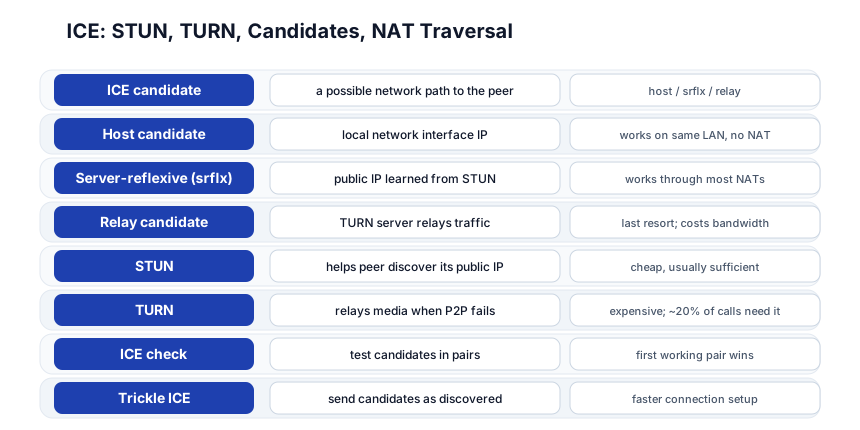
Most devices are behind NAT (home router, corporate firewall). Peer A can’t directly reach Peer B’s private IP. ICE (Interactive Connectivity Establishment) finds a working path by trying multiple candidates:
| Candidate type | What it is | Works when |
|---|---|---|
| Host | local network interface IP | same LAN, no NAT |
| Server-reflexive (srflx) | public IP learned from STUN | most NATs (the common case) |
| Relay | TURN server relays traffic | symmetric NAT, restrictive firewall |
STUN — discover your public IP
STUN (Session Traversal Utilities for NAT) — the peer asks a STUN server “what’s my public IP?” The server replies with the public IP + port it sees. The peer adds this as a srflx candidate. This works for most NATs (cone NAT).
TURN — relay when P2P fails
TURN (Traversal Using Relays around NAT) — when direct P2P fails (symmetric NAT on both sides, restrictive corporate firewall), the TURN server relays the media. Both peers send to TURN; TURN forwards to the other peer. This is expensive (bandwidth) but guarantees connectivity. ~10-20% of WebRTC calls need TURN.
const configuration = {
  iceServers: [
    { urls: "stun:stun.l.google.com:19302" },
    { urls: "turn:turn.example.com:3478", username: "user", credential: "pass" },
  ],
};
const pc = new RTCPeerConnection(configuration);
Trickle ICE — send candidates as discovered
Instead of waiting for all ICE candidates before sending the offer, trickle ICE sends candidates as they’re discovered — the peer starts trying connections immediately. This speeds up connection setup significantly.
pc.onicecandidate = (event) => {
  if (event.candidate) {
    // send candidate to peer via signaling (trickle)
    signaling.send({ candidate: event.candidate });
  }
};
Pitfall: Without a TURN server, ~10-20% of calls fail (symmetric NAT). Always configure a TURN server in production. Google’s free STUN works for testing; you need your own TURN for production (it relays bandwidth, so it costs).
Stage 3 — Media: Capture, Encode, SRTP, DTLS
getUserMedia — capture camera + mic
const stream = await navigator.mediaDevices.getUserMedia({
  video: { width: 1280, height: 720 },
  audio: true,
});
stream.getTracks().forEach((track) => pc.addTrack(track, stream));
getUserMedia requests camera + microphone access. The browser shows a permission prompt. The resulting MediaStream contains MediaTracks (one video, one audio) that you add to the RTCPeerConnection.
Codecs — negotiated in SDP
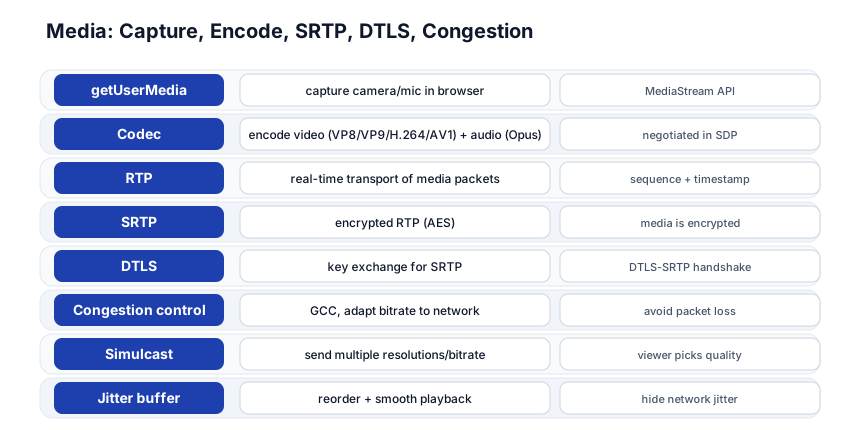
| Type | Codecs | Notes |
|---|---|---|
| Video | VP8, VP9, H.264, AV1 | VP8 is the default; AV1 is the newest (better compression) |
| Audio | Opus, G.711 | Opus is the default (full-band, low-latency) |
The offer lists all supported codecs; the answer picks the ones both sides support. The browser encodes the captured media with the selected codec.
RTP + SRTP — transport + encryption
- RTP (Real-time Transport Protocol) — carries media packets with sequence numbers + timestamps (for ordering + jitter buffer).
- SRTP (Secure RTP) — RTP encrypted with AES. All WebRTC media is encrypted by default — there is no unencrypted WebRTC.
- DTLS-SRTP — the key exchange for SRTP happens via DTLS (Datagram TLS) during the ICE connection setup. The DTLS handshake negotiates the SRTP keys; after that, all media is encrypted.
Congestion control + simulcast
- Congestion control (GCC — Google Congestion Control) — monitors packet loss + round-trip time; if the network is congested, the encoder reduces the bitrate (adaptive quality). This is how WebRTC stays smooth on bad networks.
- Simulcast — the sender encodes multiple resolutions/bitrate simultaneously (e.g. 1080p, 720p, 360p). The receiver (or SFU) picks the quality that fits its bandwidth. This is how a multi-person call scales — each viewer gets the best quality their connection supports.
Jitter buffer
The receiver maintains a jitter buffer — it holds incoming packets briefly, reorders them (by RTP sequence number), and plays them out smoothly. This hides network jitter (variable packet arrival) at the cost of a small added latency.
Pitfall: WebRTC media is always encrypted (SRTP). There is no “unencrypted WebRTC” — if you need to record, you record on the sending side (before encryption) or on a receiving peer/SFU that decrypts with the SRTP keys. You can’t sniff WebRTC media from the network.
Stage 4 — Data Channels: P2P Messaging
RTCDataChannel — the WebSocket alternative
const dc = pc.createDataChannel("chat", { ordered: true });
dc.onopen = () => dc.send("hello P2P!");
dc.onmessage = (e) => console.log(e.data);
A data channel is a P2P, encrypted, low-latency channel for arbitrary data — like a WebSocket, but peer-to-peer (no server in the path after connection). It uses SCTP over DTLS (Stream Control Transmission Protocol over Datagram TLS).
Reliable vs unreliable
// Ordered + reliable (like TCP) — for chat, file transfer
const dc1 = pc.createDataChannel("chat", { ordered: true });

// Unordered + unreliable (like UDP) — for game state, real-time position
const dc2 = pc.createDataChannel("game", { ordered: false, maxRetransmits: 0 });
Data channels can be reliable (TCP-like, guaranteed delivery, ordered) or unreliable (UDP-like, no retransmit, unordered). Use reliable for chat/file transfer; unreliable for real-time game state where old data is useless.
Backpressure
if (dc.bufferedAmount < 256 * 1024) {
  dc.send(data);
} else {
  // slow consumer; back off
}
Same as WebSocket — check bufferedAmount before sending to avoid filling the buffer.
Stage 5 — Scaling: Mesh vs SFU vs MCU
Mesh — full P2P (small groups)
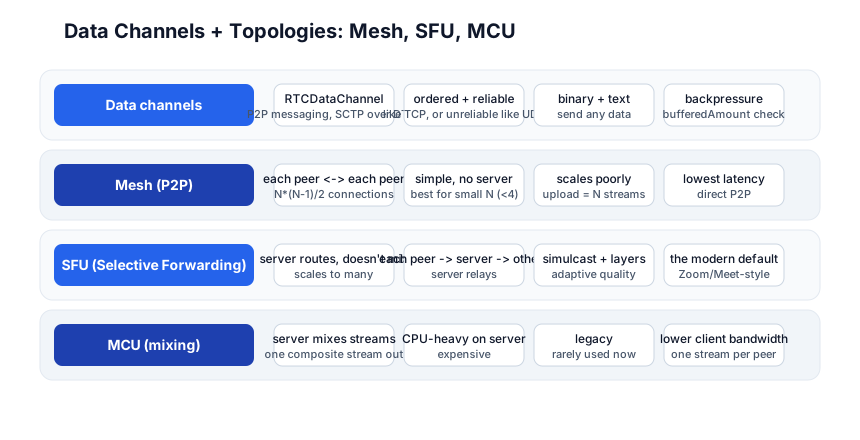
Each peer connects to every other peer. N peers = N×(N-1)/2 connections. Each peer sends N-1 streams (one per other peer). Simple, no server, lowest latency — but doesn’t scale: 10 peers = 45 connections, each peer uploading 9 streams. Good for ≤4 participants.
SFU — Selective Forwarding Unit (the modern default)
Peer A -> SFU -> Peer B, C, D
Peer B -> SFU -> Peer A, C, D
Each peer sends one stream to the SFU; the SFU forwards it to the other peers (it doesn’t mix — it routes). Each peer uploads 1 stream (not N-1) and downloads N-1. This scales to many participants (Zoom, Google Meet, Jitsi all use SFU). Combined with simulcast, the SFU forwards the best-quality layer each receiver’s bandwidth supports.
SFU implementations: mediasoup, Janus, LiveKit, Pion (Go), Jitsi Videobridge.
MCU — Multipoint Control Unit (legacy)
The MCU mixes all incoming streams into one composite stream (e.g. a grid of all participants), then sends the composite to each peer. Each peer uploads 1 and downloads 1 — but the MCU does heavy video processing (decoding, compositing, re-encoding), which is CPU-expensive. Rarely used today — SFU is cheaper and more flexible.
| Mesh | SFU | MCU | |
|---|---|---|---|
| Server | none | relays (no mixing) | mixes (CPU-heavy) |
| Upload per peer | N-1 | 1 | 1 |
| Download per peer | N-1 | N-1 | 1 |
| Scalability | ≤4 | 100s | 10s |
| Latency | lowest | low | higher (re-encode) |
| Use | 1:1, small group | the default | legacy |
Pitfall: Mesh doesn’t scale — at 8 participants, each peer uploads 7 streams and the browser encoder is overwhelmed. Use an SFU for anything beyond 4 participants. LiveKit, mediasoup, or Jitsi are production-ready SFUs.
Quick-Start Checklist
- Create an
RTCPeerConnectionwith STUN + TURN servers. getUserMediato capture camera + mic.- Add tracks to the connection (
pc.addTrack). - Create an offer (
pc.createOffer) +setLocalDescription. - Send the offer via a signaling server (WebSocket).
- Peer B:
setRemoteDescription+createAnswer+setLocalDescription. - Handle ICE candidates (
onicecandidate→ send via signaling). - Handle incoming tracks (
ontrack→ attach to a<video>element). - Configure a TURN server for production (10-20% of calls need it).
- Use an SFU (LiveKit, mediasoup, Jitsi) for multi-party calls.
Common Pitfalls
- No TURN server — 10-20% of calls fail behind symmetric NAT. Always configure TURN.
- Mesh for large groups — doesn’t scale beyond ~4 peers. Use an SFU.
- Signaling server routes media — signaling is only for the handshake; media is P2P (or TURN).
- No
onicecandidatehandler — candidates never reach the peer; connection never establishes. - Not attaching
ontrack— incoming media arrives but isn’t displayed; attach to a<video>. - Forgetting
getUserMediapermissions — the browser prompts; if denied, no media. Handle the rejection. - Unencrypted? — WebRTC is always encrypted (SRTP). There’s no “turn off encryption” option.
- TURN bandwidth cost — TURN relays all media; budget for it. STUN is free; TURN is not.
Further Reading
- WebRTC on MDN — the browser API reference
- WebRTC for the Curious — free, comprehensive
- WebRTC Specs — the W3C specification
- mediasoup — Node.js SFU
- LiveKit — open-source WebRTC stack (SFU + client SDKs)
- Pion — Go WebRTC implementation
Related guides
WebRTC is the real-time media layer — these PyShine tutorials connect to it:
- Learn WebSocket in One Post — WebSocket is for real-time text/binary; WebRTC is for real-time media + P2P data.
- Learn Computer Networking in One Post — UDP, NAT, DTLS, and the network layers WebRTC uses.
- Learn Cryptography in One Post — DTLS-SRTP key exchange; AES encryption of media.
- Learn JavaScript + TypeScript in One Post — the browser API is JavaScript;
RTCPeerConnection,getUserMedia. - Learn Node.js + Express in One Post — the signaling server runs on Node; mediasoup is Node-based.
WebRTC’s value is browser-native, encrypted, sub-second P2P media — no plugins, no intermediary (except TURN when needed), and the full pipeline from camera capture to encrypted RTP to the other peer’s screen. The five stages here — signaling, ICE, media, data channels, scaling — cover everything from a 1:1 video call to a multi-party SFU-scaled conference with simulcast and TURN fallback. The two habits that pay off: always configure a TURN server (10-20% of calls fail without it), and use an SFU for more than 4 participants (mesh doesn’t scale). Open a browser console, Enjoyed this post? Never miss out on future posts by following us getUserMedia, create an RTCPeerConnection, and watch your own camera feed appear — once you’ve seen the local track, the model clicks.