AI Website Cloner: Clone Any Website With One Command Using AI Coding Agents
1. Introduction
Imagine pointing a single command at any URL and watching an AI rebuild that entire website as a clean, modern Next.js codebase — pixel for pixel. That is exactly what AI Website Cloner (JCodesMore/ai-website-cloner-template) does. It is a reusable template that turns AI coding agents into a team of website reverse-engineers: one orchestrator inspects the target site, extracts every design token and asset, writes detailed component specifications, and dispatches parallel builder agents to reconstruct each section.
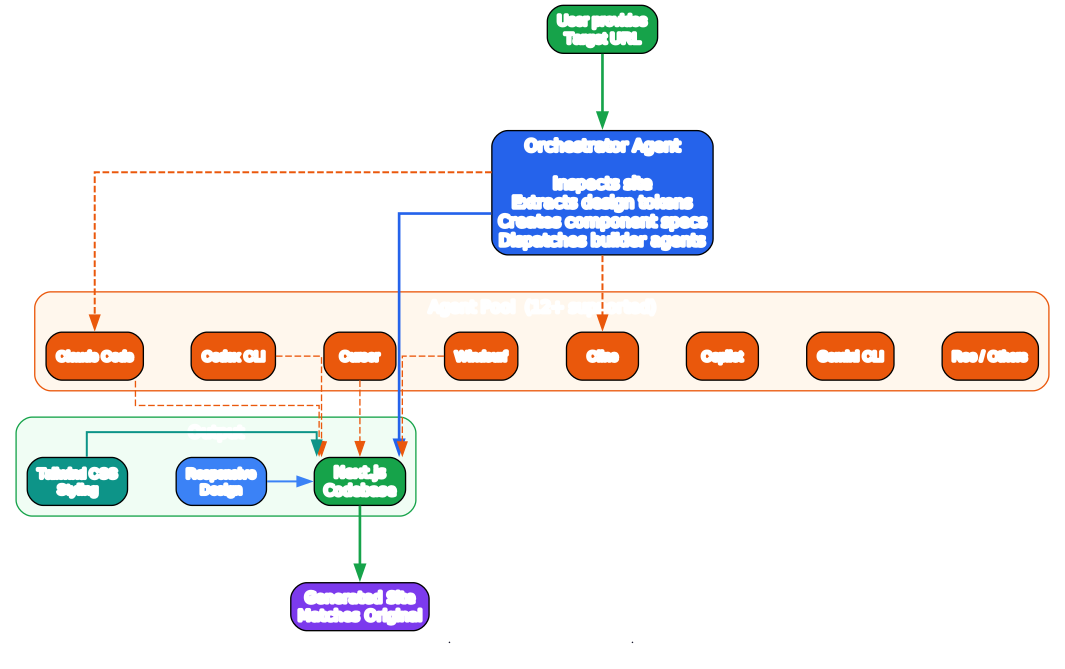
With over 26,000 GitHub stars and growing at roughly 10,000 per month, AI Website Cloner has struck a nerve in the developer community. The reason is simple: website cloning has always been a tedious, manual grind, and AI agents are finally capable enough to automate it end to end. The project recommends Claude Code with Opus 4.8 for best results, but it works with a dozen different AI coding agents including Codex CLI, Cursor, Windsurf, Gemini CLI, Cline, and more.
AI-driven website cloning matters because it collapses a multi-day manual task into a single command. Whether you are migrating a legacy site, recovering lost source code, or learning how a production layout achieves a particular effect, AI Website Cloner gives you a working, editable Next.js codebase instead of a static screenshot. In this post we will walk through how it works, its architecture, its multi-agent pipeline, and how to use it yourself.
2. The Website Cloning Problem
Cloning a website by hand is a famously painful exercise. The traditional workflow looks something like this: open the target site in a browser, fire up DevTools, and start copying CSS values one property at a time. You screenshot the site for reference, manually transcribe colors, font sizes, padding, and spacing, then hand-build React components that approximate what you saw. Along the way you download images, hunt for inline SVGs, guess at responsive breakpoints, and try to reverse-engineer animations by scrubbing through the page.
The problems with this approach are numerous. It is tedious — a single complex section can take hours to replicate accurately. It is error-prone — humans estimate values (“it looks like 16px”) instead of extracting exact computed styles, and those small errors accumulate into a clone that feels “off.” It is time-consuming — a full marketing site can take days of focused work. And it is brittle — miss a layered overlay image or misidentify a scroll-driven interaction as click-driven, and the clone looks broken the moment someone actually uses it.
Worst of all, the manual process does not scale. Want to clone five pages? Multiply the effort by five. Want to keep the clone in sync as the original site evolves? You are essentially re-doing the work from scratch each time. AI Website Cloner exists to solve exactly this problem. By delegating the inspection, extraction, and code generation to AI agents, it removes the tedium, eliminates the estimation errors, and turns cloning into a repeatable, auditable pipeline.
3. How AI Website Cloner Works
At its core, AI Website Cloner is a template plus a skill. The template is a pre-scaffolded Next.js 16 project with shadcn/ui and Tailwind CSS v4 already wired up. The skill is a /clone-website command that instructs your AI coding agent to run a multi-phase pipeline against any URL you provide.
The philosophy is best described in the project’s own words: you are not doing a two-phase “inspect then build” process. Instead, you are a foreman walking the job site. As you inspect each section of the page, you write a detailed specification to a file, then hand that file to a specialist builder agent with everything it needs. Extraction and construction happen in parallel, but extraction is meticulous and produces auditable artifacts.
When you run /clone-website https://example.com, the agent first verifies that browser automation is available (Chrome MCP, Playwright MCP, or similar). It confirms the base project builds with npm run build. Then it launches into reconnaissance: navigating to the URL, taking full-page screenshots at desktop and mobile widths, and running an interaction sweep across scroll, click, hover, and responsive breakpoints. From there it builds the foundation (fonts, colors, global CSS, TypeScript types, downloaded assets), writes a component spec for each section, dispatches parallel builder agents in git worktrees, merges their work, and runs a visual QA diff against the original. The result is a verified, deployable Next.js codebase.
4. Architecture Overview
Understanding the Architecture
The architecture diagram above illustrates the core components of AI Website Cloner and how they interact. Let’s break down each component:
User Input (Blue) The entry point is a single command: /clone-website <url>. This is the only human action required. The URL is passed as an argument to the skill, which normalizes and validates it before proceeding. From this point on, the orchestrator drives everything.
AI Agent Orchestrator (Orange) The orchestrator is the “foreman” — the coordinating intelligence, typically Claude Code with Opus 4.8. It does not just delegate; it actively inspects the page via browser MCP, writes component spec files, and dispatches builder agents. It holds full context across the entire pipeline, which is what allows it to resolve merge conflicts intelligently later.
Browser MCP and Web Scraper (Blue) Browser automation is mandatory — the skill cannot work without it. The orchestrator uses Chrome MCP (or Playwright, Browserbase, Puppeteer) to navigate, screenshot, and run JavaScript extraction scripts against the live page. The “web scraper” layer is where getComputedStyle() dumps, asset enumeration, and interaction sweeps happen.
Foundation Builder, Spec Writer, and Parallel Builders (Orange) These are the AI processing stages. The foundation builder updates fonts, colors, globals.css, TypeScript types, and downloads all assets — sequentially, because everything else depends on it. The spec writer produces per-component specification files with exact CSS values. The parallel builders each receive a spec inline and work in isolated git worktrees, one agent per section.
Code Generator, Assembly & QA, and Template Output (Green) These are the success and output stages. The code generator produces Next.js 16 + React 19 components with shadcn/ui and Tailwind v4. Assembly merges worktrees, wires up page.tsx, and runs npm run build. The template output is a pixel-perfect, deployable Next.js codebase.
Data Flow The diagram shows how data moves through the system: the URL flows from input to orchestrator to browser MCP to scraper. Raw extraction data flows into the foundation and spec stages. Specs flow to parallel builders. Built components flow through assembly and QA to the final output. A dashed feedback loop returns from QA to the orchestrator when visual discrepancies are found, triggering re-extraction.
Key Insights This architecture is notable for treating extraction and construction as a single interleaved process rather than two separate phases. The orchestrator does not wait for all extraction to finish before building — it dispatches builders as soon as each section’s spec is ready, maximizing parallelism. The use of git worktrees gives each builder an isolated workspace, and the orchestrator’s full-context merge resolution is what makes the parallel approach viable.
5. Cloning Workflow

Understanding the Cloning Workflow
The workflow diagram traces the journey from a single URL to a finished Next.js codebase across six numbered steps.
Step 1: URL Input Everything begins with /clone-website https://example.com. The skill parses the argument as one or more URLs, normalizes and validates each, and verifies accessibility via browser MCP. Multiple URLs can be processed in parallel with per-site isolation in dedicated folders.
Step 2: Page Analysis (Reconnaissance) The orchestrator navigates to the target and takes full-page screenshots at 1440px (desktop) and 390px (mobile), saving them to docs/design-references/. It then runs a mandatory interaction sweep: a scroll sweep to catch scroll-driven animations and sticky headers, a click sweep to discover tabs and modals, a hover sweep to capture hover states, and a responsive sweep at 1440px, 768px, and 390px. All findings land in docs/research/BEHAVIORS.md.
Step 3: Asset Extraction (Foundation) This sequential phase updates fonts in layout.tsx, writes the target’s color tokens into globals.css, creates TypeScript interfaces for observed content structures, extracts inline SVGs as named React components in icons.tsx, and downloads all images, videos, and binary assets to public/. The orchestrator verifies npm run build passes before moving on.
Step 4: AI Code Generation For each section in the page topology, the orchestrator extracts exact computed CSS via a getComputedStyle() script, captures multi-state styles (before/after diffs for scroll-triggered or hover changes), extracts verbatim text content, and writes a component spec file to docs/research/components/. It then dispatches builder agents in git worktrees — one per section, or one per sub-component for complex sections.
Step 5: Template Assembly As builders complete, the orchestrator merges their worktree branches into main, resolving conflicts with full context. It wires everything together in src/app/page.tsx, implements page-level behaviors (scroll snap, intersection observers, smooth scroll), and verifies the build passes clean.
Step 6: Output (with Visual QA gate) Before declaring completion, the orchestrator runs a visual QA diff: side-by-side comparison screenshots at desktop and mobile, testing all interactive behaviors. The decision diamond in the diagram represents this gate. If discrepancies are found, the loop returns to re-extraction and fixing. Only on a passing QA is the clone complete and the deployable Next.js codebase delivered.
Key Insights The workflow’s most important property is its feedback loop. The visual QA gate is not a formality — it actively feeds back into re-extraction when the clone does not match. This is what separates a “close enough” approximation from a pixel-perfect clone. The complexity budget rule (split a section if its spec exceeds ~150 lines) keeps each builder task small enough to nail perfectly.
6. Key Features

Understanding the Key Features
The features diagram highlights six capabilities that make one-command website cloning possible.
1. One-Command Cloning The entire pipeline runs from a single command. There is no manual inspection step, no hand-copying of CSS, no separate asset-download script to run. You provide a URL and the agents handle the rest. This is the headline feature — it turns cloning from a multi-day chore into a single invocation.
2. Multi-Agent System Rather than one agent trying to build an entire site in one monolithic pass, AI Website Cloner uses a foreman orchestrator that dispatches parallel builder agents in git worktrees. Each agent owns one section and verifies its own build (npx tsc --noEmit) before finishing. This parallelism is what makes cloning a full page feasible in a reasonable timeframe, and the worktree isolation prevents builders from stepping on each other.
3. Template Generation The output is not a pile of loose HTML — it is a clean Next.js 16 codebase with React 19, shadcn/ui, and Tailwind CSS v4. It uses oklch design tokens, the cn() utility from shadcn, and Lucide React icons (replaced by extracted SVGs during cloning). The result is reusable, customizable, and ready to deploy to Vercel.
4. Asset Extraction The pipeline downloads images, videos, fonts, favicons, and inline SVGs. Critically, it detects layered and overlay compositions — a section that looks like one image is often a background gradient plus a foreground PNG plus an overlay icon. Missing an overlay makes a clone look empty even when the background is correct, so the extraction script enumerates all <img> elements and background images within each container.
5. Responsive Output The clone is not desktop-only. The orchestrator inspects at 1440px, 768px, and 390px, captures breakpoint shifts, and generates mobile-first Tailwind utilities so the clone adapts exactly like the original. Responsive behavior is documented per component in the spec files.
6. Customization The design principle is “clone first, customize later.” During the emulation phase, the agent makes no personal aesthetic changes — it matches the target 1:1. After the build, the generated codebase is standard Next.js, so you can edit it freely with any AI agent or by hand. This separation keeps the clone faithful while leaving the door open for your own modifications.
Why These Features Matter Traditional cloning is a manual grind. AI Website Cloner automates the entire process with a multi-agent pipeline that extracts exact computed styles, dispatches parallel builders, and assembles a verified, deployable Next.js codebase — turning days of tedious work into a single command. Supported agents include Claude Code (recommended), Codex CLI, Cursor, Windsurf, Gemini CLI, Cline, Roo Code, Continue, Amazon Q, Augment Code, and Aider.
7. AI Agent Pipeline

Understanding the Agent Pipeline
The agent pipeline diagram shows how specialized agents collaborate: scrape, analyze, generate, review, and output — all coordinated by the orchestrator.
Scrape Agent The scrape agent handles browser MCP navigation, full-page screenshots, asset enumeration, and getComputedStyle() dumps. It is the eyes of the system, capturing raw visual and structural data from the live page. Its output is the raw material every downstream agent relies on.
Analyze Agent The analyze agent takes the raw dumps and runs the interaction sweep — scroll, click, hover, and responsive. It maps the page topology (every distinct section, its visual order, fixed vs. flow content, z-index layers, dependencies) and writes the behavior bible (BEHAVIORS.md). A critical responsibility is identifying the interaction model of each section before any building happens: is it click-driven, scroll-driven, hover-driven, or time-driven? Getting this wrong means a complete rewrite, not a CSS tweak.
Generate Agent(s) The generate stage is where parallelism shines. Each builder agent receives its full component spec inline — exact CSS values, states, behaviors, assets, and verbatim content — and works in an isolated git worktree. One agent per section, or one per sub-component for complex sections. Each builder verifies npx tsc --noEmit before finishing. The orchestrator does not wait; as soon as one section’s builders are dispatched, it moves to extracting the next.
Review Agent The review agent merges worktree branches into main, resolving conflicts with full context (it knows what each builder was tasked with and what they produced). It runs npm run build and performs the side-by-side visual diff at desktop and mobile. This is the quality gate.
Output On a passing QA, the assembled Next.js codebase is ready. On failure, the dashed feedback loop returns to the analyze stage for re-extraction and rebuilding.
The Spec File Contract The blue box in the middle of the diagram — component spec files in docs/research/components/ — is the linchpin of the whole pipeline. It is the contract between extraction and building. Every CSS value in a spec comes from getComputedStyle(), not estimation. Every state’s content and styles are captured. Every image (including overlays) is identified. The builder receives this spec inline in its prompt, so it never has to read external docs or guess. This is what the project calls “completeness beats speed” — take the extra minute to extract one more property rather than shipping an incomplete brief.
Key Principle The pipeline’s guiding truth is that small tasks produce perfect results. When an agent gets “build the entire features section,” it glosses over details. When it gets a single focused component with exact CSS values, it nails it every time. The complexity budget rule mechanically enforces this: if a builder prompt exceeds ~150 lines of spec content, the section is too complex for one agent and must be split.
8. Installation and Setup
Getting started with AI Website Cloner is straightforward. The recommended path is to create your own repository from the template rather than cloning it directly.
Step 1: Create your own repository from the template
On the GitHub page for the project, click Use this template, then click Create a new repository. Give your new repository a name, choose public or private, and click Create repository. This gives you your own separate project so your website changes stay in your account.
Step 2: Clone your new repository to your computer
git clone https://github.com/YOUR-USERNAME/YOUR-NEW-REPOSITORY.git
cd YOUR-NEW-REPOSITORY
Step 3: Install dependencies
npm install
Step 4: Start your AI agent
Claude Code is recommended for best results:
claude --chrome
Step 5: Run the skill
/clone-website https://example.com
Prerequisites
- Node.js 24 or higher
- An AI coding agent (see the supported platforms list)
- A browser MCP tool (Chrome MCP, Playwright MCP, Browserbase MCP, or Puppeteer MCP)
Verify the base build
Before cloning, confirm the scaffold builds cleanly:
npm run build
If the build fails, resolve any issues before running the clone skill — the pipeline expects a working base project.
9. Usage Examples
Basic cloning
Clone a single website with one command:
/clone-website https://stripe.com
The orchestrator will navigate to the URL, run reconnaissance, build the foundation, write component specs, dispatch parallel builders, assemble the page, and run visual QA.
Cloning multiple sites
You can pass multiple URLs in one command. They are processed independently and in parallel where possible, with each site’s extraction artifacts isolated in dedicated folders:
/clone-website https://stripe.com https://linear.app
Per-site folders like docs/research/<hostname>/ and docs/design-references/<hostname>/ keep artifacts separate.
Customizing after the clone
The design principle is “clone first, customize later.” Once the base clone is built, modify it as needed. Because the output is standard Next.js, you can continue editing with any AI agent:
# After the clone completes, start the dev server
npm run dev
Then iterate on the generated components in src/components/.
Running checks
npm run lint        # ESLint check
npm run typecheck   # TypeScript check
npm run build       # Production build
npm run check       # lint + typecheck + build
Using Docker
If you prefer containerized development:
docker compose up app --build   # build and run the app
docker compose up dev --build   # run the app in dev mode on port 3001
10. Template System
AI Website Cloner is itself a template — a reusable starting point you copy via GitHub’s “Use this template” button. The pre-scaffolded base includes Next.js 16 with the App Router, React 19, TypeScript strict mode, shadcn/ui (Radix primitives plus Tailwind CSS v4), and Lucide React icons. The cn() utility from shadcn is already in src/lib/utils.ts.
The template’s project structure is deliberately clean:
src/
  app/              # Next.js routes
  components/       # React components
    ui/             # shadcn/ui primitives
    icons.tsx       # Extracted SVG icons as React components
  lib/utils.ts      # cn() utility
  types/            # TypeScript interfaces
  hooks/            # Custom React hooks
public/
  images/           # Downloaded images from target
  videos/           # Downloaded videos from target
  seo/              # Favicons, OG images
docs/
  research/         # Extraction output & component specs
  design-references/ # Screenshots
When you run the clone skill, the orchestrator fills this structure with real content from the target site. The generated components are standard React/TypeScript, so they are immediately reusable and customizable. You can take a cloned section — say, a pricing card layout — and adapt it for your own projects, or use the entire cloned site as a starting point for a redesign.
A powerful aspect of the template system is its portability across AI agents. Two source-of-truth files power all platform support: AGENTS.md for project instructions and .claude/skills/clone-website/SKILL.md for the clone skill. Sync scripts regenerate platform-specific copies automatically:
bash scripts/sync-agent-rules.sh   # Regenerate agent instruction files
node scripts/sync-skills.mjs       # Regenerate /clone-website for all platforms
11. Asset Extraction
Asset extraction is where many manual clones fail, and it is where AI Website Cloner pays special attention. The pipeline does not just grab the obvious images — it enumerates everything.
The orchestrator runs a discovery script via browser MCP that collects every <img> element with its src, alt, natural dimensions, parent classes, sibling count, position, and z-index. It collects every <video> with its source, poster, and playback attributes. It walks the entire DOM to find elements with backgroundImage set. It counts inline SVGs and enumerates the distinct font families actually in use. It even grabs favicons and apple-touch-icons.
A key insight from the project is that layered assets matter. A section that looks like one image is often multiple layers: a background watercolor or gradient, a foreground UI mockup PNG, and an overlay icon. The extraction script inspects each container’s full DOM tree and enumerates all <img> elements and background images within it, including absolutely-positioned overlays. Missing an overlay image makes the clone look empty even if the background is correct.
Once discovered, assets are downloaded with a Node.js script (scripts/download-assets.mjs) that uses batched parallel downloads (four at a time) with proper error handling. Images go to public/images/, videos to public/videos/, and SEO assets (favicons, OG images, webmanifest) to public/seo/. Inline SVGs are deduplicated and saved as named React components in src/components/icons.tsx, named by visual function (e.g., SearchIcon, ArrowRightIcon, LogoIcon).
Fonts receive equal care. The orchestrator inspects <link> tags for Google Fonts or self-hosted fonts, checks computed font-family on key elements, and configures them in src/app/layout.tsx using next/font/google or next/font/local. This ensures the cloned typography renders identically to the original.
12. AI Coding Agent Integration
One of AI Website Cloner’s strongest features is its broad agent support. The project explicitly supports 12 different AI coding agents:
| Agent | Status |
|---|---|
| Claude Code | Recommended — Opus 4.8 |
| Codex CLI | Supported |
| OpenCode | Supported |
| GitHub Copilot | Supported |
| Cursor | Supported |
| Windsurf | Supported |
| Gemini CLI | Supported |
| Cline | Supported |
| Roo Code | Supported |
| Continue | Supported |
| Amazon Q | Supported |
| Augment Code | Supported |
| Aider | Supported |
This breadth is achieved through a clever architecture. Two source-of-truth files — AGENTS.md for project instructions and .claude/skills/clone-website/SKILL.md for the clone skill — are the canonical sources. Sync scripts (scripts/sync-agent-rules.sh and scripts/sync-skills.mjs) regenerate platform-specific copies automatically. Agents that read the source files natively (like Claude Code reading CLAUDE.md, which simply imports AGENTS.md) need no regeneration.
For example, CLAUDE.md contains just @AGENTS.md, so Claude Code picks up the full project instructions automatically. GEMINI.md does the same for Gemini CLI. Other agents have their own config directories (.cursor/, .windsurf/, .codex/, .continue/, .gemini/, .opencode/, .augment/, .amazonq/, .clinerules for Cline, .aider.conf.yml for Aider) that are regenerated from the source of truth.
This design means you are not locked into one agent. You can start with Claude Code for the best results, then hand the generated codebase to a teammate who uses Cursor or Windsurf for further customization. The project instructions travel with the repo, so any compliant agent understands the conventions: TypeScript strict mode, named exports, PascalCase components, camelCase utils, Tailwind utility classes (no inline styles), 2-space indentation, and mobile-first responsive design.
13. Performance and Accuracy
AI Website Cloner is designed for pixel-perfect fidelity, and its accuracy comes from a few deliberate design choices.
Exact values, not estimates. Every CSS value in a component spec comes from getComputedStyle(), not a human or AI estimate. The extraction script pulls fontSize, fontWeight, fontFamily, lineHeight, letterSpacing, color, padding, margin, width, height, display, flexDirection, gap, borderRadius, boxShadow, position, zIndex, opacity, transform, transition, and dozens more — the actual computed values, not Tailwind class guesses. This is why the project warns against approximating: “It looks like text-lg” is wrong if the computed value is 18px with a line-height of 24px but text-lg implies 28px.
Multi-state extraction. The pipeline does not extract only the default state. For tabbed content, it clicks each tab and extracts content per state. For scroll-dependent elements, it captures computed styles at scroll position 0 and again past the trigger threshold, then diffs the two to identify exactly which properties change, recording the transition CSS and the exact trigger threshold.
Interaction model identification. Before building any interactive section, the orchestrator definitively answers whether it is click-driven, scroll-driven, hover-driven, or time-driven. It scrolls first (before clicking) to observe autonomous changes. This prevents the single most expensive cloning mistake: building a click-based UI when the original is scroll-driven, which requires a complete rewrite rather than a CSS fix.
Parallelism for speed. By dispatching builders in git worktrees as soon as each spec is ready, the pipeline overlaps extraction and construction. Builders run concurrently, each in its own branch, and the orchestrator merges them with full context. This is what makes cloning a full page feasible in a reasonable timeframe.
Limitations and optimization tips. The clone is visual — it does not reproduce real backends, authentication, or real-time features. Mock data is used for demo purposes. Browser automation is mandatory; without a Chrome/Playwright/Browserbase/Puppeteer MCP, the skill cannot run. For best results, use Claude Code with Opus 4.8. To optimize, keep sections small (respect the ~150-line complexity budget), ensure the base build passes before cloning, and let the visual QA loop run to completion rather than accepting a “close enough” result.
14. Use Cases
AI Website Cloner is intended for legitimate, productive use cases. The project is explicit about what it is and is not for.
Platform migration. Rebuild a site you own from WordPress, Webflow, or Squarespace into a modern Next.js codebase. If your marketing site is stuck on a legacy CMS and you want to move to a modern stack, cloning gives you a working Next.js starting point that preserves your design — then you can wire up your real backend.
Lost source code. Your site is live but the repo is gone, the developer left, or the stack is legacy. AI Website Cloner lets you get the code back in a modern format. Point it at your live URL and recover a clean, editable codebase.
Learning. Deconstruct how production sites achieve specific layouts, animations, and responsive behavior by working with real code. Instead of staring at a screenshot and guessing how a sticky sidebar works, you get an actual React component with the IntersectionObserver logic spelled out.
Template generation. Clone a site whose layout you admire, then adapt the generated components for your own projects. The output is standard Next.js with shadcn/ui, so sections are immediately reusable.
Design inspiration. Study how leading sites handle complex interactions — scroll-driven tab switching, parallax layers, dark-to-light section transitions — by reading the generated code and the spec files that document the exact mechanisms.
What it is NOT for. The project is clear about ethical boundaries. It must not be used for phishing or impersonation, for passing off someone’s design as your own (logos, brand assets, and original copy belong to their owners), or for violating terms of service. Some sites explicitly prohibit scraping or reproduction — always check first. The tool is a development aid, not a license to steal.
15. Conclusion
AI Website Cloner represents a genuine shift in how we think about website reproduction. By combining a clean Next.js template with a multi-agent AI pipeline, it turns a task that used to take days of tedious DevTools work into a single command. The orchestrator inspects, the spec writer documents, the parallel builders construct, and the review agent verifies — all coordinated through auditable spec files that enforce exactness over estimation.
The project’s design principles are worth studying even if you never clone a site: completeness beats speed, small tasks produce perfect results, real content and real assets over placeholders, foundation first, extract how it looks AND how it behaves, identify the interaction model before building, extract every state not just the default, spec files are the source of truth, and the build must always compile. These are lessons hard-won from failed clones, and they generalize to any AI-assisted development work.
As AI coding agents grow more capable, tools like AI Website Cloner point toward a future where the gap between “I saw a website I like” and “I have a working codebase that looks like that” shrinks to a single command. The ethical guardrails — no phishing, no impersonation, respect for terms of service and intellectual property — are an important part of that future, ensuring the power is used for migration, recovery, and learning rather than deception.
If you want to try it yourself, head to JCodesMore/ai-website-cloner-template, click “Use this template,” and run /clone-website against any URL. With Claude Code and Opus 4.8, you will be watching an AI team rebuild a website in front of your eyes.
Related Posts

Enjoyed this post? Never miss out on future posts by following us


