Learn Terraform in a Single Post: Complete Tutorial From HCL and State to Modules, Providers, and Infrastructure as Code
Terraform is infrastructure as code: you describe the cloud resources you want — servers, databases, networks, DNS — in declarative config files, and Terraform creates, updates, and destroys them to match. No more clicking around the AWS console, no more “who created this EC2?”, no more drift between what exists and what’s documented. This single post teaches the whole tool in five stages, with hand-drawn diagrams and runnable HCL.
Learning Roadmap
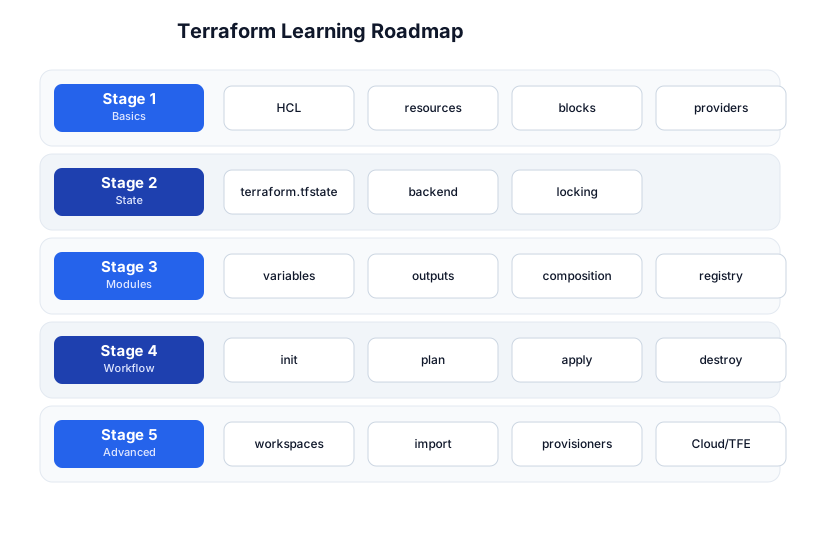
The roadmap moves from the language (Stage 1), through the state that tracks reality (Stage 2), reusable modules (Stage 3), the day-to-day workflow (Stage 4), and the advanced/managed layer (Stage 5). You’ll want Docker and Git context — IaC is the ops analog of those.
Stage 1 — Basics: HCL, Resources, Providers
What Terraform is
Terraform is a declarative tool: you write what infrastructure you want, Terraform figures out how to create/update/destroy it. It works across hundreds of providers (AWS, GCP, Azure, Kubernetes, GitHub, Datadog…) through a uniform interface — the same resource block shape for everything.
HCL — HashiCorp Configuration Language
# main.tf
terraform {
  required_providers {
    aws = { source = "hashicorp/aws", version = "~> 5.0" }
  }
}

provider "aws" {
  region = "us-east-1"
}

resource "aws_s3_bucket" "uploads" {
  bucket = "my-app-uploads-prod"
  tags   = { Environment = "prod" }
}

resource "aws_instance" "web" {
  ami           = "ami-0c7217cdde317cf16"
  instance_type = "t3.micro"
  tags          = { Name = "web-server" }
}
The building blocks:
terraform {}— Terraform settings (required providers, backend).provider "aws" {}— configures a provider (region, credentials).resource "TYPE" "NAME" {}— the core unit: one piece of infrastructure.TYPEis provider-defined (aws_s3_bucket),NAMEis your label (referenced asaws_s3_bucket.uploads).variable "NAME" {}— input (Stage 3).output "NAME" {}— exported value (Stage 3).data "TYPE" "NAME" {}— read an existing resource you didn’t create with Terraform.
Attributes reference each other
resource "aws_instance" "web" {
  ami           = "ami-0c7217cdde317cf16"
  instance_type = var.instance_type        # variable
  subnet_id     = aws_subnet.public.id    # attribute of another resource
  tags          = { Name = "web" }
}
Resources expose attributes you reference with TYPE.NAME.ATTRIBUTE — wiring resources together (a subnet ID into an instance).
Pitfall: HCL is declarative — order of blocks in the file doesn’t matter; Terraform computes a dependency graph. Don’t try to “order” your resources top-to-bottom like a script; reference attributes and let Terraform figure out the order.
Stage 2 — State
What state is and why it matters
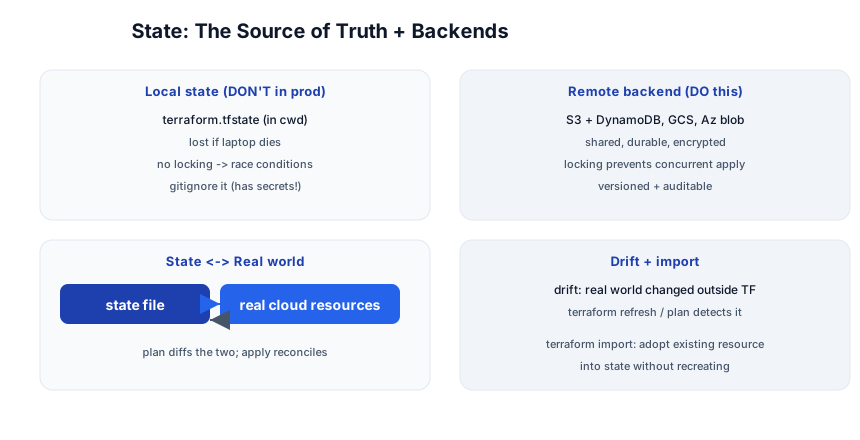
Terraform needs to know what it already created so it can diff your config against reality. That record is the state file (terraform.tfstate) — a JSON map of every resource Terraform manages, its IDs, and its attributes.
# store state remotely (DO THIS in any team)
terraform {
  backend "s3" {
    bucket         = "my-tf-state"
    key            = "prod/main.tfstate"
    region         = "us-east-1"
    dynamodb_table = "tf-locks"   # locking
    encrypt        = true
  }
}
| Local state | Remote backend | |
|---|---|---|
| Where | terraform.tfstate in cwd | S3/GCS/Azure blob/TF Cloud |
| Shared | no | yes (team) |
| Durable | lost if laptop dies | durable, encrypted |
| Locking | none (race conditions) | yes (DynamoDB/table-based) |
| Secrets in it | yes — gitignore it! | encrypted at rest |
Pitfall: The state file contains secrets (resource passwords, tokens) and is the source of truth for your infrastructure. Never commit it to Git (add to
.gitignore); always use a remote backend with locking. If two peopleapplyconcurrently without locking, you corrupt state.
Drift and import
- Drift — someone changed a resource outside Terraform (in the console), so state doesn’t match reality.
terraform plandetects it (shows an unexpected diff);terraform applyreconciles it back to your config. terraform import— adopt an existing resource (created by hand or another tool) into Terraform state, so Terraform manages it going forward without recreating it:
terraform import aws_s3_bucket.uploads my-app-uploads-prod
# then add the matching resource block to your .tf file
Stage 3 — Modules
Why modules
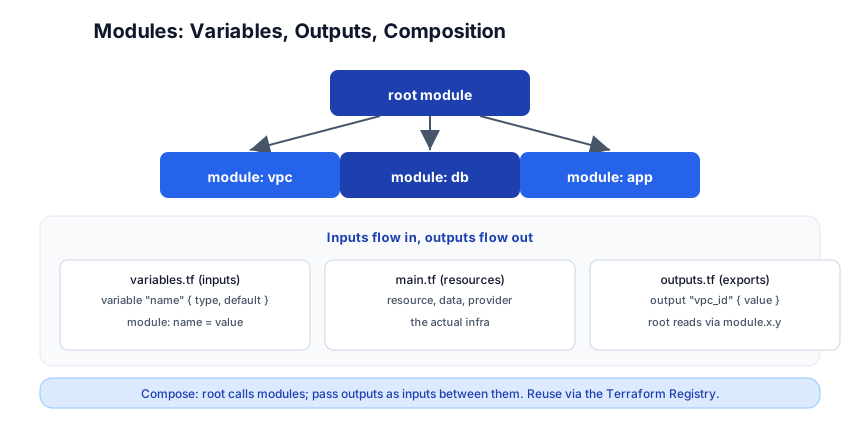
Copy-pasting resource blocks across environments (dev/staging/prod) doesn’t scale. A module is a reusable, parameterized bundle of resources — a function for infrastructure.
Module structure
modules/
  vpc/
    variables.tf    # inputs
    main.tf          # the resources
    outputs.tf       # exports
# modules/vpc/variables.tf
variable "cidr"         { type = string }
variable "name"         { type = string }
variable "azs"          { type = list(string) }

# modules/vpc/main.tf
resource "aws_vpc" "this" {
  cidr_block = var.cidr
  tags       = { Name = var.name }
}

# modules/vpc/outputs.tf
output "vpc_id" { value = aws_vpc.this.id }
Use a module
# main.tf (root module)
module "vpc" {
  source = "./modules/vpc"
  cidr   = "10.0.0.0/16"
  name   = "prod-vpc"
  azs    = ["us-east-1a", "us-east-1b"]
}

resource "aws_instance" "web" {
  subnet_id = module.vpc.vpc_id   # read a module output
}
source can be a local path, a Git URL, or a Terraform Registry module (e.g. terraform-aws-modules/vpc/aws). The Registry has thousands of community-maintained, tested modules — don’t reinvent a VPC module; use the canonical one.
Composition
The root module composes child modules, passing one module’s output as another module’s variable. This is how you build a full stack (VPC → DB → app → DNS) from small, reusable pieces.
Pitfall: A module that’s too big (a “kitchen sink”) is worse than copy-paste. Keep modules small and focused — one module per concern (VPC, DB, app, DNS). Compose them at the root.
Stage 4 — The Workflow
init → plan → apply → destroy
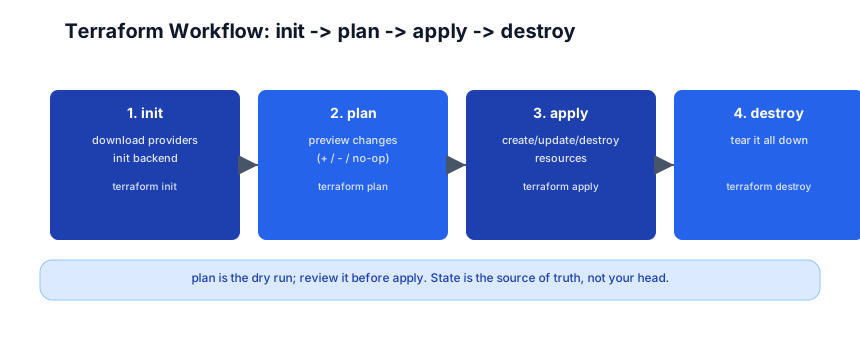
terraform init      # download providers, init the backend
terraform fmt       # format the .tf files (like gofmt)
terraform validate  # static check of syntax + internal consistency
terraform plan      # DRY RUN: show what will change (+ / - / ~)
terraform apply     # execute the plan (prompts "yes")
terraform destroy   # tear everything down
plan is the most important command. Always review the plan before apply — it shows exactly what will be created (+), changed (~), or destroyed (-). In a team, plan in CI (Terraform Cloud / a PR check) so a human reviews the diff before it runs.
terraform plan -out=tfplan     # save the plan
terraform apply tfplan          # apply exactly that plan (no re-plan, no surprises)
Pitfall: Running
terraform applywithout reviewingplanfirst is how prod gets taken down. In any team environment, runplanin CI on every PR and require a human review of the diff beforeapply.
Stage 5 — Advanced
Workspaces (use sparingly)
terraform workspace new staging
terraform workspace select prod
A workspace is a named slice of the same state — the same config, different state file per workspace (dev/staging/prod). Use sparingly: workspaces hide which environment you’re hitting, which is dangerous. Most teams prefer separate directories + variable files (envs/prod/, envs/staging/) — explicit, harder to mistake.
Providers — hundreds available
| Provider | Manages |
|---|---|
aws, google, azurerm | cloud compute/network/DB |
kubernetes, helm | K8s resources + Helm releases |
github | repos, teams, actions secrets |
datadog, pagerduty | monitoring/alerting |
A data source reads an existing resource you didn’t create with TF (an AMI, a zone ID):
data "aws_ami" "latest" { most_recent = true; filter { name = "name"; values = ["amzn2-ami-*"] } }
resource "aws_instance" "web" { ami = data.aws_ami.latest.id }
Provisioners (last resort)
resource "aws_instance" "web" {
  # ...
  provisioner "remote-exec" {
    connection { host = self.public_ip, type = "ssh", user = "ec2-user" }
    inline = ["sudo yum install -y nginx"]
  }
}
Provisioners run commands after a resource is created. They’re a last resort — they’re not tracked in state, so they don’t re-run on update and can’t be cleanly undone. Prefer configuration management (Ansible, user-data, a Packer-built AMI) over provisioners.
Terraform Cloud / Enterprise
Terraform Cloud (managed) and Terraform Enterprise (self-hosted) add:
- Remote runs —
applyhappens on Terraform’s servers, not your laptop, with the plan shown in a UI for review. - CI/CD —
planon every PR, gatedapply. - Policy as code — Sentinel / OPA policies that block non-compliant plans (e.g. “no S3 bucket without encryption”).
- Workspaces + RBAC — per-team, per-env access control.
For solo/small teams, the CLI + a remote backend is enough. Terraform Cloud’s free tier covers small teams and adds the PR-plan review that’s worth its weight in gold.
The ecosystem
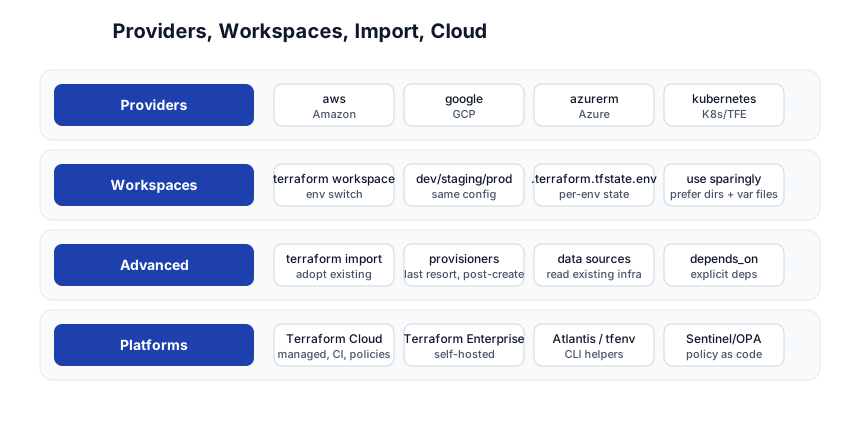
| Concern | Tool |
|---|---|
| Providers | aws, google, azurerm, kubernetes, github, datadog |
| Workspaces | env switching (prefer dirs + var files) |
| Advanced | import (adopt), provisioners (last resort), data (read existing), depends_on |
| Platforms | Terraform Cloud (managed), Terraform Enterprise (self-hosted), tfenv (version manager), Sentinel/OPA (policy) |
Quick-Start Checklist
- Install Terraform (
brew install terraform/ download); verifyterraform -v. - Set cloud creds in env (
AWS_ACCESS_KEY_ID, etc.) — never in.tffiles. - Write a 1-resource
main.tf— an S3 bucket — and runinit. - Run
planand read every line beforeapply. - Use a remote backend with locking for any team project.
- Gitignore
terraform.tfstateand any*.tfstate.backup. - Extract a module for anything you reuse (VPC, DB, app).
- Use Registry modules for standard patterns (don’t reinvent a VPC).
- Run
planin CI (PR check) and require human review beforeapply. terraform destroywhen done with a sandbox — don’t leave resources running.
Common Pitfalls
- Committing state to Git — it has secrets and is the source of truth; gitignore it and use a remote backend.
- No backend locking — concurrent
applycorrupts state; use DynamoDB/table locks. applywithout reviewingplan— how prod dies; review every line, especially-(destroy).- Hardcoding secrets in
.tf— use variables from env / a secrets manager; never literals. - Big “kitchen-sink” modules — keep modules focused; compose at the root.
- Reinventing standard modules — use the Terraform Registry’s canonical VPC/DB modules.
- Provisioners for config — they’re not idempotent or tracked; use user-data/Packer/Ansible.
- Workspaces for prod vs dev — too easy to mis-target; prefer separate dirs + var files.
- Ignoring drift — run
planregularly; reconcile console changes back to config (orimportthen adopt).
Further Reading
- Terraform Docs — the official reference
- Terraform Registry — providers + modules
- Terraform Best Practices — community patterns
- Terraform: Up & Running by Yevgeniy Brikman — the canonical book
- Terraform AWS Provider Docs — every resource, exhaustively
Related guides
Terraform is the IaC layer of the DevOps stack — these PyShine tutorials connect to it:
- Learn Docker in One Post — Terraform provisions the machines that run containers; the two compose.
- Learn Kubernetes in One Post — the
kubernetes/helmproviders manage K8s resources from Terraform. - Learn Git in One Post — IaC lives in Git; review plans on PRs like code review.
- Learn GitHub Actions in One Post — run
terraform planin CI on every PR. - Learn System Design in One Post — the infra you design, Terraform provisions.
Terraform’s value is that infrastructure becomes reviewable, versioned, repeatable — a diff in a PR instead of a click in a console. The five stages here — HCL, state, modules, the workflow, advanced — cover everything from one S3 bucket to a multi-environment, module-composed, CI-gated infrastructure. The two habits that pay off forever: always review Enjoyed this post? Never miss out on future posts by following us plan before apply (it’s the only thing between you and a destroyed prod database), and treat state as the source of truth — remote backend, locking, gitignored. Write a main.tf with one bucket, run init → plan → apply, then destroy it — once you’ve seen a resource appear and disappear from a config file, the model clicks.