Introduction
If you are building modern web applications, working with AI coding tools, or developing any JavaScript-based project, Node.js is the foundation of your development environment. But managing multiple Node.js versions across different projects can quickly become a headache. That is where NVM (Node Version Manager) comes in – it lets you install, switch, and manage multiple Node.js versions seamlessly on a single machine.
Claude Code, Anthropic’s AI-powered coding assistant, requires Node.js to run via its npm package. Whether you are setting up a fresh development machine or migrating from an older Node.js installation, this guide walks you through every step: from installing NVM, to managing Node.js versions, to getting Claude Code up and running.
By the end of this guide, you will have a fully configured development environment with NVM managing your Node.js versions and Claude Code ready to assist you in writing better code, faster.
What is Node.js?
Node.js is a JavaScript runtime built on Chrome’s V8 JavaScript engine. It allows developers to run JavaScript on the server side, enabling full-stack JavaScript development without switching languages between frontend and backend. Since its creation by Ryan Dahl in 2009, Node.js has become one of the most popular platforms for building web servers, APIs, real-time applications, and command-line tools.
At its core, Node.js relies on three key components that work together to deliver its signature performance:
-
V8 Engine: Google’s open-source JavaScript engine that compiles JavaScript directly to machine code, providing near-native execution speed. V8 is the same engine that powers the Chrome browser, ensuring consistent behavior between server and client environments.
-
libuv: A C library that provides the event loop and asynchronous I/O capabilities. libuv abstracts platform-specific I/O operations (file system, network, DNS) into a uniform interface, allowing Node.js to handle thousands of concurrent connections efficiently without blocking the main thread.
-
Event Loop: The heart of Node.js’s non-blocking architecture. Instead of creating a new thread for each request, the event loop processes operations asynchronously, queuing callbacks and executing them when their corresponding I/O operations complete. This design makes Node.js exceptionally well-suited for I/O-intensive applications.
Node.js also ships with a rich set of core modules (fs, http, path, crypto, and more) and includes npm (Node Package Manager), the world’s largest software registry with over 2 million packages. The combination of a fast runtime, a massive ecosystem, and a vibrant community makes Node.js indispensable for modern development.
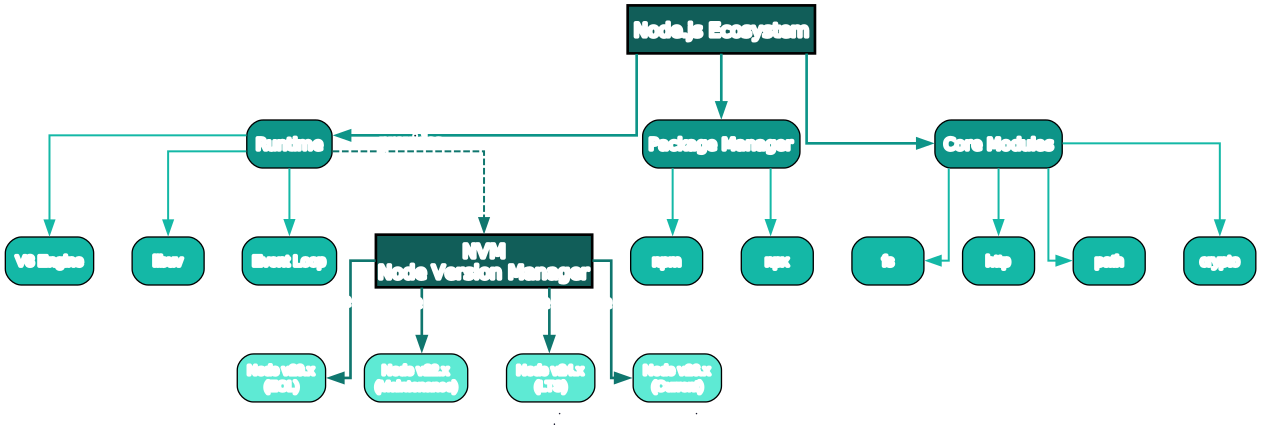
The diagram above illustrates the Node.js ecosystem architecture. At the top level, the ecosystem is organized into three pillars: the Runtime (powered by the V8 engine, libuv, and the event loop), the Package Manager (npm and npx for dependency management and script execution), and Core Modules (built-in modules like fs, http, path, and crypto). Below these pillars sits NVM, the Node Version Manager, which provides the ability to manage multiple Node.js versions simultaneously – from legacy v20.x to the current v26.x release. NVM acts as the bridge between your development environment and the specific Node.js runtime each project requires.
Node.js Versions Explained
Node.js follows a predictable release cycle with two primary release lines:
-
LTS (Long Term Support): These versions receive security updates, bug fixes, and performance improvements for 30 months. LTS releases are recommended for production environments because of their stability guarantees. Even-numbered major versions (20, 22, 24) are designated as LTS releases.
-
Current: The latest stable release with the newest features and improvements. Current releases are ideal for developers who need cutting-edge features and are willing to accept a shorter support window. Odd-numbered major versions (25, 26) typically start as Current releases.
As of July 2026, the current Node.js versions are:
| Release Line | Version | npm Version | Status |
|---|---|---|---|
| LTS | v24.18.0 | 11.16.0 | Active LTS |
| Current | v26.5.0 | 11.x | Current |
To check your installed Node.js version, run:
node -v
This outputs something like v24.18.0. If you need a specific version for a project, NVM makes switching between versions effortless – which brings us to the next section.
What is NVM?
NVM (Node Version Manager) is a command-line utility that allows you to install and manage multiple versions of Node.js on a single machine. Without NVM, you would need to manually download, install, and configure Node.js versions, and switching between them would require uninstalling and reinstalling – a tedious and error-prone process.
With NVM, you can:
- Install any Node.js version with a single command
- Switch between versions instantly in your current shell
- Set a default version for new terminal sessions
- Use project-specific versions via
.nvmrcfiles - Avoid permission issues with global npm packages (no more
sudo npm install)
The .nvmrc file is particularly powerful for team projects. By placing a .nvmrc file in your project root that contains a version number (e.g., 20 or v24.18.0), any developer on your team can run nvm use in the project directory, and NVM will automatically read the file and switch to the correct version. This ensures everyone on the team is using the same Node.js version, eliminating “works on my machine” issues.
NVM works on macOS, Linux, and WSL (Windows Subsystem for Linux). For native Windows users, alternatives like nvm-windows, nodist, and nvs provide similar functionality.
NVM Installation
Installing NVM is straightforward. Open your terminal and run the curl command below. This downloads and executes the NVM installation script, which clones the NVM repository to ~/.nvm and adds the necessary configuration to your shell profile file (~/.bashrc, ~/.zshrc, ~/.profile, or ~/.bash_profile).
Using curl (recommended):
curl -o- https://raw.githubusercontent.com/nvm-sh/nvm/v0.40.5/install.sh | bash
Using wget:
wget -qO- https://raw.githubusercontent.com/nvm-sh/nvm/v0.40.5/install.sh | bash
After the installation script completes, you need to either restart your terminal or source your shell profile to load NVM:
source ~/.bashrc
Or, if you use Zsh:
source ~/.zshrc
Verify the installation by checking the NVM version:
nvm --version
This should output 0.40.5 (or whatever the latest version is at the time of your installation). If you see nvm: command not found, see the Troubleshooting section below.
Essential NVM Commands
NVM provides a comprehensive set of commands for managing Node.js versions. Here is a complete reference of the most important commands you will use day-to-day:
| Command | Description |
|---|---|
nvm install <version> | Install a specific Node.js version |
nvm install 24 | Install the latest Node.js 24.x |
nvm install --lts | Install the latest LTS version |
nvm use <version> | Switch to a specific version in the current shell |
nvm use 24 | Use Node.js 24.x in the current shell |
nvm ls | List all installed Node.js versions |
nvm ls-remote | List all available Node.js versions for install |
nvm alias default <version> | Set the default Node.js version for new shells |
nvm current | Display the currently active Node.js version |
nvm deactivate | Disable NVM’s Node.js version (revert to system Node) |
nvm run <version> <script> | Run a script using a specific Node.js version |
nvm exec <version> <command> | Execute a command with a specific Node.js version |
nvm uninstall <version> | Remove an installed Node.js version |
nvm reinstall-packages <from> | Reinstall global npm packages from another version |
nvm version | Display the installed NVM version |
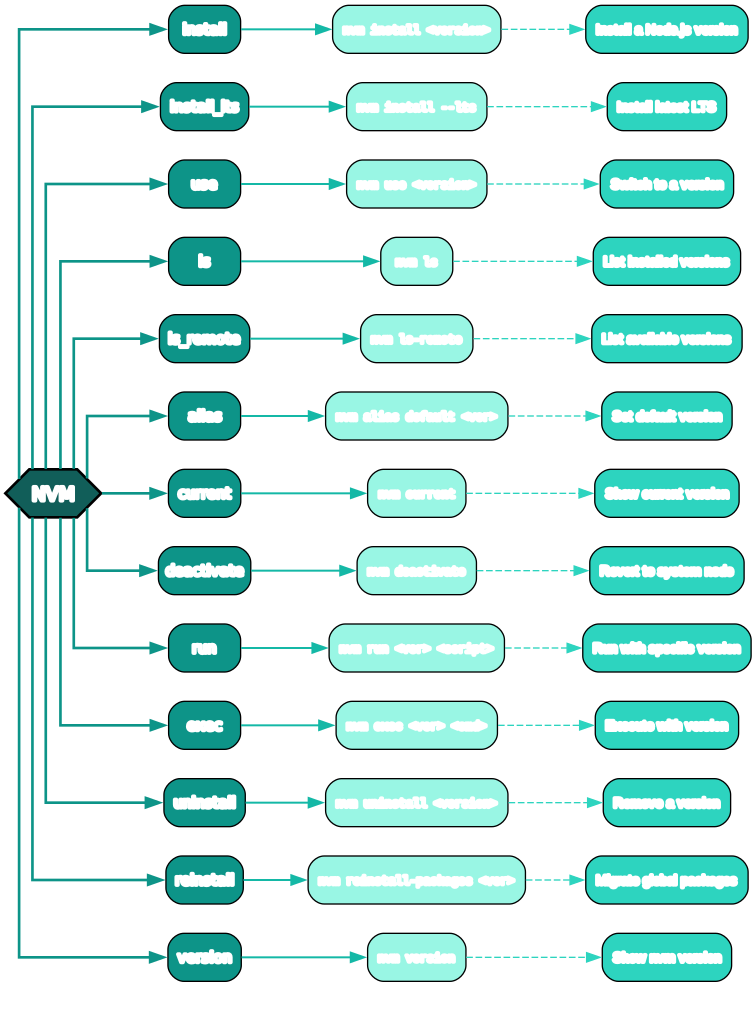
The diagram above shows the NVM command reference as a branching flowchart. At the center is the NVM hexagon, which branches out to each command category. Each branch shows the command name, its full syntax, and a brief description of what it does. The most frequently used commands are nvm install for adding new versions, nvm use for switching versions, and nvm alias default for setting your preferred version. The nvm deactivate command is particularly useful when you want to temporarily revert to the system-installed Node.js without uninstalling NVM-managed versions.
Common NVM Workflows
Installing and switching to the latest LTS:
nvm install --lts
nvm use --lts
nvm alias default 'lts/*'
Installing a specific version and making it default:
nvm install 24
nvm use 24
nvm alias default 24
Using a project-specific version with .nvmrc:
# In your project directory, create .nvmrc
echo "24" > .nvmrc

# Then, anyone on the team can run:
nvm use
Migrating global packages when upgrading:
nvm install 26
nvm reinstall-packages 24
This reinstalls all global npm packages from Node.js 24 into your new Node.js 26 installation, saving you from manually reinstalling each package.
NVM on Windows
NVM is designed for Unix-like systems (macOS, Linux, WSL). If you are running native Windows (not WSL), you have several alternatives:
nvm-windows is the most popular option and provides a nearly identical command set to the original NVM:
- Download from: https://github.com/coreybutler/nvm-windows
- Install via:
winget install CoreyButler.NVMforWindows - Commands are similar:
nvm install 24,nvm use 24,nvm list,nvm uninstall 24
nodist is another option that provides version management with a slightly different interface:
- Download from: https://github.com/nodists/nodist
- Uses commands like
nodist +24andnodist 24
nvs (Node Version Switcher) is a cross-platform version manager:
- Download from: https://github.com/nvs/nvs
- Works on Windows, macOS, and Linux
- Supports
.node-versionand.nvmrcfiles
For the best experience on Windows, we recommend using WSL (Windows Subsystem for Linux) with the official NVM, as it provides the most consistent experience with the broader Node.js ecosystem and tutorials.
Installing Claude Code
Claude Code is Anthropic’s AI-powered coding assistant that integrates directly into your terminal. It can understand your codebase, write code, debug issues, and explain complex logic – all from the command line. There are multiple ways to install it depending on your platform and preferences.
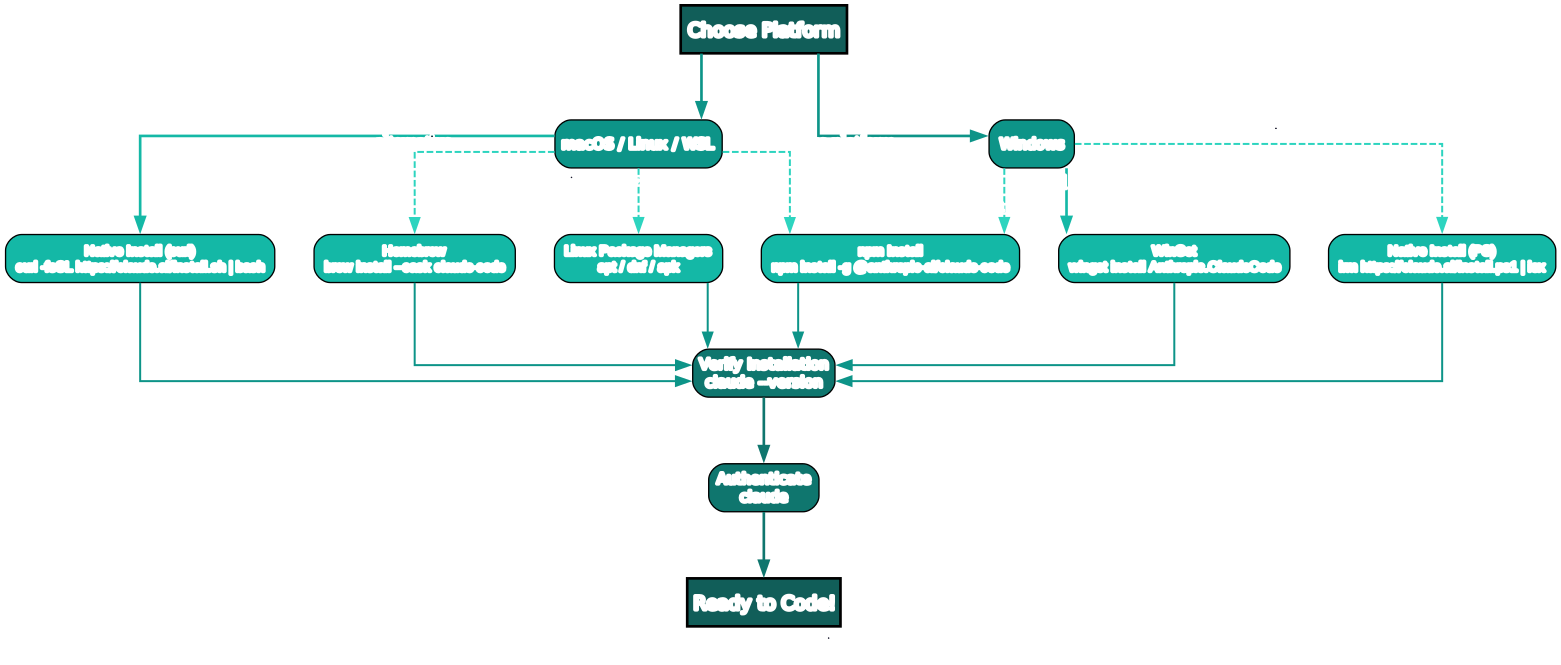
The diagram above illustrates the Claude Code installation flow. Starting from the top, you choose your platform (macOS/Linux/WSL or Windows). For macOS, Linux, and WSL, the recommended method is the native curl installer, with Homebrew as an alternative. For Windows, WinGet is the recommended method, with the native PowerShell installer as an alternative. The npm install method works across all platforms as a cross-platform option. After installation, you verify with claude --version, authenticate with claude, and you are ready to code.
Method 1: Native Install (Recommended)
The native installer is the fastest and most reliable way to get Claude Code running. It handles dependencies and configuration automatically.
macOS / Linux / WSL:
curl -fsSL https://claude.ai/install.sh | bash
Windows PowerShell:
irm https://claude.ai/install.ps1 | iex
Windows Command Prompt:
curl -fsSL https://claude.ai/install.cmd -o install.cmd && install.cmd && del install.cmd
Method 2: Homebrew (macOS)
If you use Homebrew on macOS, you can install Claude Code as a cask:
brew install --cask claude-code
Method 3: WinGet (Windows)
Windows users with WinGet can install Claude Code directly:
winget install Anthropic.ClaudeCode
Method 4: npm Global Install
The npm method works on any platform with Node.js installed. This is the method that requires NVM-managed Node.js:
npm install -g @anthropic-ai/claude-code
This method is particularly useful if you want to manage Claude Code alongside other global npm packages or if you need version-specific installations.
Method 5: Linux Package Managers
Claude Code is also available through native Linux package managers:
# Debian/Ubuntu
sudo apt install claude-code

# Fedora/RHEL
sudo dnf install claude-code

# Alpine
sudo apk add claude-code
System Requirements
Before installing Claude Code, ensure your system meets these minimum requirements:
| Requirement | Minimum |
|---|---|
| macOS | 13+ (Ventura or later) |
| Windows | 10 version 1809+ |
| Ubuntu | 20.04+ |
| RAM | 4 GB+ |
| Account | Claude Pro, Max, Team, Enterprise, or Console |
Verifying Installation
After installing Claude Code through any method, verify the installation:
claude --version
Then run the built-in diagnostics:
claude doctor
This checks your environment, dependencies, and configuration, reporting any issues that need attention.
Complete Setup Workflow
Now let us walk through the complete setup process from scratch – from a fresh machine to a fully configured development environment with NVM, Node.js, and Claude Code.
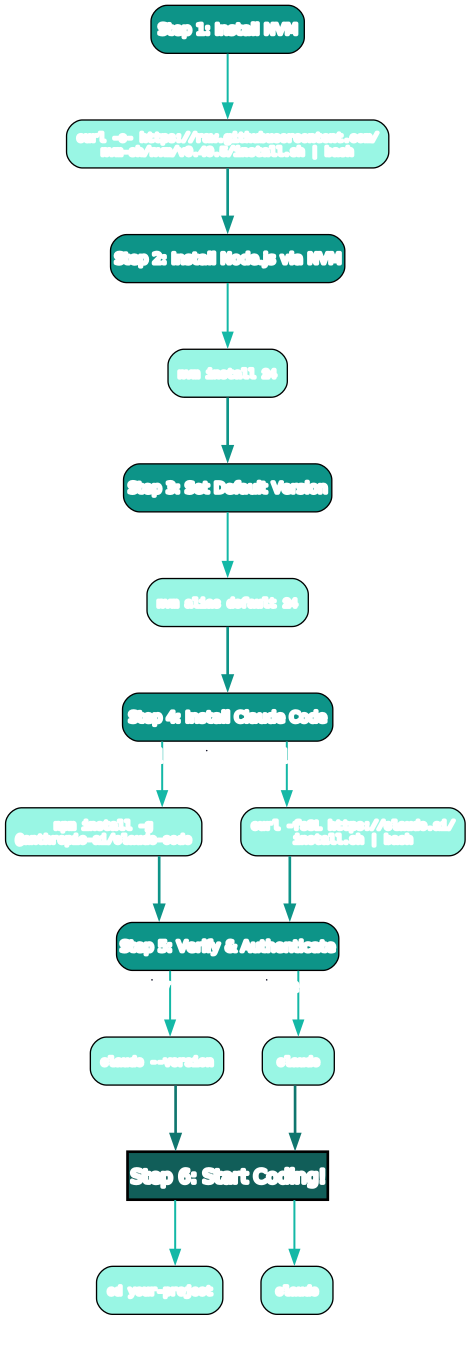
The diagram above shows the complete developer workflow as a step-by-step process. Each step includes the specific command you need to run. The workflow begins with installing NVM, progresses through installing and configuring Node.js, then installing Claude Code (with two method options: npm or native), and concludes with verification and authentication before you start coding.
Step 1: Install NVM
curl -o- https://raw.githubusercontent.com/nvm-sh/nvm/v0.40.5/install.sh | bash
source ~/.bashrc
This downloads and installs NVM, then reloads your shell configuration. After this step, the nvm command should be available in your terminal.
Step 2: Install Node.js via NVM
nvm install 24
This installs the latest Node.js 24.x LTS release. NVM downloads the binary, sets it up, and makes it available in your current shell. You can verify with node -v.
Step 3: Set Default Version
nvm alias default 24
This ensures that every new terminal session automatically uses Node.js 24.x. Without this, new shells would revert to whatever system Node.js is installed (or none at all).
Step 4: Install Claude Code
Choose one of two methods:
Option A: npm global install (requires Node.js):
npm install -g @anthropic-ai/claude-code
Option B: Native install (does not require Node.js):
curl -fsSL https://claude.ai/install.sh | bash
Both methods result in a working Claude Code installation. The npm method is convenient if you already have Node.js set up via NVM, while the native installer is simpler and does not depend on Node.js.
Step 5: Verify and Authenticate
claude --version
claude
The first command confirms Claude Code is installed and shows the version number. The second command launches the authentication flow, which opens a browser window for you to sign in with your Claude account (Pro, Max, Team, Enterprise, or Console).
Step 6: Start Coding
cd your-project
claude
Navigate to your project directory and launch Claude Code. It will analyze your codebase and be ready to assist you with coding tasks, debugging, refactoring, and more.
Troubleshooting
Here are the most common issues you might encounter and how to resolve them:
nvm: command not found
This error means your shell does not know about NVM. It typically happens after installation if you have not reloaded your shell configuration.
Solution: Source your shell config or restart your terminal:
source ~/.bashrc
If the problem persists, check that the NVM initialization lines were added to your shell profile (~/.bashrc, ~/.zshrc, or ~/.profile). They should look like:
export NVM_DIR="$HOME/.nvm"
[ -s "$NVM_DIR/nvm.sh" ] && \. "$NVM_DIR/nvm.sh"
[ -s "$NVM_DIR/bash_completion" ] && \. "$NVM_DIR/bash_completion"
Node Version Not Switching
If nvm use <version> does not seem to change the active Node.js version, check the current version:
nvm current
node -v
Make sure the version you are trying to use is actually installed (nvm ls). If you see a system Node.js taking precedence, use nvm deactivate to disable the NVM-managed version and then nvm use <version> to switch.
Permission Errors with npm Global Packages
If you see EACCES errors when running npm install -g, it usually means you are trying to install global packages into a system Node.js directory that requires sudo. With NVM, this should not happen because NVM installs Node.js into your home directory.
Solution: Make sure you are using NVM’s Node.js:
which node
# Should output something like: /home/user/.nvm/versions/node/v24.18.0/bin/node
# NOT: /usr/local/bin/node
If which node points to a system directory, run nvm use to switch to an NVM-managed version.
Claude Code Not Found After Install
If claude --version returns command not found, the Claude Code binary is not in your PATH.
Solution: Check your PATH and reinstall if necessary:
# Check if claude is in PATH
which claude

# If not found, reinstall
npm install -g @anthropic-ai/claude-code

# Or with the native installer
curl -fsSL https://claude.ai/install.sh | bash
Windows PATH Issues
On Windows, PATH issues are common after installing Node.js or NVM-windows. Ensure the Node.js and NVM directories are in your system PATH:
- Open System Properties > Environment Variables
- Check that
C:\Program Files\nodejsor your NVM symlink path is in PATH - Restart your terminal after making changes
Upgrading from an Older Node.js Version
If you are currently running Node.js 20 (or any older version) and need to upgrade to the latest LTS, NVM makes the process seamless. Here is how to upgrade safely without losing your global packages or breaking your projects.
Step-by-Step Upgrade from Node.js 20 to 24
1. Check your current version:
node -v
# Output: v20.20.1 (or similar)
2. Install the new LTS version:
nvm install 24
# Output: Now using node v24.18.0 (npm v11.16.0)
3. Migrate your global npm packages:
This is the critical step that most people miss. When you install a new Node.js version with NVM, it starts with a clean slate – your globally installed packages from the old version are not carried over. The nvm reinstall-packages command solves this:
nvm reinstall-packages 20
This reinstalls all global npm packages that were installed under Node.js 20 into your new Node.js 24 installation. Packages like @anthropic-ai/claude-code, typescript, eslint, and any other global tools will be automatically reinstalled.
4. Set the new version as default:
nvm alias default 24
5. Verify everything works:
node -v          # Should show v24.18.0
npm -v           # Should show v11.16.0
claude --version # Should show Claude Code version
6. (Optional) Remove the old version:
Once you have confirmed everything works with the new version, you can free up disk space by removing the old version:
nvm uninstall 20
Only do this after verifying that all your projects work correctly with the new version. Some projects may have dependencies that are pinned to specific Node.js versions.
What Happens to Your Projects?
Your projects will continue to work because NVM allows you to switch versions per shell session. If a project requires Node.js 20, you can still use it:
cd legacy-project
nvm use 20
node -v  # v20.20.1
For projects that use .nvmrc files, NVM will automatically switch to the correct version when you run nvm use in the project directory.
Handling Breaking Changes
When upgrading across major versions (e.g., 20 to 24), be aware of potential breaking changes:
- Node.js 22: Introduced stable WebSocket support, improved
fetch, and betternode:testmodule - Node.js 24: Includes npm 11, V8 13.6 engine, stable
node:sqlitemodule, and improved--experimental-strip-typesfor TypeScript
Check the Node.js changelog for a complete list of changes: https://nodejs.org/en/blog/release/
Run your project’s test suite after upgrading to catch any compatibility issues:
npm test
If tests fail, you can always switch back:
nvm use 20
Platform-Specific Installation Issues
Different operating systems have their own quirks when it comes to installing NVM, Node.js, and Claude Code. Here are the most common issues and their solutions for each platform.
macOS Issues
Problem: nvm: command not found after installation on macOS
On macOS, the default shell changed from Bash to Zsh starting with Catalina (10.15). If NVM installs its configuration into ~/.bashrc but you are using Zsh, the commands will not be available.
Solution: Add the NVM initialization lines to ~/.zshrc:
echo 'export NVM_DIR="$HOME/.nvm"' >> ~/.zshrc
echo '[ -s "$NVM_DIR/nvm.sh" ] && \. "$NVM_DIR/nvm.sh"' >> ~/.zshrc
echo '[ -s "$NVM_DIR/bash_completion" ] && \. "$NVM_DIR/bash_completion"' >> ~/.zshrc
source ~/.zshrc
Problem: Xcode command line tools not installed
NVM requires Git to clone its repository. On macOS, Git comes with the Xcode command line tools.
Solution: Install them with:
xcode-select --install
Problem: Apple Silicon (M1/M2/M3/M4) Node.js compilation errors
On Apple Silicon Macs, some older Node.js versions (below v16) may fail to compile from source.
Solution: Use Node.js v16+ which has native arm64 binaries:
nvm install 24 # Native arm64 binary available
If you must use an older version, install Rosetta 2 first:
softwareupdate --install-rosetta
Linux Issues
Problem: nvm: command not found on Linux
After running the NVM install script, the shell may not pick up the new configuration.
Solution: Source your shell config or restart the terminal:
# For Bash users
source ~/.bashrc

# For Zsh users
source ~/.zshrc
If that does not work, manually add the NVM lines to your shell profile and source again.
Problem: Missing build tools (C++ compiler)
Some Node.js versions need to compile from source, which requires a C++ compiler and related build tools.
Solution: Install build essentials:
# Debian/Ubuntu
sudo apt-get install build-essential libssl-dev

# Fedora/RHEL
sudo dnf groupinstall "Development Tools"
sudo dnf install openssl-devel

# Alpine
apk add build-base openssl-dev
Problem: Permission denied on global npm packages
If you installed Node.js system-wide (without NVM), global npm installs may require sudo.
Solution: Switch to NVM-managed Node.js to avoid permission issues entirely:
nvm use 24
which node  # Should show ~/.nvm/versions/node/... path
npm install -g @anthropic-ai/claude-code  # No sudo needed
Windows Issues
Problem: NVM is not available on native Windows
The official nvm-sh/nvm does not support Windows natively. It only works in WSL (Windows Subsystem for Linux).
Solution: Use one of these Windows-compatible alternatives:
- nvm-windows (recommended):
winget install CoreyButler.NVMforWindowsThen use similar commands:
nvm install 24,nvm use 24 - nvs (cross-platform):
winget install jasongin.nvs - WSL (best compatibility):
wsl --installThen install NVM inside WSL following the standard Linux instructions.
Problem: node -v shows wrong version on Windows
nvm-windows requires running the terminal as Administrator to switch versions.
Solution: Run Command Prompt or PowerShell as Administrator, then:
nvm use 24
Problem: Claude Code install fails on Windows PowerShell
The irm command may fail if PowerShell execution policy blocks script execution.
Solution: Temporarily set the execution policy:
Set-ExecutionPolicy -ExecutionPolicy RemoteSigned -Scope CurrentUser
irm https://claude.ai/install.ps1 | iex
Problem: 'irm' is not recognized error
This means you are running in CMD, not PowerShell. The irm (Invoke-RestMethod) cmdlet is PowerShell-only.
Solution: Use the CMD-specific install command instead:
curl -fsSL https://claude.ai/install.cmd -o install.cmd && install.cmd && del install.cmd
WSL (Windows Subsystem for Linux) Issues
Problem: NVM install fails inside WSL
WSL may not have curl or git installed by default.
Solution: Install prerequisites first:
sudo apt update
sudo apt install curl git -y
curl -o- https://raw.githubusercontent.com/nvm-sh/nvm/v0.40.5/install.sh | bash
source ~/.bashrc
Problem: Node.js performance is slow in WSL1
WSL1 does not have a real Linux kernel, which can cause performance issues with Node.js file system operations.
Solution: Upgrade to WSL2 for native Linux kernel performance:
# In Windows PowerShell (as Administrator)
wsl --set-default-version 2
wsl --update
Problem: Claude Code cannot find Git Bash in WSL
Claude Code in WSL uses the Linux shell directly, so this is not an issue. However, if you are running Claude Code on native Windows and want it to use Git Bash:
Solution: Set the Git Bash path in your Claude Code settings:
{
  "env": {
    "CLAUDE_CODE_GIT_BASH_PATH": "C:\\Program Files\\Git\\bin\\bash.exe"
  }
}
Alpine Linux Issues
Problem: NVM does not work on Alpine Linux
Alpine Linux uses musl libc instead of glibc, which means standard Node.js binaries will not work.
Solution: Use the native package manager or install compatibility layers:
# Option 1: Use Alpine's Node.js package
apk add nodejs npm

# Option 2: Install compatibility libraries for NVM
apk add libgcc libstdc++ bash curl
export USE_BUILTIN_RIPGREP=0
Then install NVM and Node.js as usual, but note that some versions may need to compile from source.
Frequently Asked Questions
Can I have multiple Node.js versions installed at the same time?
Yes! That is the primary purpose of NVM. You can install as many versions as you need and switch between them instantly:
nvm install 20
nvm install 22
nvm install 24
nvm use 22    # Switch to v22
nvm use 24    # Switch to v24
What happens to my global npm packages when I switch versions?
Each Node.js version has its own set of global packages. When you switch versions with nvm use, only the packages installed for that version are available. Use nvm reinstall-packages <old-version> to migrate packages to a new version.
Do I need Node.js to run Claude Code?
Not necessarily. The native installer (curl -fsSL https://claude.ai/install.sh | bash) installs Claude Code as a standalone binary that does not require Node.js. However, if you want to install via npm (npm install -g @anthropic-ai/claude-code), you do need Node.js.
What is the difference between nvm use and nvm alias default?
nvm use <version>switches the Node.js version for the current shell session only. When you open a new terminal, it reverts to the default.nvm alias default <version>sets the version that every new shell session will use automatically.
Always run both commands when setting up a new version:
nvm use 24          # For current session
nvm alias default 24  # For future sessions
What does nvm deactivate do?
nvm deactivate removes the NVM-managed Node.js version from your current shell’s PATH, effectively reverting to whatever Node.js is installed system-wide (or no Node.js if there is no system installation). This is useful for:
- Testing whether your scripts work with the system Node.js
- Debugging PATH-related issues
- Temporarily disabling NVM without uninstalling it
nvm deactivate
node -v  # May show system Node.js or "command not found"
To reactivate, simply run nvm use <version> again.
How do I use a specific Node.js version for a project?
Create a .nvmrc file in your project root:
echo "24" > .nvmrc
Then anyone on your team can run:
nvm use
NVM will automatically read the .nvmrc file and switch to the specified version. You can also add a shell hook that automatically switches versions when you cd into a directory containing a .nvmrc file.
Can I use NVM in CI/CD pipelines?
Yes. Here is a typical CI/CD setup:
# GitHub Actions example
steps:
  - uses: actions/checkout@v4
  - name: Setup Node.js
    run: |
      curl -o- https://raw.githubusercontent.com/nvm-sh/nvm/v0.40.5/install.sh | bash
      source ~/.bashrc
      nvm install 24
      nvm use 24
  - name: Install dependencies
    run: npm ci
  - name: Run tests
    run: npm test
Alternatively, use the official actions/setup-node action which handles NVM-like version management for CI.
How do I uninstall NVM completely?
Remove the NVM directory and clean up your shell profile:
rm -rf ~/.nvm
Then remove these lines from ~/.bashrc, ~/.zshrc, or ~/.profile:
export NVM_DIR="$HOME/.nvm"
[ -s "$NVM_DIR/nvm.sh" ] && \. "$NVM_DIR/nvm.sh"
[ -s "$NVM_DIR/bash_completion" ] && \. "$NVM_DIR/bash_completion"
Restart your terminal after making these changes.
Quick Reference Card
Here is a summary of all the essential commands covered in this guide:
| Category | Command | Description |
|---|---|---|
| NVM Install | curl -o- https://raw.githubusercontent.com/nvm-sh/nvm/v0.40.5/install.sh \| bash | Install NVM |
| NVM Version | nvm --version | Check NVM version |
| Install Node | nvm install 24 | Install Node.js 24.x |
| Install LTS | nvm install --lts | Install latest LTS |
| Switch Version | nvm use 24 | Switch to Node.js 24.x |
| Set Default | nvm alias default 24 | Set default version |
| List Installed | nvm ls | List installed versions |
| List Available | nvm ls-remote | List available versions |
| Current Version | nvm current | Show active version |
| Deactivate | nvm deactivate | Revert to system Node |
| Uninstall | nvm uninstall 20 | Remove Node.js 20.x |
| Migrate Packages | nvm reinstall-packages 22 | Migrate global packages |
| Node Version | node -v | Check Node.js version |
| npm Version | npm -v | Check npm version |
| Claude Install | curl -fsSL https://claude.ai/install.sh \| bash | Install Claude Code (native) |
| Claude npm | npm install -g @anthropic-ai/claude-code | Install Claude Code (npm) |
| Claude Brew | brew install --cask claude-code | Install Claude Code (Homebrew) |
| Claude WinGet | winget install Anthropic.ClaudeCode | Install Claude Code (WinGet) |
| Claude Verify | claude --version | Check Claude Code version |
| Claude Doctor | claude doctor | Run diagnostics |
| Claude Auth | claude | Authenticate and start |
Conclusion
Setting up a modern development environment with Node.js, NVM, and Claude Code does not have to be complicated. NVM eliminates the friction of managing multiple Node.js versions, while Claude Code provides a powerful AI coding assistant that integrates seamlessly into your terminal workflow.
For further reading, check out these official resources:
- Node.js Official Documentation: https://nodejs.org/docs/latest/api/
- NVM GitHub Repository: https://github.com/nvm-sh/nvm
- Claude Code Documentation: https://docs.anthropic.com/en/docs/claude-code
- npm Registry: https://www.npmjs.com/
With NVM managing your Node.js versions and Claude Code ready to assist, you are equipped to tackle any JavaScript project with confidence. Happy coding! Enjoyed this post? Never miss out on future posts by following us 


