PyShine Screen Recorder: Native C++ Engine for Perfect A/V Sync
Screen recording seems simple until you try to build one. The moment you combine audio and video capture on Windows, you discover the painful realities of thread scheduling, the Python GIL, GPU texture management, and the elusive quest for perfect audio/video synchronization. PyShine Screen Recorder is a professional, open-source screen recording application that tackles these problems head-on with a hybrid architecture: a PyQt6 GUI on top, and a native C++ recording engine underneath that runs entirely outside the Python Global Interpreter Lock.
This post walks through the architecture, the A/V sync mechanism that makes recordings drift-free regardless of length, the capture pipeline that delivers near-lossless 1080p video, and the polished user experience that ties it all together.
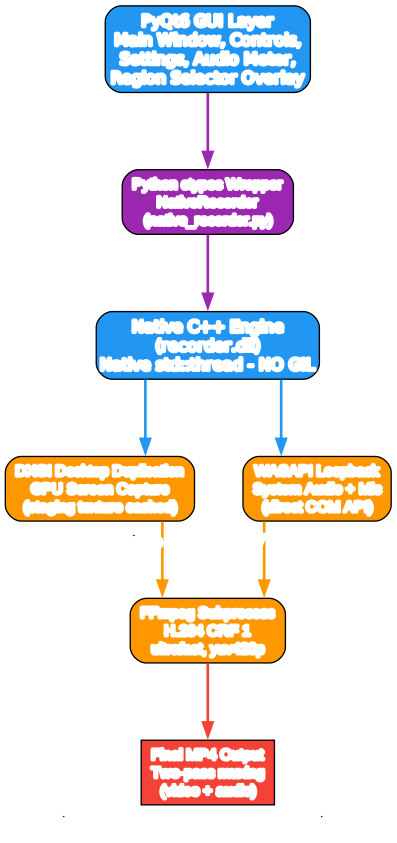
Understanding the System Architecture
The architecture diagram above illustrates the layered design that separates the user interface from the heavy lifting of media capture and encoding. Let’s break down each component:
PyQt6 GUI Layer
The top layer is the user interface built with PyQt6. This is where the user interacts with the application through the main window, recorder controls, settings panel, audio level meter, and the region selector overlay. The GUI is responsible for presenting a polished dark-themed experience with indigo accents, but it deliberately avoids performing any media capture work itself. This separation is critical because PyQt6 runs on the Python interpreter, and any capture work done in Python would be subject to GIL contention, which is the root cause of the audio “tick-tick” spikes that plague many Python-based recorders.
Python ctypes Wrapper (NativeRecorder)
Between the GUI and the native engine sits a thin ctypes wrapper class called NativeRecorder (implemented in native_recorder.py). This wrapper loads recorder.dll at runtime, sets up C function signatures for type safety, and bridges Qt signals to native callback functions. It exposes a clean Pythonic API (start_recording, stop_recording, set_audio_mode) while delegating all the actual work to the native engine. The wrapper also handles preview frame callbacks and audio level metering by converting C function pointer callbacks into Qt signals that the GUI can subscribe to.
Native C++ Engine (recorder.dll)
The heart of the application is the native C++ engine compiled into recorder.dll. This DLL exports a C ABI (using extern "C") so it can be called from Python via ctypes without any C++ name mangling issues. The engine spawns native std::thread instances for video capture, audio capture, and the writer pipeline. Because these threads are pure C++ and never acquire the Python GIL, they run uninterrupted regardless of what the Python GUI is doing. This is the single most important architectural decision in the project - it eliminates the audio glitches, frame drops, and stuttering that occur when capture threads compete with Python’s garbage collector and event loop.
DXGI Desktop Duplication
For screen capture, the engine uses the DXGI Desktop Duplication API, which is a GPU-accelerated capture method available on Windows 10 and later. Unlike older approaches like BitBlt or PrintWindow, Desktop Duplication gives you a Direct3D staging texture containing the full desktop contents, captured on the GPU with minimal CPU overhead. The engine creates this staging texture once and reuses it for every frame, eliminating the per-frame allocation that previously caused stutter and freeze on longer recordings.
WASAPI Audio Capture
For audio, the engine uses the Windows Audio Session API (WASAPI) in loopback mode. WASAPI is the lowest-level audio API available on Windows without writing a kernel-mode driver. By using direct COM calls rather than a higher-level library like PortAudio, the engine avoids an entire abstraction layer and gains precise control over buffer timing. When the microphone is enabled, the engine captures from the microphone endpoint; when disabled, it automatically falls back to system audio loopback (the eRender endpoint in loopback mode), so you always get audio even if you forget to plug in a mic.
FFmpeg Encoding and Two-Pass Muxing
The captured raw video frames are piped to an FFmpeg subprocess via stdin as rawvideo data, while audio is written directly to a temporary WAV file. FFmpeg encodes the video stream to H.264 with the ultrafast preset and a CRF (Constant Rate Factor) of 1, which is visually lossless quality. When recording stops, a second FFmpeg pass muxes the temporary video and audio files into the final MP4 output. This two-pass approach separates the concerns of capture and muxing, allowing each to run at its own pace without blocking the other.
Data Flow
The flow begins when the user clicks record. The GUI calls the Python wrapper, which calls the native recorder_start function. The native engine spawns three threads: one for DXGI screen capture, one for WASAPI audio capture, and a writer thread that consumes from a producer-consumer queue. Video frames flow from DXGI through the staging texture into the FFmpeg stdin pipe, while audio samples flow from WASAPI into a temporary WAV file. When the user stops, the threads are joined, the FFmpeg pipe is closed, and a final muxing pass combines everything into the output MP4.
Key Insights
The hybrid Python-plus-C++ architecture is increasingly common in performance-critical desktop applications. Python excels at rapid GUI development, configuration management, and cross-platform compatibility, but it fails at real-time media processing due to the GIL. By pushing the real-time work into a native DLL with a clean C ABI, you get the best of both worlds: a Python-friendly API for the UI layer and bare-metal performance for the capture pipeline. This pattern generalizes to any domain where Python needs to interact with hardware or real-time systems - audio processing, sensor data acquisition, robotics control, and game engine integration all benefit from the same approach.
How A/V Sync Actually Works
The hardest problem in screen recording is not capture - it is synchronization. If audio and video drift apart even slightly, the result is unwatchable. After 10 minutes, a 50ms offset becomes obvious. After an hour, it is unbearable.
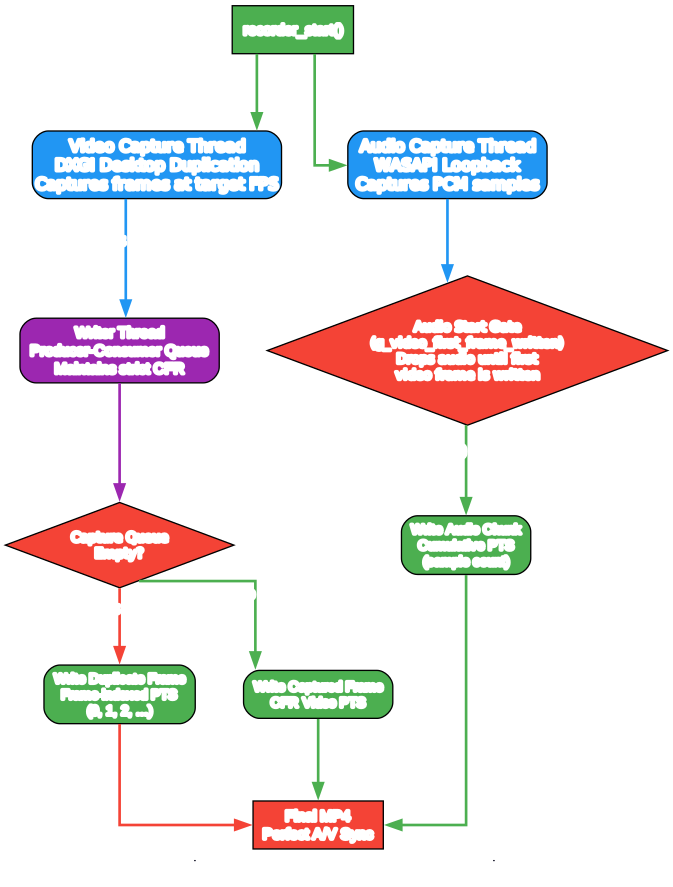
Understanding the A/V Sync Mechanism
The A/V sync diagram above shows the four-mechanism approach that PyShine Screen Recorder uses to guarantee perfect synchronization regardless of recording length. Let’s examine each mechanism in detail:
Audio Start Gate (g_video_first_frame_written)
The first mechanism is an audio start gate. When recording begins, the audio thread starts capturing immediately, but all captured audio is dropped until the video thread signals that it has written its first frame. This is tracked via a boolean flag called g_video_first_frame_written. The rationale is simple: audio capture can start almost instantly because WASAPI buffers are ready the moment the session is initialized, but video capture has to wait for the DXGI Desktop Duplication API to deliver the first desktop frame. If audio started writing before video, the audio timeline would begin before the video timeline, causing a permanent offset. By gating audio on the first video frame, the engine guarantees that audio sample 0 corresponds exactly to video frame 0.
Producer-Consumer Queue with Writer Thread
The second mechanism is a producer-consumer architecture that decouples capture from writing. The video capture thread (producer) pushes frames into a bounded queue, and a dedicated writer thread (consumer) pulls frames from the queue and writes them to FFmpeg. This decoupling is essential because the capture rate and the encode rate are not perfectly matched. DXGI delivers frames whenever the desktop changes, which can be faster or slower than the target FPS. The writer thread smooths out these variations by maintaining a steady output rate regardless of capture jitter.
Duplicate-Frame Catch-Up
The third mechanism is the most innovative. When the capture queue is empty (because the desktop has not changed or the capture thread is momentarily slow), the writer thread does not skip a frame. Instead, it writes a duplicate of the last captured frame. This is the key to maintaining a strict constant frame rate (CFR). If the writer skipped frames when the queue was empty, the video timeline would fall behind the audio timeline. By duplicating frames, the video timeline advances at the same rate as the audio timeline, no matter what. The presentation timestamps (PTS) are simply the frame index (0, 1, 2, 3, …), so every frame is exactly 1/FPS seconds apart.
Cumulative Audio PTS
The fourth mechanism ensures audio PTS advances linearly with the actual sample count. Each audio chunk written to the WAV file is tagged with a cumulative PTS based on the number of samples written so far. This is in contrast to wall-clock-based PTS, which can drift if the system clock has jitter or if the audio thread is briefly delayed. By using sample count as the PTS source, the audio timeline is locked to the actual data, not to the system clock. Combined with the audio start gate, this means the audio timeline starts at exactly the right moment and advances at exactly the right rate.
Why This Matters
Most screen recorders handle A/V sync poorly. The common approach is to timestamp each frame with the wall clock at capture time and hope for the best. This works for short recordings but drifts over time because the wall clock and the actual data rate are not perfectly aligned. PyShine Screen Recorder’s approach is fundamentally different: the video timeline is defined by frame count, the audio timeline is defined by sample count, and both start at the same moment (the first video frame). This makes the sync mathematically exact rather than approximately correct.
Practical Implications
For the end user, this means you can record a 2-hour lecture or a 4-hour gaming session and the audio will stay perfectly in sync with the video from start to finish. There is no gradual drift, no sudden desync after silent periods, and no need to manually realign tracks in a video editor. The recording is ready to use the moment FFmpeg finishes the final muxing pass.
The Capture Pipeline: From Desktop to MP4
Capturing a desktop at 1080p and encoding it to near-lossless H.264 in real time requires a carefully designed pipeline. Every stage must be efficient, and every pixel must be handled correctly to maintain quality.

Understanding the Capture Pipeline
The capture pipeline diagram shows the journey of video data from the Windows desktop to the final MP4 file. Let’s trace each stage:
DXGI Desktop Duplication API
The pipeline begins with the DXGI Desktop Duplication API, introduced in Windows 8. This API provides GPU-accelerated access to the desktop composited output. Unlike older capture methods (BitBlt, PrintWindow, Mirror Drivers), Desktop Duplication does not require the CPU to read pixel data from the GPU - instead, it provides a Direct3D texture that already contains the desktop contents. This is dramatically faster and has lower latency. The API also handles multi-monitor setups correctly, allowing the recorder to target a specific display by index.
Cached Staging Texture
A subtle but critical optimization is the cached staging texture. When you call IDXGIOutputDuplication::AcquireNextFrame, you get a texture that you need to copy to a staging texture before you can read it on the CPU. The naive approach is to create a new staging texture for every frame. This causes per-frame GPU allocation, which leads to stutter and eventual freeze on longer recordings because the GPU memory allocator has to do more and more work. PyShine Screen Recorder creates the staging texture once during initialization and reuses it for every frame. This is a single-line change in code but a night-and-day difference in stability.
Resolution Handling: 4K to 1080p Downscaling
The recorder targets 1080p (1920x1080) as its native output resolution. When capturing from a 4K monitor (3840x2160), the frames must be downscaled. The diagram shows the decision point: if the source resolution is greater than 1080p, a 2x2 box filter is applied. The box filter is an area-averaging filter that takes each 2x2 block of pixels and replaces them with their average. This is theoretically optimal for a 2:1 downscale because it uses all the source data, produces no aliasing (unlike nearest-neighbor), and introduces no blurring (unlike bilinear interpolation on non-integer ratios). For non-2:1 ratios, bilinear interpolation is used as a fallback.
Even-Dimension Enforcement
After downscaling (or when capturing at native 1080p), the engine enforces even dimensions on both width and height. This is required for the yuv420p pixel format used by FFmpeg, which subsamples chroma channels in 2x2 blocks. If the width or height is odd, the chroma subsampling would have to handle a half-pixel at the edge, which can cause color artifacts or encoding failures. By forcing both dimensions even, the engine avoids this edge case entirely.
Region Crop at Capture Time
When the user selects a custom region, the cropping is done in the native C++ engine at capture time, not in post-processing. This means only the selected pixels are ever copied or encoded, saving CPU and bandwidth. The crop is applied after downscaling and even-dimension enforcement, so the region coordinates are in the final output resolution space. This is more efficient than capturing the full screen and cropping in FFmpeg, because the encoder never sees the pixels outside the region.
FFmpeg stdin Pipe
The final stage of the video pipeline is the FFmpeg subprocess. The native engine spawns FFmpeg with the rawvideo input format reading from stdin, configured to encode with the libx264 codec, ultrafast preset, CRF 1 (visually lossless), High profile, and yuv420p pixel format. Raw RGB frames are written to FFmpeg’s stdin pipe, and FFmpeg encodes them to the temporary video file. Using a subprocess pipe rather than a library API means the encoder runs in its own process with its own memory space, which isolates the GUI from any encoding crashes and allows FFmpeg to use its own thread pool for encoding.
Key Insight: Why CRF 1 and ultrafast
The choice of CRF 1 with the ultrafast preset is deliberate. CRF 1 produces a visually lossless output (the bitrate is very high, but the quality is essentially identical to the source). The ultrafast preset minimizes CPU usage during encoding, which is critical because the CPU is also busy with capture, audio, and the GUI. The High profile is chosen for universal compatibility - it can be played on virtually any device or browser without codec issues. The yuv420p format ensures compatibility with older players that do not support 4:2:2 or 4:4:4 chroma subsampling.
User Experience: From Launch to MP4
A great architecture is wasted if the user experience is painful. PyShine Screen Recorder pairs its native engine with a carefully designed UI.
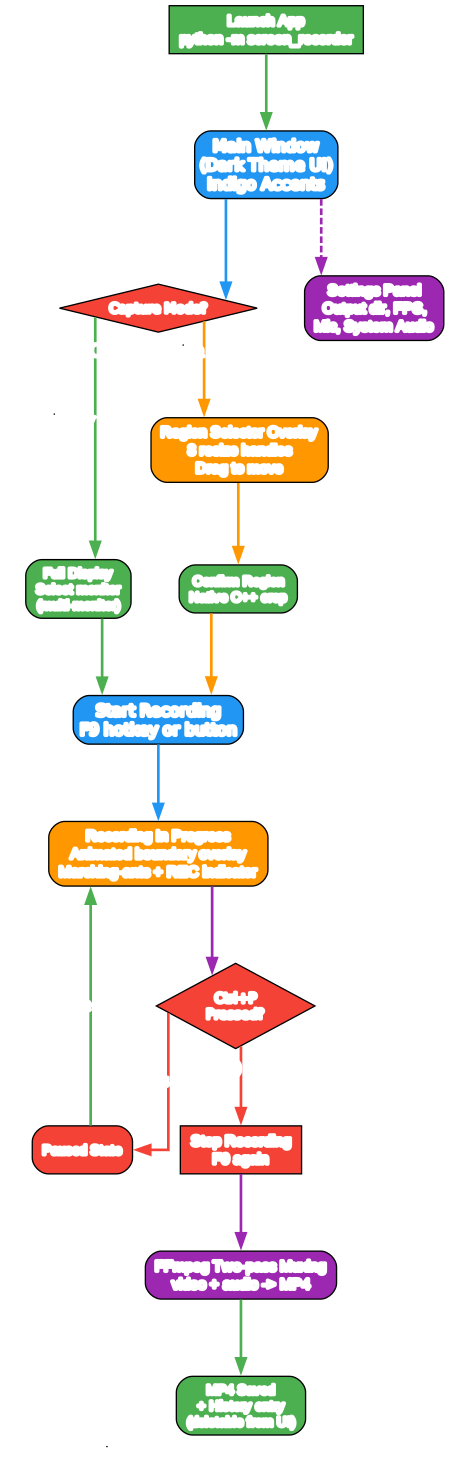
Understanding the User Workflow
The workflow diagram shows the complete user journey from launching the application to receiving the final MP4 file. Let’s walk through it:
Launch and Main Window
The application is launched with python -m screen_recorder (or by running the standalone EXE). The main window appears with a compact, dark-themed layout. The UI uses a three-tier surface palette (background, surface, elevated) to create visual depth without heavy shadows, matching the aesthetic of modern applications like VS Code, Linear, and Notion. Indigo (#6366f1) is used as the accent color because it is professional and less saturated than purple, which can feel childish.
Capture Mode Selection
The user chooses between two capture modes. In “Full Display” mode, the recorder captures the entire contents of a selected monitor. This supports multi-monitor setups, so you can record your second monitor while keeping your primary monitor free for notes or chat. In “Custom Region” mode, an overlay appears with 8 resize handles (one on each corner and one on each edge), a drag-to-move area, and confirm/cancel buttons. The overlay is drawn in a margin ring OUTSIDE the selected rectangle, so the marching-ants border and REC indicator never appear in the recorded video.
Settings Panel
Before recording, the user can open the settings panel to configure the output directory, frame rate (30 or 24 FPS), microphone toggle, and system audio toggle. Settings are stored in the platform’s standard configuration directory using JSON, so they persist across sessions. The system audio toggle is automatically enabled when the microphone is disabled, ensuring you always get some audio track.
Recording State
Once recording starts (via F9 hotkey or the record button), the application enters the recording state. An animated recording boundary overlay appears on screen - a dotted marching-ants border with a pulsing REC indicator. This overlay is drawn outside the capture region so it never appears in the video. The status bar shows the recording duration and the actual achieved FPS, so you can verify the recording is healthy at a glance. The audio level meter provides real-time stereo RMS and peak monitoring from the native engine, so you can confirm your microphone is picking up sound.
Pause and Resume
During recording, the user can pause and resume with Ctrl+P. Pause temporarily halts capture without stopping the recording session, which is useful for taking breaks during a long lecture or switching contexts during a tutorial. When resumed, the recording continues in the same file, with the writer thread maintaining the CFR timeline as if the pause never happened.
Stop and Muxing
When the user stops recording (F9 again), a friendly dialog appears explaining that FFmpeg is muxing the final MP4. This muxing step combines the temporary video and audio files into the final output. The dialog reads “This may take a while, please wait…” rather than mentioning muxing internals, because end users do not care about FFmpeg - they just want to know the app is working on it. Once muxing completes, the MP4 is saved to the output directory and a history entry appears in the UI.
History Panel
The history panel shows all recordings made in the current session. Each entry includes a thumbnail (generated by seeking ~1 second into the video and picking the first non-black frame), the file path, and a delete button. Deleting a recording from the UI also removes the file from disk, so you can clean up unwanted takes without leaving the application.
Installation
Windows (Standalone EXE - Recommended)
- Download
ScreenRecorder.exefrom the Releases page - Run directly - no extraction or installation required
No Python installation required. Windows 10/11 (64-bit) supported.
From Source (Developers)
# Clone the repository
git clone https://github.com/pyshine-labs/PyShine-Screen-Recorder.git
cd PyShine-Screen-Recorder

# Create a virtual environment (recommended)
python -m venv .venv
.venv\Scripts\activate

# Install the package in development mode
pip install -e .

# Or install dependencies directly
pip install -r requirements.txt
To run the application:
python -m screen_recorder
Building the Native C++ Recorder DLL
If you are building from source, you need to compile the native C++ recorder DLL before the application can record.
Prerequisites:
- Python >= 3.10
- PyInstaller (for EXE builds):
pip install pyinstaller - Visual Studio 2022 Build Tools (C++ workload) and CMake
# Builds recorder.dll -> bin/Release/recorder.dll
native\build.bat
Building the Portable EXE
python -m PyInstaller screen_recorder.spec --noconfirm
The output is located at dist/ScreenRecorder.exe.
Usage
Running the Application
python -m screen_recorder
Keyboard Shortcuts
| Shortcut | Action |
|---|---|
F9 | Start / Stop recording |
Ctrl+P | Pause / Resume recording |
Ctrl+Q | Quit application |
Esc | Cancel region selection |
F1 | Open help dialog |
Basic Workflow
- Launch the application - the main window appears with controls.
- Select a capture source - choose a display or draw a region using the overlay selector.
- Configure audio - enable microphone and/or system audio in Settings.
- Start recording - press F9 or click the Record button.
- Stop recording - press F9 again. The MP4 file is saved to your output directory.
Features
| Feature | Description |
|---|---|
| Native C++ recording engine | WASAPI audio and DXGI screen capture via native threads (no GIL interference) |
| 100% A/V sync | Producer-consumer architecture with duplicate-frame catch-up for strict CFR |
| Near-lossless quality | CRF 1 (visually lossless) H.264 encoding with ultrafast preset |
| 1080p native resolution | Full 1920x1080 capture; 4K downscaled via 2x2 box filter |
| Cached GPU staging texture | Staging texture created once and reused every frame to prevent stutter |
| Region selection | 8 resize handles, drag-to-move, native C++ region crop at capture time |
| Multi-monitor support | Select which display to capture |
| Microphone + system audio | WASAPI capture with automatic fallback to system loopback |
| System tray icon | Recording controls (start/stop/pause/resume) from the tray |
| Animated boundary overlay | Marching-ants border with pulsing REC indicator, drawn outside capture region |
| Professional dark UI | 3-tier surface palette, indigo accents, circular icon buttons |
| Audio level meter | Real-time stereo RMS and peak monitoring from the native engine |
| Settings panel | Output directory, FPS (30/24), microphone toggle, system audio toggle |
| Live recording history | Delete recordings from the UI also removes the file from disk |
| Pause/resume support | Pause and resume during active recording |
| MP4 output | FFmpeg with two-pass muxing (video + audio) |
| F9 hotkey | Start/stop recording with a single keypress |
Troubleshooting
recorder.dll not found
The native C++ recorder DLL must be present for the application to record. If you are running from source, build it first:
cd native
build.bat
The DLL will be placed at bin/Release/recorder.dll.
Audio sounds glitchy or has tick-tick spikes
This was a known issue in earlier versions caused by Python’s GIL interfering with the audio capture thread. The native C++ engine eliminates this entirely by running all capture on native std::threads that never acquire the GIL. If you still hear glitches, ensure you are running the latest version and that no other application is heavily loading the CPU.
A/V drift after silent periods
Fixed in v1.0.8. WASAPI loopback delivers zero packets when the system is silent, which previously caused the audio timeline to stop advancing. The engine now fills silence gaps with zero samples (with a 50ms tolerance to avoid jitter contamination), keeping the audio timeline locked to the video timeline.
Audio clicks on peak samples
Fixed in v1.0.8. The float32 to int16 conversion previously used lroundf(v * 32768.0f), which overflowed int16_t when v == 1.0f (32768 wraps to -32768, producing a loud negative spike on every peak). The conversion now multiplies by 32767.0f and clamps at the long stage before the cast.
Blank thumbnails in history
Fixed in v1.0.8. The thumbnail generator now seeks ~1 second into the video and picks the first non-black frame (brightness > 30), falling back to the first frame if all are black.
Recording freezes on long recordings
This was caused by per-frame allocation of the GPU staging texture. The cached staging texture (created once, reused every frame) eliminates this. Ensure you are running v1.0.6 or later.
Conclusion
PyShine Screen Recorder demonstrates that you do not have to choose between a Python-friendly development experience and native-level performance. By pushing the real-time capture pipeline into a C++ DLL with a clean C ABI, the application achieves perfect A/V sync, near-lossless video quality, and rock-solid stability on long recordings - all while keeping a PyQt6 GUI that is pleasant to develop and easy to extend.
The key takeaways for anyone building similar software are: keep the GIL out of the capture path, gate audio on the first video frame, use duplicate-frame catch-up for strict CFR, cache your GPU resources, and downscale with area-averaging when the ratio is 2:1. These principles apply far beyond screen recording - they are the foundation of any real-time media pipeline on Windows.
The project is open source under the MIT license, with prebuilt binaries available for Windows users who just want to record, and full source for developers who want to learn from or extend the architecture.
Links
Related Posts

Enjoyed this post? Never miss out on future posts by following us


