Learn GitLab CI/CD in a Single Post: Complete Tutorial From Pipelines and Runners to Environments and Auto DevOps
GitLab CI/CD is the CI/CD system built into GitLab — you push a .gitlab-ci.yml file to your repo, and GitLab runs your build, test, and deploy pipelines automatically. It’s the primary alternative to GitHub Actions, with the advantage of being integrated into a single platform (repo + CI + registry + deploy + monitoring). This single post teaches the whole system in five stages, with hand-drawn diagrams and runnable YAML.
Learning Roadmap
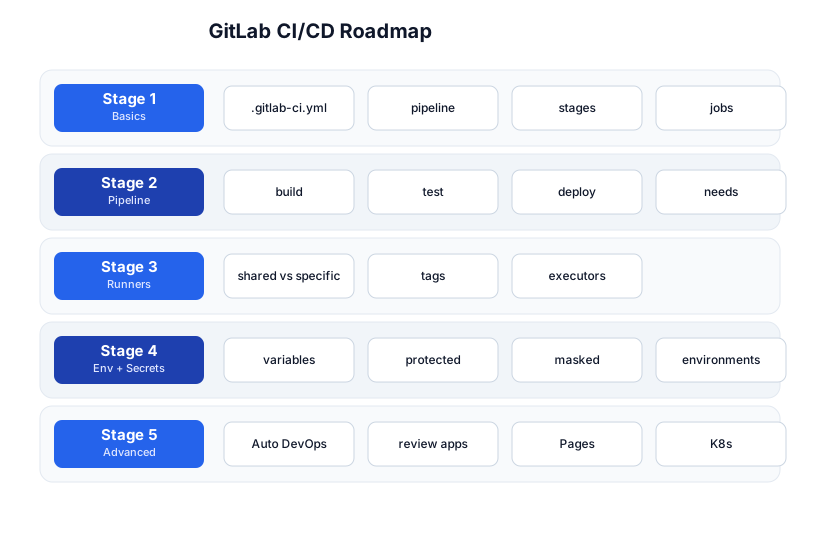
The roadmap moves from the config file (Stage 1), through pipeline design (Stage 2), where it runs (Stage 3), secrets + environments (Stage 4), and the advanced built-in features (Stage 5). You’ll want the Git tutorial and Docker tutorial as prerequisites.
Stage 1 — Basics
.gitlab-ci.yml — the pipeline definition
# .gitlab-ci.yml
stages:
  - build
  - test
  - deploy

build:
  stage: build
  image: node:20-alpine
  script:
    - npm ci
    - npm run build
  artifacts:
    paths:
      - dist/

test:
  stage: test
  image: node:20-alpine
  script:
    - npm ci
    - npm test
  needs:
    - build

deploy:
  stage: deploy
  image: alpine:latest
  script:
    - echo "deploying to staging"
  only:
    - main
Push this file and GitLab runs the pipeline automatically. The structure:
stages:— the ordered phases (build → test → deploy). Jobs in the same stage run in parallel; stages run sequentially.- Jobs (e.g.
build:,test:) — each has astage, animage, ascript, and optionalartifacts,needs,only/refs. script:— the shell commands the job runs.image:— the Docker image the job runs in (default executor is Docker).
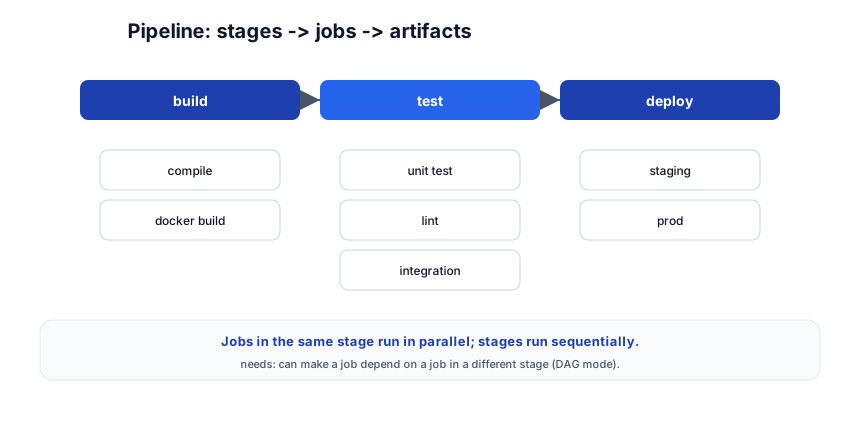
Default keywords
| Keyword | Purpose |
|---|---|
stages: | defines the stage order |
stage: | which stage a job belongs to |
script: | shell commands to run |
image: | Docker image for the job |
before_script: | runs before every job’s script |
after_script: | runs after every job (even on failure) |
artifacts: | files to pass between jobs / download from UI |
cache: | dependencies to cache between runs |
only: / except: | which branches/tags trigger the job |
rules: | modern, more flexible conditional execution |
variables: | CI/CD variables for the pipeline |
tags: | which runners to use (by label) |
Pitfall: Unlike GitHub Actions, GitLab CI requires a
stages:list — without it, all jobs go to a defaultteststage. Always declare your stages explicitly, even if there’s only one.
Stage 2 — Pipeline Design
needs: — DAG mode (out-of-order execution)
By default, stages run sequentially. needs: lets a job start as soon as its dependencies finish, even if they’re in a different stage — turning the pipeline into a DAG (directed acyclic graph):
deploy:staging:
  stage: deploy
  needs:
    - build      # can start right after build, doesn't wait for test
  script:
    - echo "deploy"

test:integration:
  stage: test
  needs:
    - build
  script:
    - npm run test:integration
With needs:, deploy:staging and test:integration run in parallel after build — instead of waiting for the entire test stage to finish. This can cut pipeline time significantly.
Parallel and matrix
test:
  stage: test
  parallel: 5              # splits the job into 5 parallel instances
  script:
    - ./run-tests $CI_NODE_INDEX/$CI_NODE_TOTAL

test:matrix:
  stage: test
  matrix:
    - IMAGE: ["node:18", "node:20", "node:22"]
      SUITE: ["unit", "integration"]
  script:
    - npm test -- --suite=$SUITE --node=$IMAGE
parallel: splits one job into N instances (good for test sharding). matrix: creates one job per combination (good for multi-version testing — 3 Node versions × 2 suites = 6 jobs).
Artifacts and caching
build:
  script:
    - npm run build
  artifacts:
    paths:
      - dist/
    expire_in: 1 week

cache:
  key: $CI_COMMIT_REF_SLUG
  paths:
    - node_modules/
- Artifacts — files passed between jobs (or downloadable from the UI).
dist/from build → available in deploy.expire_incontrols how long GitLab keeps them. - Cache — dependencies shared across pipeline runs (node_modules, .m2, pip cache). Keyed by branch so different branches don’t clobber each other.
Pitfall: Artifacts and cache are different: artifacts pass between jobs in one pipeline; cache persists across pipeline runs. Don’t use cache for build outputs (it’s not guaranteed to be there); use artifacts for that.
Stage 3 — Runners
Where jobs run
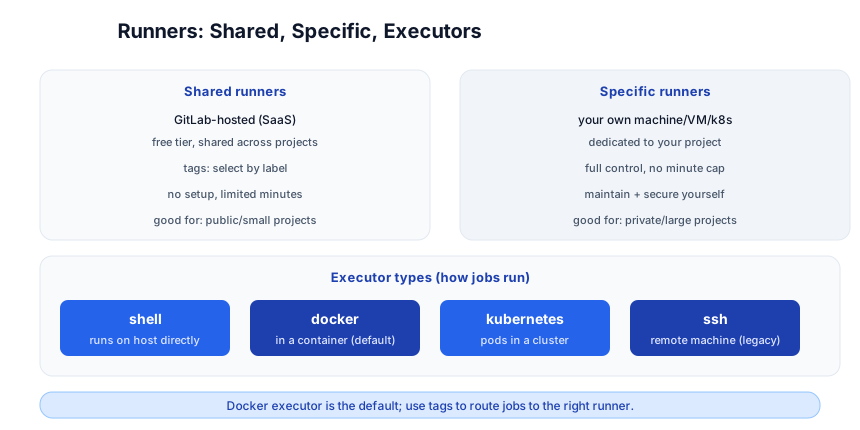
| Type | What | Use |
|---|---|---|
| Shared runners | GitLab-hosted (SaaS) | free tier, shared across projects, no setup |
| Specific runners | your own machine/VM/K8s | dedicated, full control, you maintain + secure |
| Group runners | shared across a group’s projects | for org-wide CI |
Tags — routing jobs to runners
docker-build:
  tags:
    - docker
    - linux
  script:
    - docker build -t app .

k8s-deploy:
  tags:
    - kubernetes
  script:
    - kubectl apply -f k8s/
Runners register with tags; jobs specify which tags they need. A job with tags: [docker] only runs on runners that have the docker tag. This is how you route GPU jobs to GPU runners, ARM jobs to ARM runners, etc.
Executor types
| Executor | How jobs run |
|---|---|
| docker | in a container (the default + recommended) |
| shell | directly on the host (simple but less isolated) |
| kubernetes | as pods in a K8s cluster (elastic, scalable) |
| ssh | on a remote machine via SSH (legacy) |
# register a runner
sudo gitlab-runner register
# enter the GitLab URL + token from Settings -> CI/CD -> Runners
# pick executor: docker
Pitfall: The shell executor runs directly on the host — a malicious
.gitlab-ci.yml(from a fork/MR) can access the runner’s filesystem. Use the docker executor for isolation; never use shell runners for public repos with untrusted MRs.
Stage 4 — Variables + Environments
CI/CD variables
variables:
  DATABASE_URL: "postgres://db:5432/myapp"
  NODE_ENV: "test"

deploy:
  variables:
    TARGET: "staging"
  script:
    - echo $DATABASE_URL
    - echo $CI_COMMIT_SHA        # predefined variable
    - echo $CI_PIPELINE_ID
Variables are set in .gitlab-ci.yml or in the UI (Settings → CI/CD → Variables). GitLab also provides predefined variables ($CI_COMMIT_SHA, $CI_BRANCH_NAME, $CI_PIPELINE_ID, etc.) for every pipeline.
Protected and masked
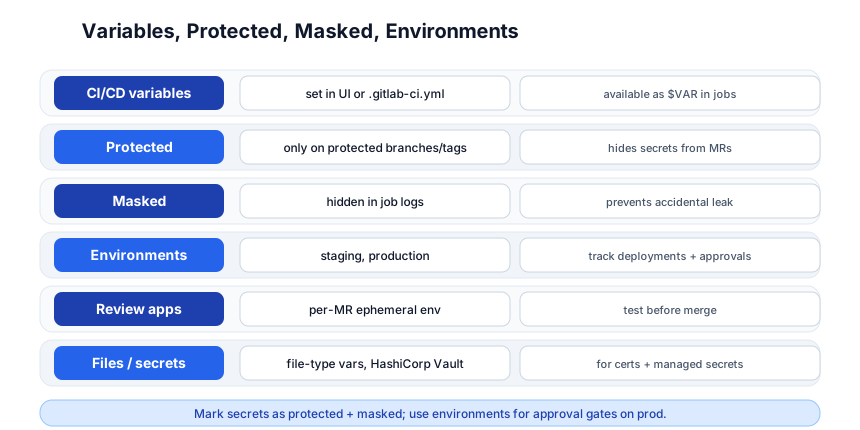
- Protected — the variable is only available on protected branches/tags (e.g.
main,v*). This prevents MRs from accessing production secrets. - Masked — the variable’s value is hidden in job logs (replaced with
[MASKED]). Prevents accidental exposure.
Always mark secrets as protected + masked. A secret that’s not protected leaks to any MR; one that’s not masked shows in the logs.
Environments
deploy:staging:
  environment:
    name: staging
    url: https://staging.myapp.com
  script:
    - ./deploy.sh staging
  only:
    - main

deploy:production:
  environment:
    name: production
    url: https://myapp.com
  script:
    - ./deploy.sh prod
  only:
    - tags
  when: manual          # requires a manual click
Environments track deployments in the UI (Operations → Environments), showing what’s deployed where, with a rollback button. when: manual turns a job into a manual approval gate — it doesn’t run until someone clicks “play” in the UI.
Review apps — per-MR ephemeral environments
review:
  environment:
    name: review/$CI_COMMIT_REF_SLUG
    url: https://$CI_COMMIT_REF_SLUG.review.myapp.com
    on_stop: stop_review
  script:
    - ./deploy.sh review $CI_COMMIT_REF_SLUG
  only:
    - branches
  except:
    - main

stop_review:
  environment:
    name: review/$CI_COMMIT_REF_SLUG
    action: stop
  script:
    - ./teardown.sh review $CI_COMMIT_REF_SLUG
  when: manual
A review app spins up an ephemeral environment for each MR, with a unique URL — so reviewers can test the change live before merging. on_stop cleans it up when the MR is closed/merged. This is GitLab’s built-in equivalent of Vercel preview deployments.
Stage 5 — Advanced Features
Auto DevOps
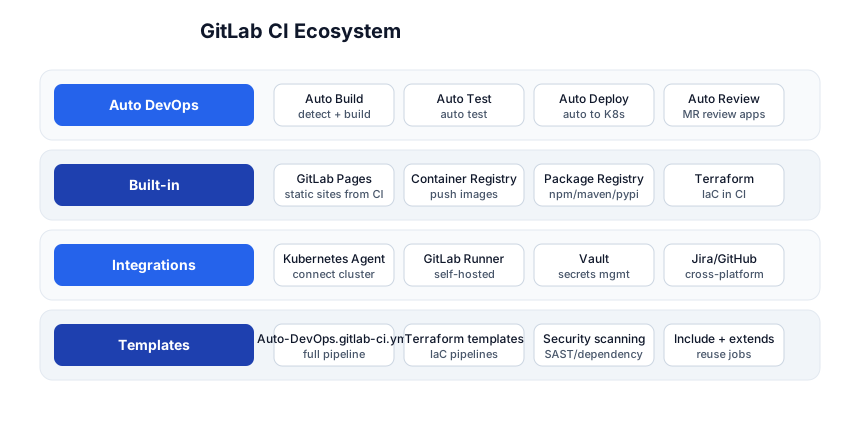
Auto DevOps is a one-line full pipeline: if you enable it (and don’t write a .gitlab-ci.yml), GitLab auto-detects your language, builds, tests, scans for security issues, and deploys to Kubernetes. It’s the zero-config path — good for getting started, and you can customize individual jobs by overriding the Auto DevOps templates.
GitLab Pages
pages:
  stage: deploy
  script:
    - npm run build
    - cp -r dist public
  artifacts:
    paths:
      - public
  only:
    - main
A pages: job with a public/ artifact publishes a static site at https://<username>.gitlab.io/<project>/. This is GitLab’s built-in static hosting — how this very Jekyll blog could be hosted if it were on GitLab.
Container Registry
build:
  script:
    - docker build -t $CI_REGISTRY_IMAGE:$CI_COMMIT_SHA .
    - docker login -u $CI_REGISTRY_USER -p $CI_REGISTRY_PASSWORD $CI_REGISTRY
    - docker push $CI_REGISTRY_IMAGE:$CI_COMMIT_SHA
GitLab has a built-in container registry per project — no separate Docker Hub setup. $CI_REGISTRY_IMAGE is the pre-configured registry URL; credentials are auto-injected.
Terraform + Kubernetes Agent
GitLab integrates Terraform (IaC state management in the UI) and a Kubernetes Agent (connect your cluster for deploy + monitoring). You can run terraform plan in CI, store state in GitLab, and deploy to K8s — all within one platform.
include + extends — reuse
include:
  - project: 'myorg/ci-templates'
    file: '/node-ci.yml'
    ref: main

.deploy_template:
  script:
    - ./deploy.sh $ENV
  only:
    - main

deploy:staging:
  extends: .deploy_template
  variables:
    ENV: staging

deploy:prod:
  extends: .deploy_template
  variables:
    ENV: prod
  when: manual
include: pulls pipelines from other repos (reusable templates). extends: inherits from a hidden job (starts with .). Together they give you DRY, composable pipelines — the GitLab equivalent of GitHub Actions’ reusable workflows + composite actions.
Quick-Start Checklist
- Create
.gitlab-ci.ymlin your repo with one stage + one job. Push it. - Watch the pipeline run in CI/CD → Pipelines. Green? You have CI.
- Add
build+test+deploystages withartifactsto pass build output. - Use
needs:to parallelize independent jobs (DAG mode). - Register a runner if you need self-hosted (or use shared for small projects).
- Set CI/CD variables for secrets; mark them protected + masked.
- Add environments for staging + production; use
when: manualfor prod. - Set up a review app for per-MR testing.
- Use
include:+extends:to DRY your pipelines across repos. - Try Auto DevOps for zero-config CI on a new project.
Common Pitfalls
- No
stages:declared — all jobs go to the defaultteststage. Always declarestages:. - Shell executor on public repos — MRs can access the runner’s filesystem. Use the docker executor.
- Secrets not protected — any MR can read them. Mark as protected + masked.
- Using cache for build outputs — cache isn’t guaranteed; use artifacts for job-to-job passing.
only: maininstead ofrules:—only/exceptis legacy;rules:is more expressive and the modern choice.- Forgetting
on_stopon review apps — environments accumulate without cleanup. - Not pinning image versions —
image: nodegetslatest, which changes. Pinnode:20-alpine.
Further Reading
- GitLab CI/CD Docs — the official reference
- GitLab CI/CD YAML Reference — every keyword
- GitLab Runner Docs — register + configure runners
- Auto DevOps — zero-config pipelines
- GitLab CI Examples — per-language recipes
Related guides
GitLab CI is the CI/CD alternative to GitHub Actions — these PyShine tutorials connect to it:
- Learn GitHub Actions in One Post — the direct comparison; concepts transfer.
- Learn Git in One Post — CI runs on Git events; know Git first.
- Learn Docker in One Post — the docker executor runs jobs in containers; build + push to the registry.
- Learn Kubernetes in One Post — deploy from CI to K8s via the GitLab Agent.
- Learn Terraform in One Post — GitLab manages Terraform state + runs
plan/applyin CI.
GitLab CI/CD’s advantage is that it’s one platform — repo, CI, registry, deploy, monitoring — without stitching together separate services. The five stages here — basics, pipeline design, runners, environments, advanced — cover everything from a one-job Enjoyed this post? Never miss out on future posts by following us .gitlab-ci.yml to a DAG-parallelized, environment-gated, Auto DevOps pipeline with review apps and Terraform state management. The two habits that pay off: declare your stages explicitly (the #1 beginner mistake is omitting stages:), and mark secrets as protected + masked (unprotected secrets leak to any MR). Write a .gitlab-ci.yml, push it, watch the pipeline go green, then layer in needs:, environments, and review apps as you grow.