You already own a second monitor. It is in your pocket, or propped up on your desk charging, or sitting in a drawer because you upgraded last year. Apple knows this too - that is why Sidecar exists - but Sidecar refuses iPhones, demands both devices share one Apple ID, and only works on a short list of hardware pairs. The paid options are not much better: Duet Display wants a subscription, and Luna Display wants you to buy a hardware dongle.
OpenDisplay is the missing option. It is a free, open-source project - about 3,300 stars on GitHub and climbing the trending charts as of this writing - that turns an iPhone, an iPad, or even a spare Mac into a true extended display for your Mac. Not a mirror: a real second monitor that macOS treats as its own, where you can drag windows, arrange it in System Settings, and read text at full Retina sharpness. It works over USB (lowest latency) or WiFi (zero config), and your touch input flows backward into macOS, so your iPhone becomes a touchscreen for your desktop. No subscription. No dongle. No account. No servers.
Understanding the Architecture
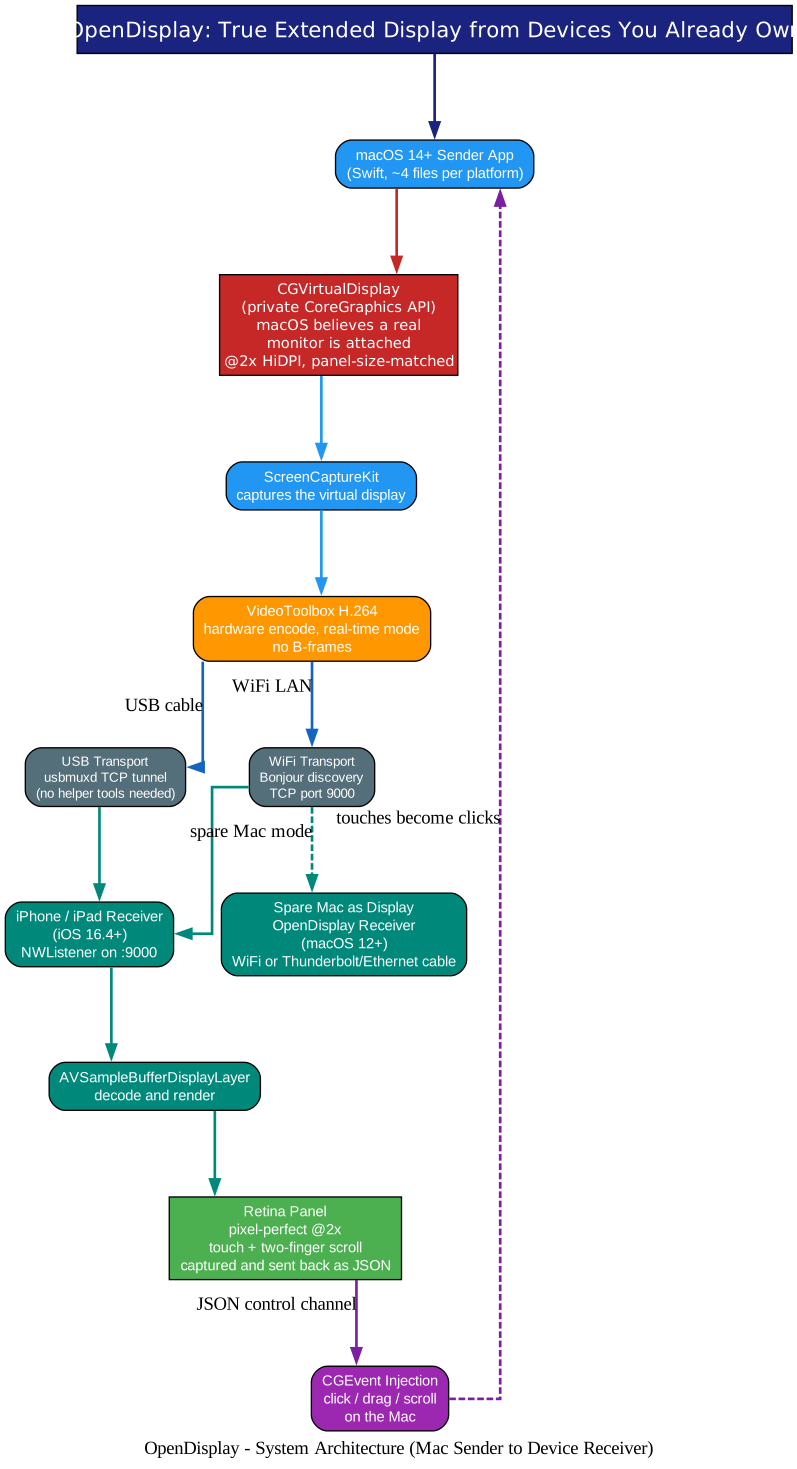
The architecture diagram above shows the full journey of a pixel - and the return journey of a fingertip. Let’s walk through each piece.
1. The CGVirtualDisplay trick (the heart of the project)
Everything starts with a private CoreGraphics API called CGVirtualDisplay. When OpenDisplay creates one, macOS genuinely believes a physical monitor has been plugged in. The virtual display is created at exactly half the receiver’s native panel size, measured in points, which pairs with the iPhone’s @2x pixel density to produce a pixel-perfect, Retina-sharp image - no fuzzy scaling, no blurry text. This is the same private API used by BetterDisplay and DeskPad, and it is precisely why OpenDisplay cannot ship on the App Store: Apple does not allow private API usage in App Store apps. So the project lives on GitHub, distributed as signed and notarized DMG files instead.
2. ScreenCaptureKit and VideoToolbox
Once the virtual display exists, macOS’s own ScreenCaptureKit (a fully public API) captures its contents frame by frame. Each frame is handed to VideoToolbox, Apple’s hardware video encoder, running in real-time mode with B-frames disabled - a deliberate trade that sacrifices some compression efficiency for the lowest possible end-to-end latency. We will dig deeper into this pipeline in a moment.
3. Two transports, one codebase
The encoded stream travels to your device over one of two transports. Over a cable, OpenDisplay talks to usbmuxd - the USB multiplexing daemon that is built into every macOS install and normally handles iPhone syncing - and tunnels its TCP stream through it. No helper tools, no drivers, no network configuration. Over WiFi, the phone advertises itself via Bonjour and the Mac lists it in a dropdown; the same TCP protocol flows over your LAN. Crucially, the receiver code is identical in both modes, which keeps the project small enough to actually understand.
4. The receiver side
On the iPhone or iPad, a listener accepts the connection on port 9000 and feeds the incoming H.264 stream into AVSampleBufferDisplayLayer, Apple’s hardware-accelerated video rendering layer. Frames decode and land directly on the Retina panel. The device also runs the reverse channel: touches, drags, and two-finger scrolls are captured, packaged as JSON messages, and sent back to the Mac, where they are replayed as real system events via CGEvent injection. Tap to click, drag to drag, scroll like a trackpad.
5. A spare Mac can be the display too
If your extra screen is an old Mac rather than a phone, install the separate OpenDisplay Receiver app on it (it runs on macOS 12+, so machines from around 2015 qualify). Connect the two Macs over WiFi, or with a Thunderbolt or Ethernet cable, and the spare Mac becomes another native-resolution extended display. The sender even moves an in-progress session onto a cable the moment you plug it in.
The Video Pipeline: Engineering for Latency
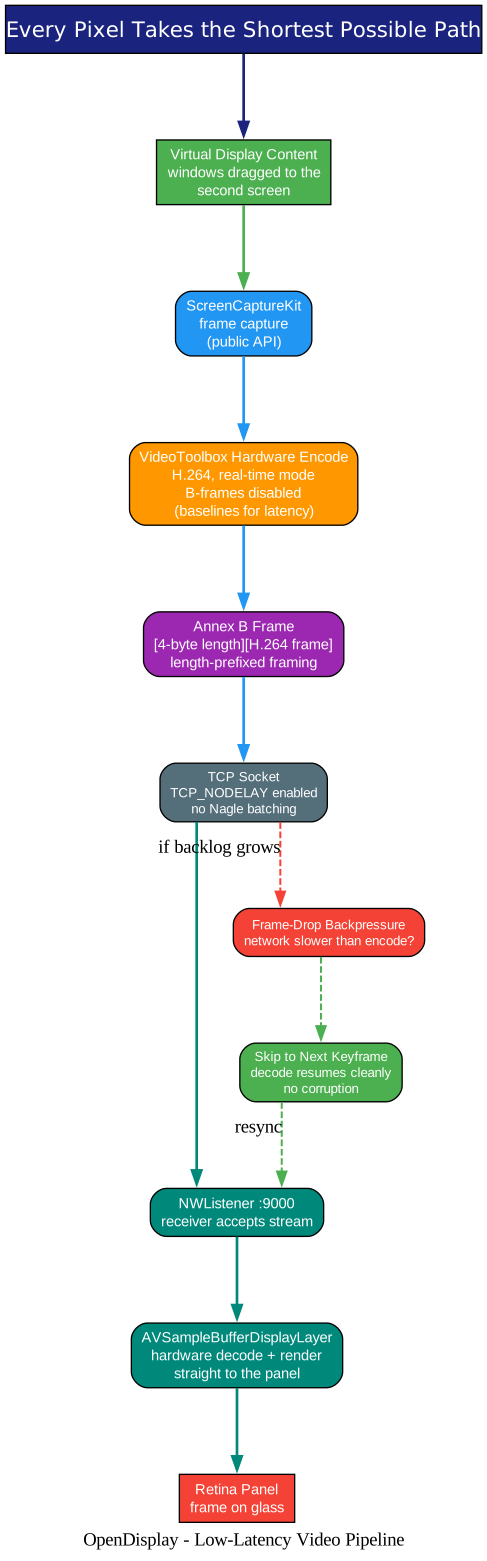
Second-display usability lives and dies on latency. If the cursor on your phone lags your hand by a quarter second, you will rip the window right back to your Mac. OpenDisplay’s entire video pipeline is a series of decisions that each shave milliseconds.
Understanding the Pipeline
Why H.264 and not HEVC or AV1?
The FAQ answers this honestly: hardware H.264 encode and decode are universally fast on every Apple chip, and the latency is excellent. HEVC squeezes better quality per bit but is planned as an option rather than the default, because the first job of a live display stream is to be now, not to be small. This is the same reasoning that keeps live-video production on H.264 years after newer codecs exist.
Real-time mode, no B-frames
VideoToolbox’s real-time mode tells the encoder that a frame arriving now must leave now - it will not buffer to look ahead. Disabling B-frames matters because B-frames encode in reference to future frames, which forces an encoder delay of at least one frame period and a decoder delay on top. A stream with only I- and P-frames can be decoded the instant it arrives. For a display stream, that is worth every bit of extra bitrate.
TCP_NODELAY and length-prefixed framing
The frames travel as length-prefixed chunks - a 4-byte length header followed by one Annex B H.264 frame - over a TCP socket with TCP_NODELAY enabled. That flag turns off Nagle’s algorithm, which would otherwise hold small writes back to coalesce them into bigger packets. On a live stream, held-back bytes are latency. The 4-byte prefix lets the receiver know exactly where each frame ends without scanning the bitstream.
Frame-drop backpressure with keyframe recovery
The dashed loop in the diagram is the robustness story. If the network (or a cheap cable) is slower than the encoder, frames pile up - and a naive receiver would fall seconds behind while trying to render every stale frame. OpenDisplay detects the backlog and drops to the next keyframe instead: an I-frame that needs no history to decode. The stream resyncs cleanly, with no corruption and no accumulated lag. This is the same technique live-streaming infrastructure uses, applied to a cable two devices apart.
One Protocol, Two Transports
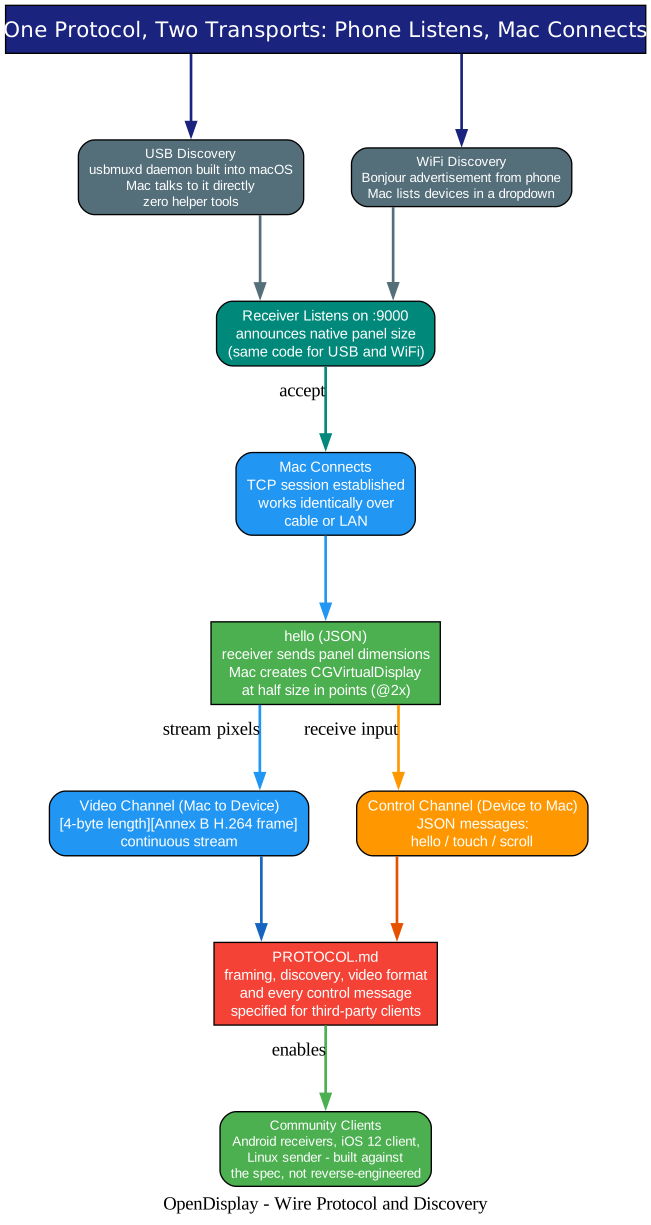
The cleverest design decision in OpenDisplay is barely a paragraph in the README: the phone listens, and the Mac connects.
Understanding the Protocol
That inversion is what lets the exact same code work over both transports. When you plug in a cable, the Mac already knows where the phone is - usbmuxd maintains a socket to every plugged-in iOS device as part of its normal syncing duties. When the phone is on WiFi, its address arrives via Bonjour discovery. Either way, the receiver simply sits listening on port 9000, and the Mac connects.
The handshake
After connecting, the receiver sends a hello JSON message announcing its native panel dimensions. The Mac uses those dimensions to create the CGVirtualDisplay at half the size in points - this is how the @2x HiDPI mapping happens dynamically per device. Plug in an iPhone SE and a 13-inch iPad and each gets a display that matches its own panel exactly.
Two channels, one socket
The video channel flows Mac-to-device as a continuous stream of length-prefixed H.264 frames. The control channel flows device-to-Mac as JSON messages: hello, touch, scroll. One TCP connection, two logical directions, no ceremony.
The protocol is the ecosystem
Everything that crosses the socket - framing, discovery, the video format, every control message - is written down in PROTOCOL.md in the repository. That document matters more than it looks: because the wire protocol is specified, other developers have built clients the project’s author never touches. There is an Android receiver for de-Googled Pixel phones (gprot42/android-opendisplay), a general Android receiver (josepacelli/opendisplay-android), an iOS 12 client that resurrects genuinely ancient iPads (cuongpham1/ipad-iphone-second-monitor-ios12-free), and a Linux sender that drives an iPad from a Wayland desktop (tixwho/opendisplay-linux). A new client can be written against the spec instead of reverse-engineered from Swift sources - the difference between a closed tool and a protocol.
Privacy and Honest Trade-offs
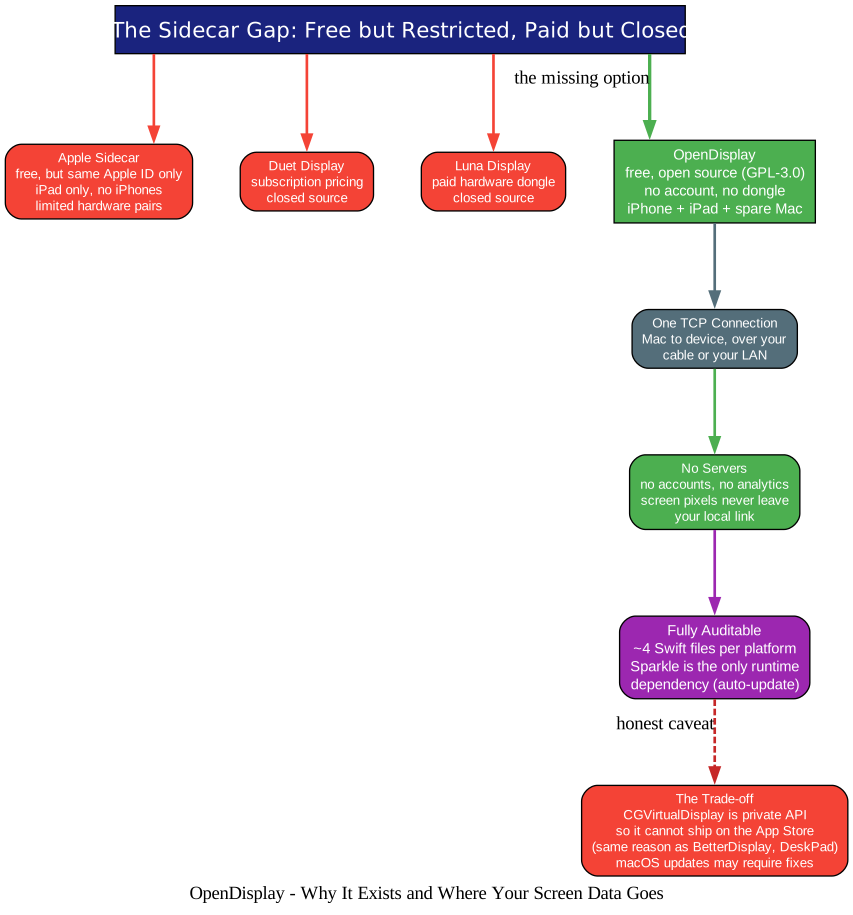
There is a second story in this project that deserves its own diagram: what happens to your screen data, and what the project willingly gives up to stay free and open.
Understanding the Privacy Model
Your pixels never leave the local link. There is exactly one TCP connection, between your Mac and your device, over your cable or your LAN. No servers, no accounts, no analytics. Compare that with the cloud-based screen-sharing tools you have probably accepted permissions from, and the difference is stark. If you want the fine print, the project publishes a privacy page - including the current caveat that WiFi transport is not yet encrypted (issue #16 on the roadmap), so stick to USB if that matters for your use case.
Small enough to audit. The codebase is intentionally about four Swift files per platform, with exactly one runtime dependency - Sparkle, the venerable open-source macOS auto-update framework - for the sender app. That is a codebase a security reviewer can genuinely read in an afternoon, which is the entire promise of open source made real.
The honest caveat. The diagram ends with the trade-off the project does not hide: CGVirtualDisplay is a private API, so a macOS update could break it, and the App Store is off the table. Every virtual-display product lives with this risk; OpenDisplay just states it plainly. The capture and streaming pipeline itself uses only public APIs, so the blast radius of any macOS change is limited to display creation.
How It Compares
| OpenDisplay | Apple Sidecar | Duet Display | Luna Display | |
|---|---|---|---|---|
| Price | Free, open source | Free | Subscription | Paid + dongle |
| iPhone as display | Yes | No (iPad only) | Yes | Yes |
| Different Apple IDs | Yes | No | Yes | Yes |
| Wired USB | Yes | Yes | Yes | No |
| True extension | Yes | Yes | Yes | Yes |
| Touch input | Yes | Yes | Yes | Yes |
| Self-hosted / auditable | Yes | Not really | No | No |
Getting Started
The easy path (5 minutes):
- Download
OpenDisplay.dmgfrom the latest release and drag it to Applications. It is signed with a Developer ID certificate and notarized by Apple, so it opens with a plain double-click on macOS 14+. - Install the iOS app via TestFlight (needs iOS 16+, including the 16.7.x line where Apple left older devices like the iPhone 8 and iPhone X).
- Open the phone app (it listens on port 9000), then plug in a data USB cable - a charge-only cable will not work. USB 2.0 is plenty: the highest-quality preset streams 18 Mb/s against USB 2.0’s 480 Mb/s capacity.
- Grant Screen Recording and Accessibility permissions when macOS asks.
- Drag a window onto your new display. Done.
For WiFi mode instead of the cable: keep both devices on the same network and pick the phone from the Connection menu. Note that both sides need Local Network permission, and macOS and iOS both fail silently without it - the README’s permissions checklist covers the full matrix. Expect the purple screen-recording indicator in your menu bar; that is macOS being honest about any screen capture, and no app should hide it.
Building from source needs Xcode 15+, xcodegen (brew install xcodegen), and any Apple developer account for sideloading:
git clone https://github.com/peetzweg/opendisplay.git
cd opendisplay
echo "DEVELOPMENT_TEAM=YOURTEAMID" > .env
./generate.sh
xcodebuild -project OpenSidecar.xcodeproj -scheme OpenSidecarMac \
  -configuration Debug -derivedDataPath build build
Releases are automated with release-please and Conventional Commits, and the Mac app updates itself through Sparkle’s signed appcast - a tidy little CI setup worth reading on its own if you ship desktop software.
What’s Next
The roadmap tracks the expected misses: encrypted WiFi transport with a pairing code, HEVC encoding for better quality-per-bit, audio forwarding, hardware keyboard passthrough, right-click and multi-touch gestures, and Apple Pencil with pressure and tilt. Multiple simultaneous devices already work - every connected device becomes its own extended display - which turns a desk with an iPad and an old iPhone into a three-screen setup for zero dollars.
Conclusion
OpenDisplay is the kind of project that restores your faith in open source: it fills a gap that three commercial products circle but none close, it is small enough to read completely, it publishes its wire protocol so strangers can join in, and it treats your screen data with the respect of a 1990s dial-up BBS - nothing leaves your machine. If you have ever looked at your iPhone and your cramped laptop screen and sighed at Duet’s subscription page, go grab the DMG. Your second monitor was in your pocket the whole time.
Links:
- Repository: https://github.com/peetzweg/opendisplay
- Website: https://peetzweg.github.io/opendisplay/
- Protocol spec: PROTOCOL.md
- Latest release: https://github.com/peetzweg/opendisplay/releases/latest
Related Posts
- PyShine Screen Recorder: High-Performance Desktop Recording
- OpenScreen: Free Screen Recording Studio
- Vaultwarden: Self-Hosted Bitwarden Password Manager in Rust

Enjoyed this post? Never miss out on future posts by following us


