Learn Nginx in a Single Post: Complete Tutorial From Configuration to Reverse Proxy, TLS, and Production
Nginx is the web server / reverse proxy that runs in front of nearly every production web application — it terminates TLS, load-balances across backend instances, caches responses, compresses output, rate-limits, and serves static files faster than any application server. It handles tens of thousands of concurrent connections with a tiny memory footprint. This single post covers the whole server in five stages, with hand-drawn diagrams and runnable config.
Learning Roadmap
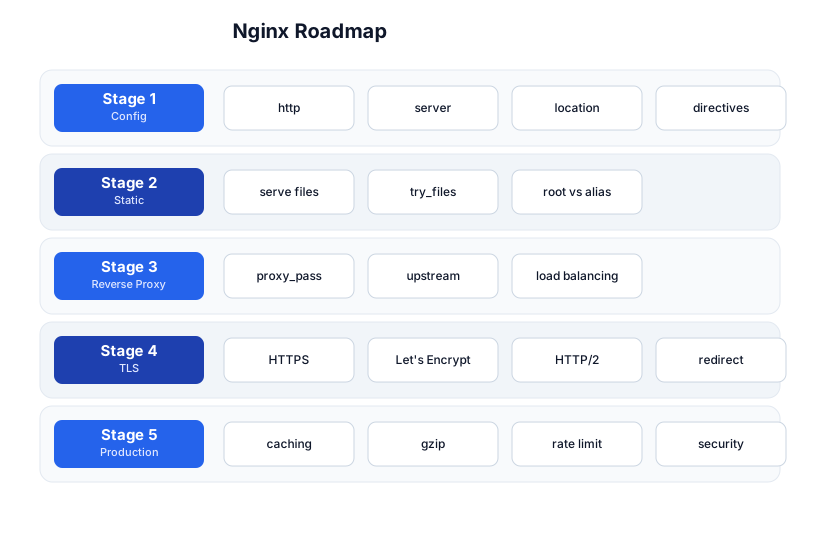
The roadmap moves from the config structure (Stage 1), through static files (Stage 2), the reverse proxy + load balancing (Stage 3), TLS/HTTPS (Stage 4), and the production layer (Stage 5).
Stage 1 — Configuration: Nested Blocks + Directives
The config hierarchy
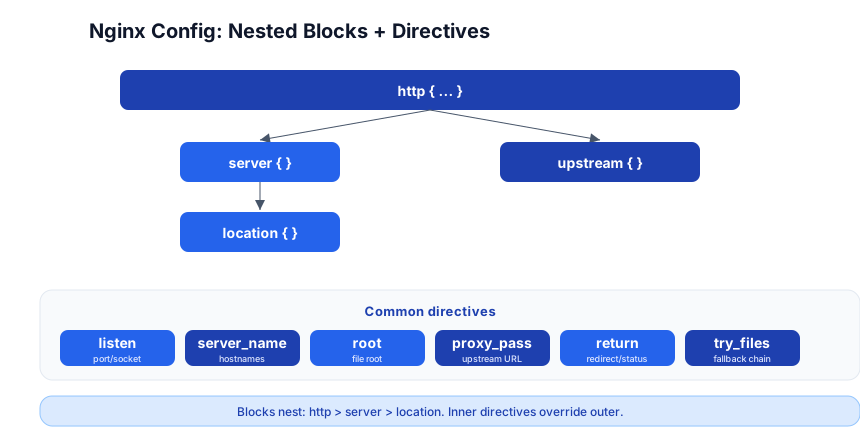
Nginx config is a tree of nested blocks, each with directives (key-value settings). The blocks nest: http → server → location. Inner directives override outer ones.
# /etc/nginx/nginx.conf
events {
    worker_connections 1024;
}

http {
    include       mime.types;
    default_type  application/octet-stream;

    upstream backend {
        server app1:3000;
        server app2:3000;
    }

    server {
        listen 80;
        server_name example.com www.example.com;

        location / {
            root /var/www/site;
            try_files $uri $uri/ /index.html;
        }

        location /api/ {
            proxy_pass http://backend;
        }
    }
}
| Block | Scope |
|---|---|
http {} | global HTTP settings (mime types, gzip, logging) |
server {} | one virtual host (a site); listens on a port + responds to server_name |
location {} | one URL pattern within a server; routes to files or a proxy |
upstream {} | a named pool of backend servers for load balancing |
| Directive | What it does |
|---|---|
listen | port/socket to listen on (listen 80; listen 443 ssl;) |
server_name | hostnames this server block responds to |
root | filesystem root for static files |
proxy_pass | forward requests to an upstream URL |
return | redirect (return 301 https://...) or status code |
try_files | fallback chain (try_files $uri $uri/ =404) |
include | pull in another config file |
Pitfall:
include mime.types;insidehttp {}maps file extensions to Content-Type headers. Without it, CSS/JS/images are served asapplication/octet-stream(downloaded instead of rendered). Always include it.
Stage 2 — Static File Serving
root vs alias
location /static/ {
    root /var/www/site;   # file: /var/www/site/static/style.css
}

location /assets/ {
    alias /var/www/site/assets/;   # file: /var/www/site/assets/style.css (strips /assets/)
}
root appends the full URI to the root path; alias replaces the location prefix with the alias path. root is the common choice (simpler); alias when the filesystem path doesn’t match the URL.
try_files — the fallback chain
location / {
    root /var/www/site;
    try_files $uri $uri/ /index.html;
}
try_files checks each option in order: $uri (the exact file), $uri/ (a directory), then /index.html (a fallback). This is how you serve a SPA (React/Vue/Next.js static export) — any unmatched URL falls back to index.html so the client-side router takes over.
Performance for static files
location ~* \.(js|css|png|jpg|svg|woff2)$ {
    expires 1y;
    add_header Cache-Control "public, immutable";
    access_log off;
}
Set long cache lifetimes on static assets with content-hashed filenames (app.3a9f.js) so new deploys are new URLs — the browser caches aggressively, never needs invalidation.
Stage 3 — Reverse Proxy + Load Balancing
proxy_pass — forward to a backend
upstream backend {
    server app1:3000;
    server app2:3000;
    server app3:3000;
}

server {
    listen 80;
    location / {
        proxy_pass http://backend;
        proxy_set_header Host $host;
        proxy_set_header X-Real-IP $remote_addr;
        proxy_set_header X-Forwarded-For $proxy_add_x_forwarded_for;
        proxy_set_header X-Forwarded-Proto $scheme;
    }
}
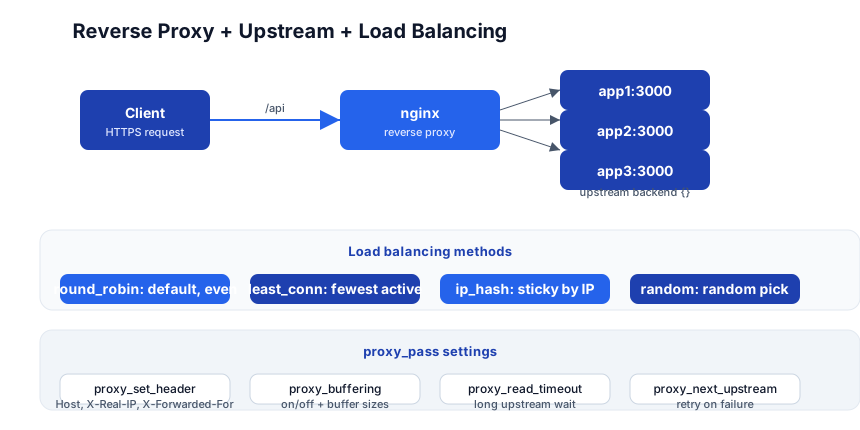
proxy_pass http://backend; forwards the request to the upstream pool. The proxy_set_header directives pass the original client’s IP (not nginx’s IP) so the backend sees who the real client is. Without them, every request looks like it comes from nginx (127.0.0.1 or the docker network).
Load balancing methods
| Method | How | Use |
|---|---|---|
| round_robin (default) | distribute evenly | uniform backends |
| least_conn | fewest active connections | uneven request costs |
| ip_hash | same client → same backend (sticky) | session affinity without cookies |
| random | random pick | simple + low overhead |
upstream backend {
    least_conn;
    server app1:3000 weight=3;   # 3x more traffic
    server app2:3000;
    server app3:3000 backup;       # only if others fail
}
Health checks + failover
upstream backend {
    server app1:3000 max_fails=3 fail_timeout=30s;
    # if app1 fails 3 times in 30s, it's removed from rotation for 30s
}
Nginx (open source) does passive health checks — it removes a backend if it fails (5xx or timeout) max_fails times in fail_timeout seconds. Nginx Plus (paid) adds active health checks.
WebSocket proxying
location /ws {
    proxy_pass http://backend;
    proxy_http_version 1.1;
    proxy_set_header Upgrade $http_upgrade;
    proxy_set_header Connection "upgrade";
}
WebSockets need HTTP/1.1 + Upgrade/Connection headers. Without these, the upgrade handshake fails and the WebSocket connection is refused.
Pitfall: Forgetting
proxy_set_header Host $host;— the backend seesbackend(the upstream name) instead of the real hostname, breaking virtual-host-based routing and CORS. Always passHost,X-Real-IP,X-Forwarded-For,X-Forwarded-Proto.
Stage 4 — TLS: HTTPS, Let’s Encrypt, HTTP/2
Enable HTTPS
server {
    listen 443 ssl;
    server_name example.com;

    ssl_certificate     /etc/letsencrypt/live/example.com/fullchain.pem;
    ssl_certificate_key /etc/letsencrypt/live/example.com/privkey.pem;
    ssl_protocols       TLSv1.2 TLSv1.3;
    ssl_ciphers         HIGH:!aNULL:!MD5;
    ssl_session_cache    shared:SSL:10m;
    ssl_session_tickets off;
}
Redirect HTTP → HTTPS
server {
    listen 80;
    server_name example.com www.example.com;
    return 301 https://$host$request_uri;
}
Let’s Encrypt (certbot)
sudo certbot certonly --webroot -w /var/www/site -d example.com -d www.example.com
# generates certs in /etc/letsencrypt/live/example.com/
# auto-renews (certbot installs a systemd timer)
HTTP/2
listen 443 ssl http2; # one directive, enables multiplexed connections
HTTP/2 multiplexes multiple requests over one TCP connection (faster than HTTP/1.1’s one-request-per-connection). Nginx enables it with one directive.
Security headers
add_header Strict-Transport-Security "max-age=31557600; includeSubDomains" always;
add_header X-Frame-Options "SAMEORIGIN" always;
add_header X-Content-Type-Options "nosniff" always;
add_header Referrer-Policy "strict-origin-when-cross-origin" always;
Strict-Transport-Security (HSTS) tells the browser to always use HTTPS (even if the user types http://). always ensures the header is sent even on error responses.
Pitfall:
add_headerin alocationblock replaces (not extends) headers from theserverblock. If you add a header in alocation, you must re-declare all headers from the server block. Useadd_header ... always;on each.
Stage 5 — Production: Caching, Gzip, Rate Limiting
proxy_cache — cache upstream responses
proxy_cache_path /var/cache/nginx levels=1:2 keys_zone=api_cache:10m max_size=1g inactive=10m;

server {
    location /api/ {
        proxy_pass http://backend;
        proxy_cache api_cache;
        proxy_cache_valid 200 5m;
        proxy_cache_valid 404 1m;
        add_header X-Cache-Status $upstream_cache_status;   # HIT / MISS / BYPASS
    }
}
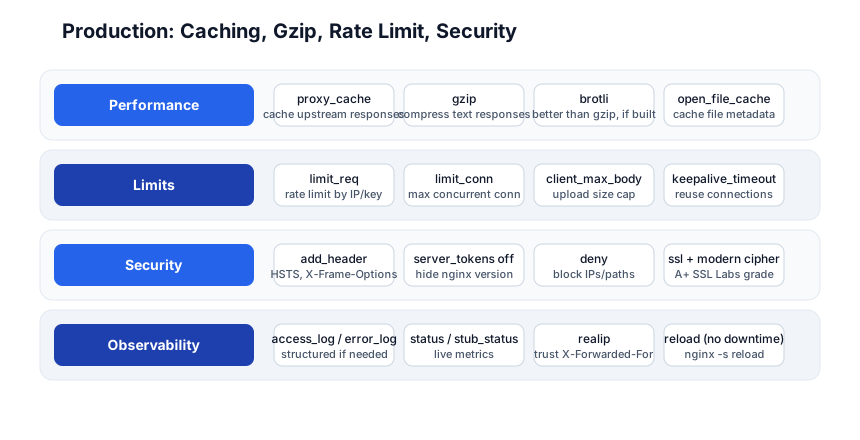
Nginx can cache upstream responses on disk — the second request for the same URL is served from the cache (no backend call). $upstream_cache_status tells you whether the response was a cache hit or miss (useful for debugging).
Gzip compression
gzip on;
gzip_comp_level 5;
gzip_min_length 256;
gzip_types text/plain text/css application/json application/javascript text/xml;
gzip_vary on;
Compresses text responses (HTML, CSS, JS, JSON) — cuts bandwidth by 60-80%. gzip_types controls which Content-Types are compressed (don’t compress images; they’re already compressed).
Rate limiting
limit_req_zone $binary_remote_addr zone=api:10m rate=10r/s;

server {
    location /api/ {
        limit_req zone=api burst=20 nodelay;
        proxy_pass http://backend;
    }
}
limit_req_zone defines a rate limit (10 requests/second per IP); limit_req applies it with a burst capacity of 20 (spike allowed) and nodelay (serve burst immediately, not queued). Excess requests get a 503 Service Unavailable.
Zero-downtime reload
nginx -t          # test config (always do this first)
nginx -s reload   # reload config without dropping connections
nginx -s reload sends a SIGHUP; the master process starts new workers with the new config while old workers finish their active connections and exit. Zero downtime — no dropped requests. Always run nginx -t first to catch syntax errors (a bad config reloaded mid-request can cause a brief 500).
Other production settings
server_tokens off;                          # hide nginx version (security)
client_max_body_size 10m;                    # max upload size
keepalive_timeout 65;                        # reuse connections (perf)
proxy_read_timeout 60s;                       # wait for slow upstream
proxy_next_upstream error timeout http_502;  # retry on failure
Quick-Start Checklist
- Install Nginx —
apt install nginx/brew install nginx/ Dockernginx:alpine. - Edit
nginx.conf— add oneserverblock withlisten 80+ alocation /that serves a static file. nginx -t && nginx -s reload— test + reload (zero downtime).- Add a reverse proxy —
upstream backend { server app:3000; }+proxy_pass http://backend;. - Pass headers —
proxy_set_header Host / X-Real-IP / X-Forwarded-For / X-Forwarded-Proto. - Enable HTTPS —
listen 443 ssl;+ cert paths +return 301 https://...redirect. - Run certbot —
sudo certbot certonly --webroot -w /var/www/site -d your.domain. - Enable HTTP/2 —
listen 443 ssl http2;(one word). - Add gzip + caching + rate limiting — the production directives above.
- Reload, don’t restart —
nginx -s reloadnever drops connections.
Common Pitfalls
- Missing
proxy_set_header Host $host;— backend sees the upstream name, not the real hostname; breaks virtual hosting and CORS. rootvsaliasconfusion —rootappends the URI;aliasreplaces the prefix. Getting them wrong serves the wrong file or 404s.- Forgetting
include mime.types;— CSS/JS served asapplication/octet-stream→ browser downloads them instead of rendering. add_headerinlocationoverrides server — must re-declare all headers; they don’t inherit.- Not running
nginx -tbefore reload — a syntax error in a reload can cause a brief 500 (old workers serve stale config; new workers fail). - Compressing already-compressed files — gzip on images/PDFs wastes CPU; only compress text.
- No WebSocket headers —
Upgrade+Connection: upgraderequired, else WebSocket fails silently. server_tokens on;— leaks your nginx version to attackers (fingerprinting). Turn it off.
Further Reading
- Nginx Docs — the official reference
- Nginx Beginner’s Guide — the official tutorial
- Nginx Config Generator — interactive config builder
- certbot Docs — Let’s Encrypt automation
- Mozilla SSL Config Generator — best-practice TLS config
Related guides
Nginx is the edge layer of the web stack — these PyShine tutorials connect to it:
- Learn Docker in One Post — Nginx runs as a container; Docker Compose puts it in front of your app containers.
- Learn Kubernetes in One Post — Nginx Ingress Controller is the K8s-native reverse proxy.
- Learn REST API in One Post — Nginx proxies and load-balances the APIs this post describes.
- Learn Computer Networking in One Post — TLS, HTTP/2, and the networking concepts Nginx implements.
- Learn Cryptography in One Post — TLS handshakes and certificates are the crypto layer behind
listen 443 ssl.
Nginx is the swiss-army knife of web infrastructure: reverse proxy, load balancer, TLS terminator, cache, compressor, rate limiter, and static file server — all from one config file. The five stages here — config, static files, reverse proxy, TLS, production — cover everything from serving one HTML file to a TLS-terminated, load-balanced, cached, gzip-compressed, rate-limited production edge. The two habits that pay off: always pass Enjoyed this post? Never miss out on future posts by following us Host + X-Forwarded-For (the backend needs to know who the real client is), and always run nginx -t before nginx -s reload (a syntax error should never reach a live reload). Install Nginx, write a 10-line config, proxy to a backend, and curl through it — once you’ve seen the proxy headers arrive at the backend, the model clicks.