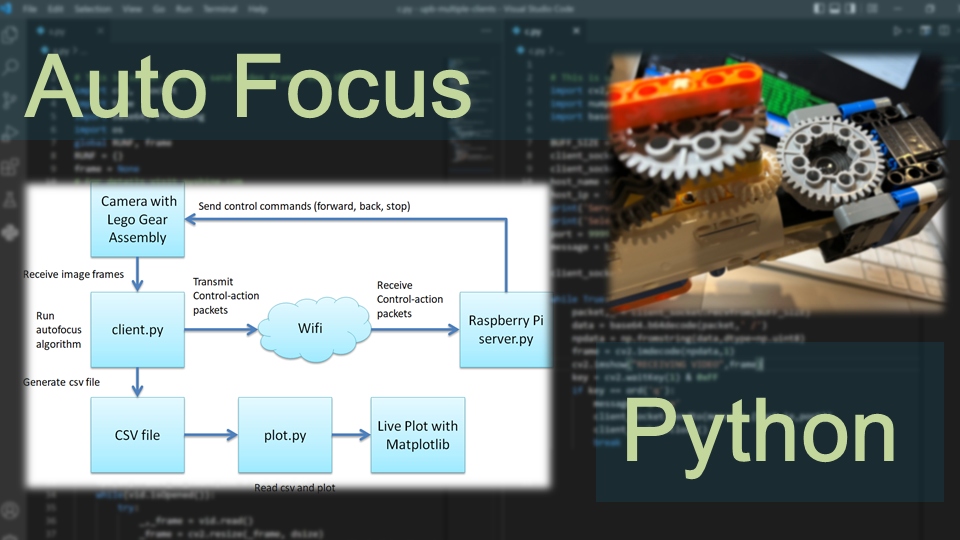
Hi friends! Today’s tutorial is Part 04 of the Raspberry Pi (RPi) learning series. Raspberry Pi zero W has limited resources in terms of compute power as compare to higher versions such as Raspberry Pi 3 and 4. The aim of this tutorial is to do optimized video transfer and client control all inside the tiny little Raspberry Pi zero W (RPi), which weighs only 9 grams. The following code also applies and works well in higher version of Raspberry Pi. The lighter weight of RPi makes it perfect candidate for the control of toy cars or small drones. Please watch the video below to understand the code
Running Video Streamer and Flask App in PC
Project view:
Project_Directory/
├── templates/
│   ├── index.html
└── main.py
Here is the Python code for the Flask application running at local machine and no control pins are activated:
main.py
## Welcome to PyShine, this code is for demonstration on PC
## Client can send control commands to server, and also can view live
## video stream on the same webpage.
## We can easily extend this code for Raspberry Pi Zero W and other versions of Pi
import cv2
import pyshine as ps # pip3 install pyshine==0.0.9
import threading
## import RPi.GPIO as io
from flask import Flask, render_template, request
app = Flask(__name__)
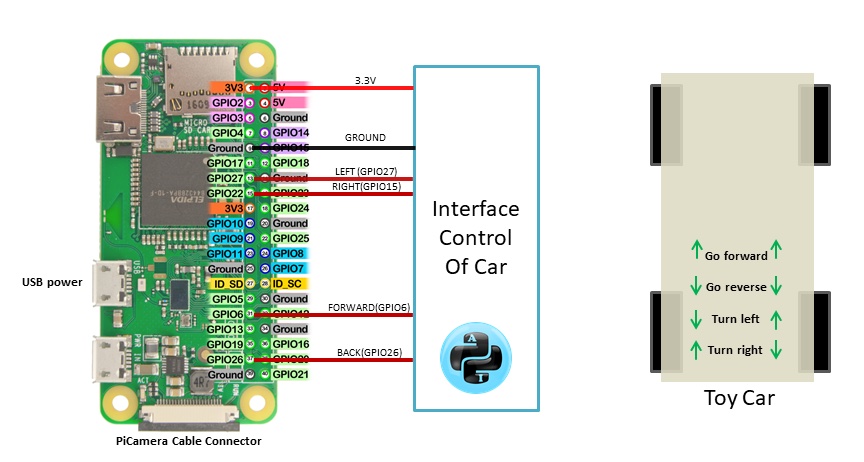
FORWARD = 6
BACK = 26
LEFT = 27
RIGHT = 22
map_motion = {
FORWARD: "FORWARD",
BACK : "BACK",
LEFT : "LEFT",
RIGHT : "RIGHT"}
server_ip = '192.168.10.115'
port = 9000
HTML="""
<html>
<head>
<title>PyShine Live Streaming</title>
</head>
<body>
<center><h1> PyShine Live Streaming using OpenCV </h1></center>
<center><img src="stream.mjpg" width='640' height='480' autoplay playsinline></center>
</body>
</html>
"""
def main():
StreamProps = ps.StreamProps
StreamProps.set_Page(StreamProps,HTML)
address = (server_ip,port) # Enter your IP address
try:
StreamProps.set_Mode(StreamProps,'cv2')
capture = cv2.VideoCapture('test.mp4') # replace 'outside.mp4' with 0 depending on webcam id
capture.set(cv2.CAP_PROP_BUFFERSIZE,4)
capture.set(cv2.CAP_PROP_FRAME_WIDTH,320)
capture.set(cv2.CAP_PROP_FRAME_HEIGHT,240)
capture.set(cv2.CAP_PROP_FPS,30)
StreamProps.set_Capture(StreamProps,capture)
StreamProps.set_Quality(StreamProps,90)
server = ps.Streamer(address,StreamProps)
print('Server started at','http://'+address[0]+':'+str(address[1]))
server.serve_forever()
except KeyboardInterrupt:
capture.release()
server.socket.close()
my_list =[FORWARD,BACK,LEFT,RIGHT]
def run_for (pin):
print(f"action-- {map_motion[pin]}")
def init():
pass
global pin
pin = FORWARD
init()
@app.route("/", methods=['GET', 'POST'])
def index():
global pin
data= 'stop' #default
if request.method == 'POST':
data = request.form.get("data")
if data == 'forward':
pin = FORWARD
run_for (pin)
elif data == 'back':
pin = BACK
run_for (pin)
elif data == 'left':
pin = LEFT
run_for (pin)
elif data == 'right':
pin = RIGHT
run_for (pin)
print('right')
elif data == 'stop':
print('STOP')
else:
return render_template("index.html")
elif request.method == 'GET':
print("NO POST ...")
return render_template("index.html")
if __name__ == '__main__':
t1 = threading.Thread(target=main, args=())
t1.start()
app.run(debug=True, host=server_ip,port=port+1,threaded=True)
Following is the index.html containing javascript
index.html
<html>
<body>
<center><h1>PyShine Live Streaming and Control Car with Sockets</h1></center>
<center><img src="http://192.168.10.115:9000/stream.mjpg" width="640" height="480" autoplay playsinline class="rotateimg0"></center>
<script src="https://code.jquery.com/jquery-3.5.1.js"
integrity="sha256-QWo7LDvxbWT2tbbQ97B53yJnYU3WhH/C8ycbRAkjPDc="
crossorigin="anonymous">
</script>
<script type="text/javascript">
// forward function
function forward_func(element, color,action) {
if(!color) {
color = element.dataset.normalColor;
$.ajax({
type: "POST", url: "/",data:{data:'stop'},
success: function(result) {
console.log('good');
},
error: function(result) {
alert('error');
}
});
} else {
element.dataset.normalColor = element.style.backgroundColor;
$.ajax({type: "POST", url: "/", data:{data:action},
success: function(result) {
console.log('good');
},
error: function(result) {
alert('error');
}
});
}
element.style.backgroundColor = color;
}
</script>
<center>
<button onpointerdown="forward_func(this,'blue','forward')" onpointerup="forward_func(this)" style="height:120px;width:120px">Forward</button>
<button onpointerdown="forward_func(this,'blue','back')" onpointerup="forward_func(this)" style="height:120px;width:120px">Back</button>
<button onpointerdown="forward_func(this,'blue','left')" onpointerup="forward_func(this)" style="height:120px;width:120px">Left</button>
<button onpointerdown="forward_func(this,'blue','right')" onpointerup="forward_func(this)" style="height:120px;width:120px">Right</button>
</center>
</body>
</html>
Running Video Streamer and Flask App in Raspberry Pi Zero W
You can skip the above code and use the following code only for the Raspberry Pi.
!
Project view:
Project_Directory/
├── templates/
│   ├── index.html
├── staic/
│   │   ├── scripts/
│   │   │   ├── jquery-3.5.1.js
└── main.py
main.py
import  pyshine as ps #  pip3 install pyshine==0.0.9
import threading
import RPi.GPIO as io
import picamera
from flask import Flask, render_template, request
app = Flask(__name__)

FORWARD = 6
BACK = 26
LEFT = 27
RIGHT = 22

server_ip = '192.168.10.1'
port = 9000

map_motion =  {FORWARD: "FORWARD",
        BACK : "BACK",
        LEFT : "LEFT",
        RIGHT : "RIGHT"}

HTML="""
<html>
<head>
<title>PyShine Live Streaming</title>
</head>

<body>
<center><h1> PyShine Live Streaming using OpenCV </h1></center>
<center><img src="stream.mjpg" width='640' height='480' autoplay playsinline></center>
</body>
</html>
"""

def main():

    StreamProps = ps.StreamProps
    StreamProps.set_Page(StreamProps,HTML)
    address = (server_ip,port) # Enter your IP address
    StreamProps.set_Mode(StreamProps,'picamera')
    with picamera.PiCamera(resolution='320x240', framerate=30) as camera:
        output = ps.StreamOut()
        StreamProps.set_Output(StreamProps,output)
        camera.rotation = 90
        camera.start_recording(output, format='mjpeg')
        try:
            server = ps.Streamer(address, StreamProps)
            print('Server started at','http://'+address[0]+':'+str(address[1]))
            server.serve_forever()
        finally:
            camera.stop_recording()


my_list =[FORWARD,BACK,LEFT,RIGHT]


def run_for (pin):
    print(f"action-- {map_motion[pin]}")
    io.cleanup()
    io.setmode(io.BCM)
    io.setup(pin, io.OUT)
    io.output(pin, True)
    for x in my_list:
        if x != pin:
            io.output(pin, False)


def init():
    io.setmode(io.BCM)
    io.setup(FORWARD,io.OUT)
    io.setup(BACK,io.OUT)
    io.setup(LEFT,io.OUT)
    io.setup(RIGHT,io.OUT)
    for x in my_list:
        io.output(pin, False)
    io.cleanup()

global pin
pin = FORWARD
init()
@app.route("/", methods=['GET', 'POST'])

def index():

    global pin
    data= 'stop'
    if request.method == 'POST':
        data = request.form.get("data")

        if data == 'forward':
            ## print('forward')
            run_for(FORWARD)
            pin = FORWARD
        elif  data == 'back':
            ## print("back")
            run_for(BACK)
            pin = BACK
        elif data == 'left':
            ## print('left')
            run_for(LEFT)
            pin = LEFT
        elif data == 'right':
            ## print('right')
            run_for(RIGHT)
            pin = RIGHT
        elif data == 'stop':
            ## print('STOP')
            io.setmode(io.BCM)
            io.setup(pin, io.OUT)
            io.output(pin, False)
            io.cleanup()

        else:
            return render_template("index.html")
    elif request.method == 'GET':
        print("NO POST ...")
    return render_template("index.html")


if __name__ == '__main__':

    t1 = threading.Thread(target=main, args=())
    t1.start()
    app.run(debug=True, host=server_ip,port=port+1,threaded=True)
index.html
Please note that, in the following script we are accessing jquery-3.5.1.js from the /static/scripts/ location instead of https://code.jquery.com/jquery-3.5.1.js, because if you want to run in Ad hoc mode, then you would not have the choice to access this js file from the internet. In that case you can download and save it in the /static/scripts/ location
<html>
<body>
<center><h1>PyShine Live Streaming and Control Car with Sockets</h1></center>
<center><img src="http://192.168.10.1:9000/stream.mjpg" width="640" height="480" autoplay playsinline class="rotateimg0"></center>
<script src="/static/scripts/jquery-3.5.1.js"
crossorigin="anonymous">
</script>
<script type="text/javascript">
// forward function
function forward_func(element, color,action) {
if(!color) {
color = element.dataset.normalColor;
$.ajax({
type: "POST", url: "/",data:{data:'stop'},
success: function(result) {
console.log('stop');
},
error: function(result) {
alert('error');
}
});
} else {
element.dataset.normalColor = element.style.backgroundColor;
$.ajax({type: "POST", url: "/", data:{data:action},
success: function(result) {
console.log(action);
},
error: function(result) {
alert('error');
}
});
}
element.style.backgroundColor = color;
}
</script>
<center>
<button onpointerdown="forward_func(this,'blue','forward')" onpointerup="forward_func(this)" style="height:120px;width:120px">Forward</button>
<button onpointerdown="forward_func(this,'blue','back')" onpointerup="forward_func(this)" style="height:120px;width:120px">Back</button>
<button onpointerdown="forward_func(this,'blue','left')" onpointerup="forward_func(this)" style="height:120px;width:120px">Left</button>
<button onpointerdown="forward_func(this,'blue','right')" onpointerup="forward_func(this)" style="height:120px;width:120px">Right</button>
</center>
</body>
</html>
Setting up Raspberry Pi in Ad hoc mode
If you want to run this code at a place with no wifi router, than you can configure RPi in Adhoc mode. However, this is optional. Previously, we have discussed how to configure your RPi device in Ad hoc mode or infrastructure-less mode. Yes, that means without any requirement of a wifi router. That is a significant advantage of Ad hoc mode because it gives us the wifi-router freedom, and a dedicated point-to-point link provides lower latency, which is the best choice for the FPV systems. You can visit https://pyshine.com/How-to-configure-Raspberry-Pi-in-Ad-hoc-wifi-mode/
TIP
We can run any Python code automatically e.g., /home/pi/Documents/main.py by giving the path to profile, once the RPi is booted. Open up profile
sudo nano /etc/profile
Now put the path to /home/pi/Documents/main.py the profile page as the last line with python version.
python3 /home/pi/Documents/main.py &
Save it and reboot, the code main.py will run automatically once booted. Enjoyed this post? Never miss out on future posts by following us